Mesh Filter Bag Part #8200*
*Sold Separately
CLEANING OR CHANGING THE FILTER BAG
When removing the cleaner from the water, make sure that the Power Supply is turned off and that the cleaner's Floating Cable is
unplugged.
l
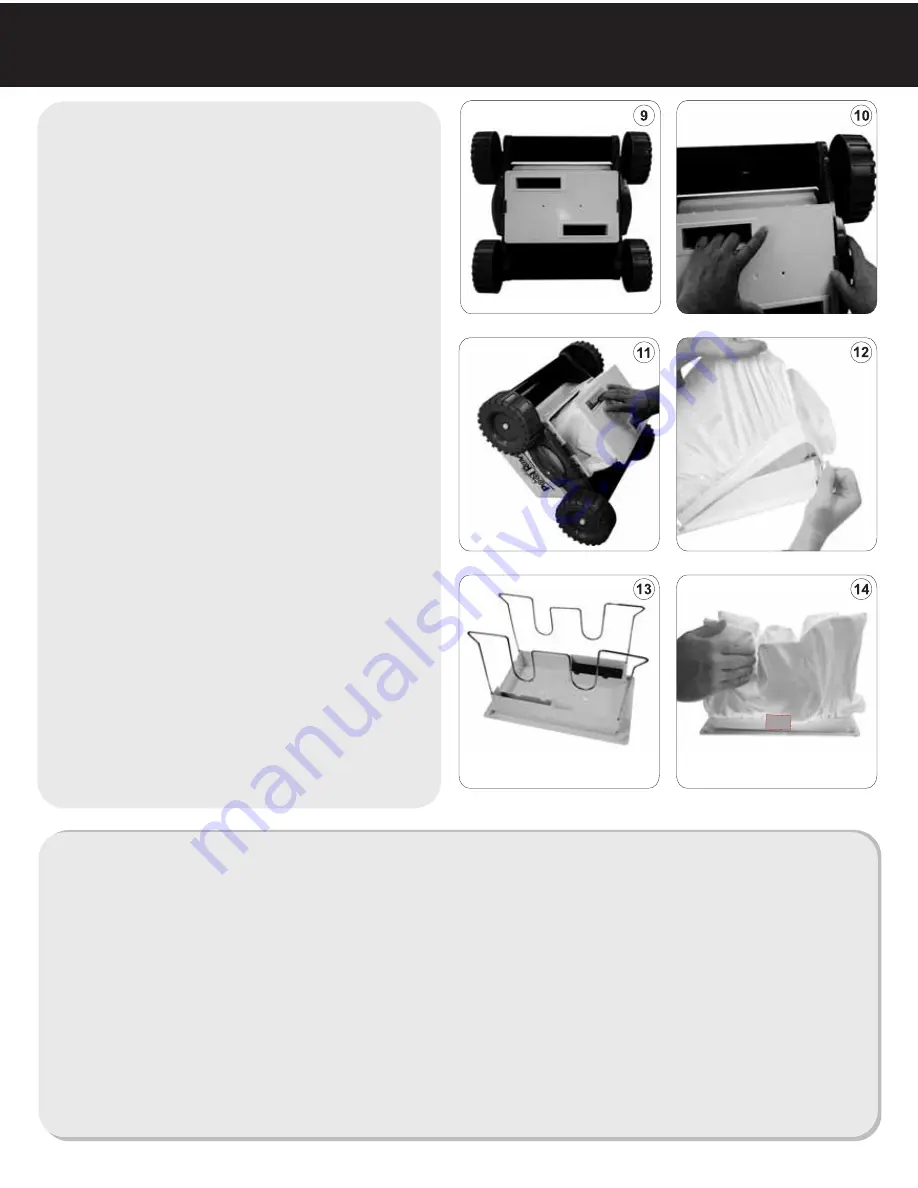
Place the cleaner on its back on a soft non-abrasive surface to protect your cleaner from scratches. Using your thumbs, push the two
Lock Tabs away from the center of the cleaner to unlock the Bottom Lid Assembly (FIG. 10). Remove the Bottom Lid Assembly (FIG. 11)
l
Remove the Filter Bag from the bag support Wire Frames (FIG. 12).
l
Turn the Filter Bag inside out (the Fine Filter Bag has a soft felt surface on the inside) and wash off visible dirt using a garden hose or a
faucet. Gently agitate the bag in your hands to help remove fine particles. Continue cleaning and squeezing the Bag gently until rinse
water is clear. Use of a washing machine (cold water only) is recommended when visible dirt will not rinse off by other methods. DO
NOT USE DETERGENT or BLEACH! DO NOT MACHINE DRY!
l
Turn the Filter Bag “right side out” (felt surface on the inside) remount the Bag on the Wire Frames making sure that the Label on the
Bag is centered on one of the long sides of the Bottom Lid Assembly (FIG. 14). Pull the Bag toward the middle of each Wire Frame so
that the bag corners are snug against the corners of the Wire Frame. Tuck the excess bag into the lower points of the Wire Frames
(FIG. 14).
l
Re-install the Bottom Lid Assembly. Make sure that neither debris nor the Filter Bag itself interferes with complete closure of the Bottom
Lid Assembly.
Fine Filter Bag Part #8100
Filter Bag
Bottom Lid Assembly
Cleaning
The size of your pool, and the amount of debris in it, will
determine the length of time required to clean the pool. The time
may vary from one to two hours.
When your cleaner slows down considerably or constantly
reverses direction before reaching the sides of the pool, it is
sending a signal that it is time to clean the Filter Bag.
Removing Your Cleaner From The Pool
After two hours, the cleaner has completed cleaning the pool
and will automatically turn itself off.
Turn off the Power Supply by pressing the ON/OFF switch to
the OFF position. Unplug the cleaner's Floating Cable from the
Power Supply, and gently pull the cleaner toward you using the
Floating Cable. When the cleaner is within reach, remove it from
the water using the side-plate handle only, never remove or carry
the cleaner by its Cable! Removing the cleaner by its Floating
Cable may cause severe damage to the cable requiring costly
repairs.
Important:
Always reverse the locking pin position to the
alloted hole on the opposing side of the turning wheel axle
after each use to protect the Floating Cable from twisting.
In-Season Storage
Tilt the cleaner on its side to allow water to drain from its
body. Do not leave your cleaner in the pool when not in use.
Doing so, will reduce the life of your Filter Bag and pool cleaner.
After removing your cleaner from the pool you should clean and
re-install the Filter Bag. Then rest the cleaner in a dry, shaded
area along with its Power Supply and correctly coiled Floating
Cable.
Helpful Tip For Preserving Your Cleaner
We suggest that you rinse your cleaner inside and out after
removing it from your pool to remove the chlorine and preserve
its appearance.
Off-Season Storage
When the Pool Season is over you should thoroughly clean the
Filter Bag, make sure that there is no water in the cleaner,
completely untangle, and then properly coil the Floating Cable.
Your cleaner and Power Supply should be stored in a dry,
sheltered area that does not fall below 32° F/ 0° C.
For Technical Support Please Call
1-800-845-4856 Or You Can Visit Us On The Web
At www.AquaProducts.com/Service
OPERATING INSTRUCTIONS
LABEL


