background image

4


US (866) 877-6637 | 


CAN (866) 766-3426 | aquascapeinc.com

Installation

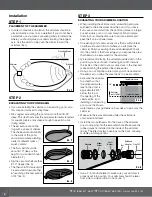
STEP 1

PLACEMENT OF THE SKIMMER

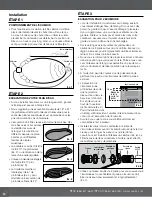
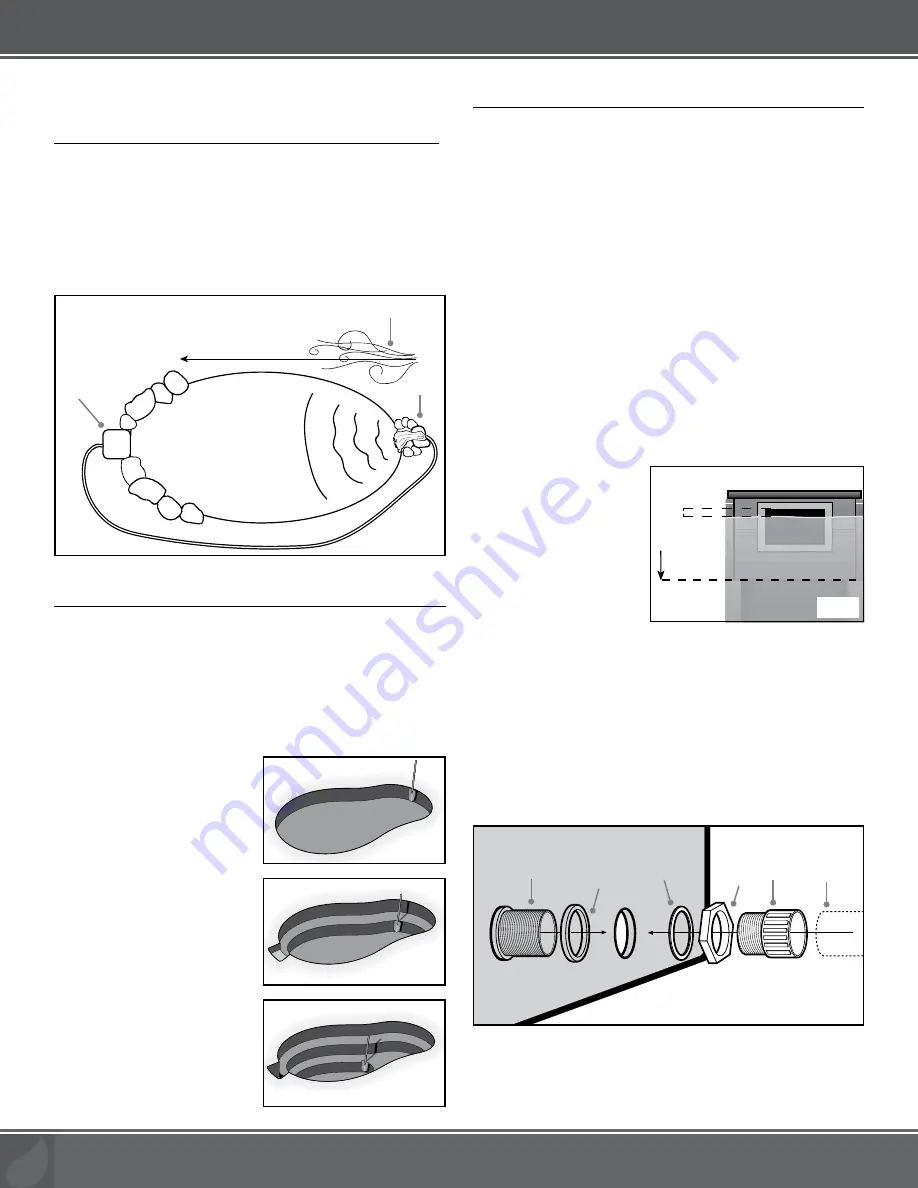
•  In order to maximize circulation, the skimmer should be 

placed directly across from a waterfall. If you do not have 
a waterfall, use your area’s prevailing winds to determine 
where you should place your skimmer along the longest 
axis. Use the wind to help push the debris toward the 
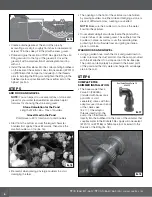
skimmer (Ex.1).

STEP 2

EXCAVATING YOUR POND BASIN

•  If you are installing the skimmer on an existing pond, skip 

this step and proceed to step three.

•  We suggest excavating the pond no more than 18-24" 

deep. This depth provides the proper water levels required 
for aquatic plants and is deep enough to keep fish alive 
during winter.

•  The excavation should be 

dug with a series of shelves.  
The shelves will add stability 
to the walls of the pond  
and will also create planting 
beds for different types of 
aquatic plants.

•  The first shelf should be 

about 8-10" deep or the 
height of a standard shovel 
blade (Ex. 2).

•  Dig the second shelf another 

8-10" deeper (Ex. 3).

•  The third shelf (if desired) will 

be excavated down another 
6

"

 reaching a final excavation 

of 24

"

 (Ex. 4).

Ex. 3

Ex. 4

Ex. 2

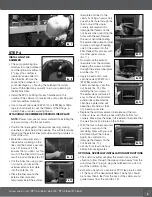
STEP 3

EXCAVATING YOUR SKIMMER LOCATION

•  When installing the skimmer onto an existing pond you 

will need to drain the water from the pond. If you have 
fish, save some water from the pond and place in a large 
bucket, kiddie pool, or cooler. Net your fish and place 
them in your container. Be sure to add an aerator and 
keep the fish in a shaded area.

•  On existing ponds, remove any rock that is within 3 feet 

on either side and in front of where you will place the 
skimmer. Pull your existing liner and underlayment back 
into the pond 3-4 feet from edge so you expose the area 
that needs to be excavated for the skimmer.

•  We recommend placing the skimmer upside-down in the 

position you have chosen. Overhang about 6" towards 
the inside of the pond to allow some slack in the liner and 
make attaching the exterior liner plate easier.

•  Using a can of brightly-colored spray paint, trace around 

the skimmer to outline the area that is to be excavated.

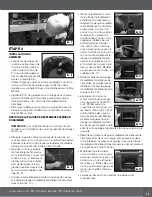
•  Excavate the skimmer 

to a depth so that 
the proposed water 
level in the pond is 
approximately 3/4" 
below the top of 
the opening of the 
skimmer (Ex. 5). If 
installing on an existing 
pond, use the known 
water level as your guideline on how deep to excavate the 
skimmer.

•  Make sure the excavated area under the skimmer is 

compacted and level.

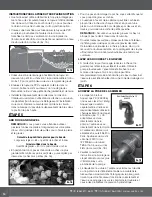
•  Install the two bulkheads into the back of the skimmer 

prior to dropping into the excavated hole. Make sure the 
rubber gasket is installed on the inside of the skimmer 
(Ex. 6). The filter has two openings on the back, allowing 
multiple plumbing options.

•  Use a 2-foot bubble level to make sure your skimmer is 

properly set into position. Your skimmer should be level 

from side to side and front to back (Ex. 7).

Bulkhead

Rubber 

Gasket

Nut

Plastic

Washer

Flex PVC

Bulkhead 

Adapter

Ex. 6

Ex. 1

Prevailing Winds

Waterfall

Skimmer

Ideal Water Level


Front of Skimmer

Soil Level 

on 1st Shelf

3/4"

Ex. 5

Summary of Contents for 43021

Page 1: ...aquascapeinc com SIGNATURE SERIES 400 POND SKIMMER I N S T R U C T I O N S M A I N T E N A N C E P R O F E S S I O N A L G R A D E Signature Series 400 Pond Skimmer Item 43021...

Page 2: ...tion 8 The Aquascape Signature Series 400 Pond Skimmer provides mechanical filtration to your pond Our skimmers were designed to be functional easy to install and maintain They include patented featur...

Page 3: ...Mat Support Rack 5 Skimmer 6 Exterior Face Plate 7 Weir Door 8 13 Brass Screws 9 2 2 Bulkhead Fittings 10 2 Plug 11 2 2 MPT x 2 Slip 12 2 2 MPT x 1 5 Slip Contents 1 2 3 4 5 6 7 9 10 11 12 8 Recommend...

Page 4: ...e them in your container Be sure to add an aerator and keep the fish in a shaded area On existing ponds remove any rock that is within 3 feet on either side and in front of where you will place the sk...

Page 5: ...er in one of the upper corners Be careful not to damage the threads on the nut inserts when punching the holes with the awl Remove the awl or nail while holding the exterior liner plate and liner in p...

Page 6: ...acing any large boulders to avoid damaging the liner Ex 15 Ex 18 Dual Union Check Valve 2 0 48026 Ex 17 Ex 16 The opening on the front of the skimmer can be hidden by placing boulders on either side a...

Page 7: ...bris The debris basket inside the skimmer is the first filter stage of the skimmer The basket will collect leaves twigs seeds and other pond debris It takes approximately two to three minutes every ot...

Page 8: ...ing out of or from the use of the product whether defective or not defective is assumed by Aquascape Inc or its affiliates Aquascape shall not be liable for any incidental consequential or other damag...

Page 9: ...aquascapeinc com SIGNATURE SERIES 400 POND SKIMMER I N S T R U C T I O N S E T E N T R E T I E N C L A S S E P R O F E S S I O N N E L L E Signature Series 400 Pond Skimmer R f rence 43021...

Page 10: ...scape Signature Series 400 fournit une filtration m canique votre bassin Nos skimmers ont t con us pour tre fonctionnels faciles installer et entretenir Ils incluent des caract ristiques brevet es qui...

Page 11: ...oire 6 Plaque frontale ext rieure 7 Trappe du d versoir 8 13 Vis en laiton 9 2 Raccord de travers e de cloison 2 po 10 Bouchon de 2 po 11 2 2 po MPT x 2 po Slip 12 2 2 po MPT x 1 5 po Slip Contenu 1 2...

Page 12: ...sons et placez les dans votre contenant Assurez vous d ajouter un a rateur et de garder le poisson dans une zone ombrag e Sur les tangs existants retirez les pierres dans un p rim tre de 3 pieds autou...

Page 13: ...e trou Ex 10 Placez le rev tement autour de la plaque de rev tement ext rieur et installez tempo rairement la plaque de rev te ment ext rieur et la doublure au cumoire l aide d un poin on ou d un clou...

Page 14: ...pour cr er une sorte de petite caverne REMARQUE Assurez vous que les grosses roches ne bloquent pas le d bit d eau dans l cumoire Couvrez toutes les surfaces planes restantes l int rieur de l tang av...

Page 15: ...ersoir d s que l entretien est termin pour viter de faire fonctionner la pompe dans des conditions de faible niveau d eau pendant p riodes prolong es Panier d bris L cumeur de la s rie Signature est c...

Page 16: ...de dommage de quelque nature ou nature que ce soit r sultant de ou de l utilisation du produit d fectueux ou non n est assum e par Aquascape Inc ou ses filiales Aquascape ne sera pas responsable des...

Reviews: