background image

3


INSTALLATION INSTRUCTIONS 

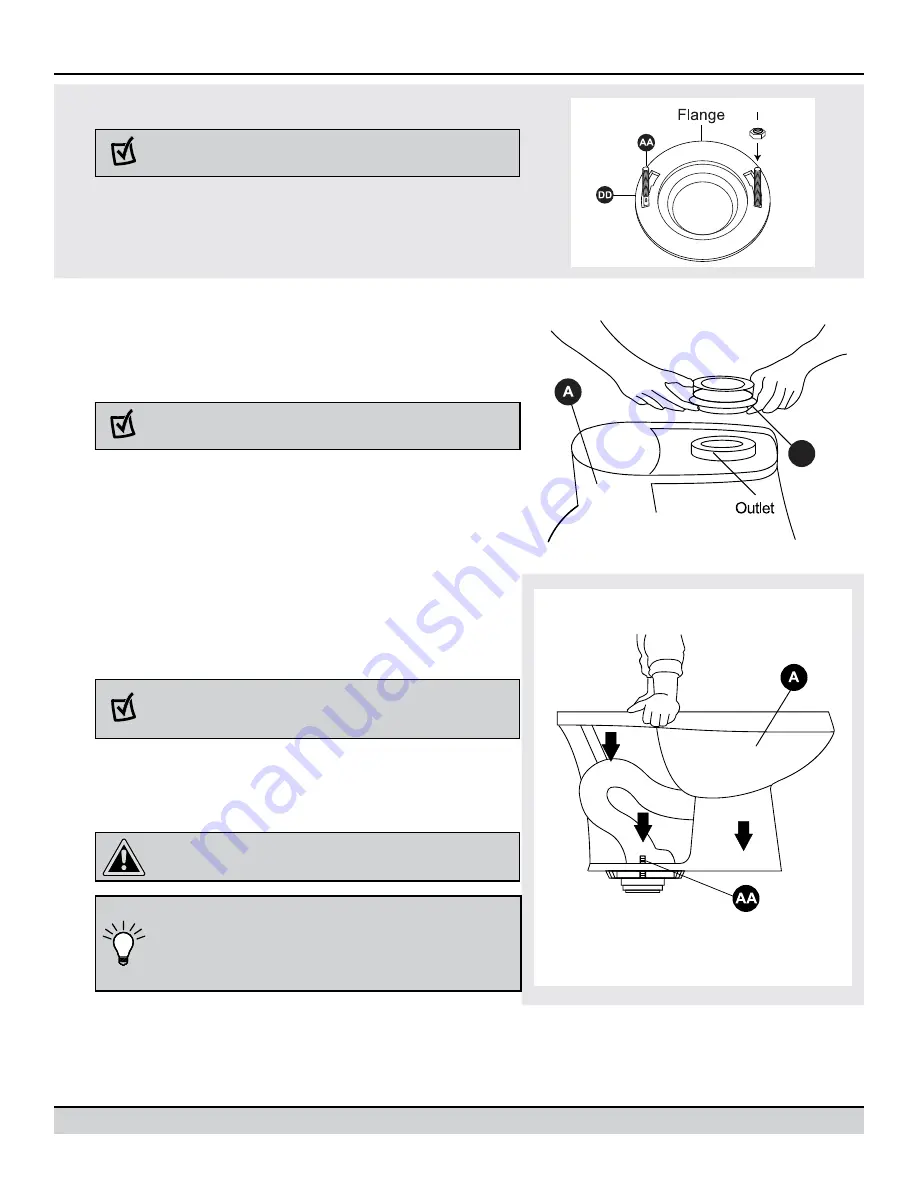
1.  Install Floor Bolts

NOTE:

 Inspect existing floor flange for damage. If it 

is damaged, replace the flange before proceeding.

Replace old T-bolts with new T-bolts (AA), then hand-tighten the 

bowl nuts (DD) onto the T-bolts. 

2.  Install Wax Ring

Turn the bowl (A) upside down and rest it gently on the floor 

on something soft (i.e. a towel or piece of cardboard) to avoid 

scratching the finish. From the bottom of the bowl (A), firmly 

press the wax ring (BB) onto the outlet.

NOTE:

 If wax ring has an integral plastic flange, be 

sure flange taper points away from the toilet.

BB

3.  Position Bowl on Floor Flange

Lower the bowl (A) onto the T-bolts (AA), making sure the 

T-bolts (AA) protrude through the mounting holes in base of the 

bowl (A).

NOTE:

 Keep the bowl level as it is lowered onto the 

floor flange. You may need a second person to help 

lift the bowl.

Once the bowl is in position, press down with a slight twisting 

motion on the top center of the bowl, eventually applying 

full body weight to evenly compress the wax ring to create a 

watertight seal. Make sure the bowl is as level as possible.

CAUTION:

 Do not rock the bowl back and forth as 

this may break the seal. 

TIP:

 It may be necessary to use small wedges 

(shims) under the edge of the bowl due to slight 

variations in vitreous chinaware or uneven floors.  

The bowl should be firmly seated on the floor so it 

does not wobble or rock.

BB

Summary of Contents for T801 0274044

Page 1: ...urn off water supply and flush tank completely Use a towel to dry remaining water from tank and bowl 2 Disconnect and remove old water supply line 3 Remove tank from bowl by removing old tank to bowl hardware 4 Remove bowl from floor by removing bolt caps and floor bolt nuts 5 Remove floor bolts from toilet flange and clean old wax putty and sealant from base area Temporarily plug floor flange wit...

Page 2: ...Nut 2 MM Wing Nut 2 EE Bowl Wing Nut 2 NN Lock Nut not to scale 1 FF Nylon Screw 2 OO Adjustable Washer 2 GG Bolt Cap 2 PP White Plastic Washer 2 HH II Bevel Disc Tank to Bowl Seal not to scale 2 1 QQ RR Nylon Wing Nut Decorative Cover 2 2 Part Description Quantity A Bowl 1 B Tank 1 C Toilet Seat 1 D Tank Lid 1 E Flush Button 1 NOTE Before beginning make sure all parts are present Compare parts wi...

Page 3: ...n Bowl on Floor Flange Lower the bowl A onto the T bolts AA making sure the T bolts AA protrude through the mounting holes in base of the bowl A NOTE Keep the bowl level as it is lowered onto the floor flange You may need a second person to help lift the bowl Once the bowl is in position press down with a slight twisting motion on the top center of the bowl eventually applying full body weight to ...

Page 4: ...nscrew the metal flat washers JJ and wing nuts MM from the tank screws CC Lower the tank B onto the bowl A and let the tank screws CC protrude through the mounting holes on bowl A From the underside of bowl A thread metal flat washers JJ and wing nuts MM onto the protruding tank screws CC Tighten the wing nuts MM alternatively until the tank B is evenly seated on the bowl A 7 Attach Water Supply L...

Page 5: ... area first Always use soft cloths or sponges to clean the surface Using abrasive materials may damage the surface of the toilet Flush valves are set at the factory and should not need adjustment Always rinse cleaning solutions from the surface immediately after cleaning Do not let chemicals remain on the toilet surface for extended periods of time NOTE Make sure the tip on the bottom of the push ...

Page 6: ...na 6 Floor hardware 801 6 7 Tank assembly hardware 801 7 8 Bevel disc bowl bolt caps 801 8 9 Toilet seat assembly set 801 9 1 Flush valve 801 1 2 Fill valve 801 2 3 Flush button 801 3 4 Wax ring 801 4 5 Tank to bowl seal 801 5 TROUBLESHOOTING Part Description Part Problem Possible Cause Corrective Action Poor flush 1 Shut off valve is not fully open 1 Open the valve 2 Water pressure is low 2 Incre...

Page 7: ...façon à vider complètement le réservoir Asséchez le réservoir et la cuvette à l aide d une serviette 2 Débranchez et retirez la vieille conduite d alimentation en eau 3 Retirez le réservoir de la cuvette en enlevant les fixations qui le maintiennent 4 Retirez la cuvette en enlevant les cache boulons et les boulons d ancrage au sol 5 Retirez les boulons d ancrage au sol et nettoyez les résidus de c...

Page 8: ...autée Joint d étanchéité pas à l échelle 2 1 QQ RR Écrou à oreilles en nylon Capuchon décoratif 2 2 Pièce Description Quantité A Cuvette 1 B Réservoir 1 C Siège 1 D Couvercle de réservoir 1 E Bouton de chasse d eau 1 REMARQUE Avant de commencer l assemblage de l article assurez vous d avoir toutes les pièces Comparez les pièces dans l emballage avec l illustration ci contre S il y a des pièces man...

Page 9: ... A sur les boulons en T AA de façon à ce que ces derniers ressortent des trous de fixation de la base de la cuvette A REMARQUE Maintenez la cuvette de niveau lorsque vous l abaissez sur la bride de sol Il se peut que vous ayez besoin de l aide d une autre personne pour soulever la cuvette Une fois la cuvette en place appuyez sur le centre en haut en appliquant un léger mouvement de rotation et aug...

Page 10: ...s plates métalliques JJ et les écrous à oreilles MM des vis du réservoir CC Placez le réservoir B sur la cuvette A en laissant les vis du réservoir CC dépasser à travers les trous de fixation de la cuvette A Sous la cuvette A vissez les rondelles plates métalliques JJ et les écrous à oreilles MM sur chaque vis CC dépassant du réservoir Serrez les écrous à oreilles MM en alternance jusqu à ce que l...

Page 11: ...onne la chasse d eau à débit intégral qui évacue les solides et les liquides Il s agit d une chasse d eau standard qui utilise 6 05 L et qui en plus d évacuer les déchets nettoie la cuvette Commencez toujours par tester les nettoyants sur une petite surface non apparente 8 KK LL 9 Installation du bouton de chasse d eau Placez le bouton de chasse d eau E sur le couvercle du réservoir D de sorte que...

Page 12: ... joint d étanchéité 1 Réglez la longueur des tiges 2 Remplacez le joint de caoutchouc 3 Remplacez ou réglez le raccord d entrée 4 Remplacez le joint de caoutchouc 5 Réglez le niveau de l eau pour qu il atteigne la ligne 6 Vérifiez le raccord enfoncé 1 Retirez ce qui bloque la soupape Actionnez la chasse d eau 1 La vanne d arrêt n est pas complètement ouverte 2 La pression de l eau est faible 3 La ...

Page 13: ...restante del tanque y la taza 2 Desconecte y retire la antigua tubería de suministro de agua 3 Retire el tanque de la taza retirando el aditamento antiguo que une el tanque con la taza 4 Retire la taza del piso retirando las tapas para pernos y las tuercas de los pernos para montaje en el piso 5 Retire del piso los pernos para montaje de la brida del inodoro y limpie los restos de cera masilla y s...

Page 14: ...a mariposa 2 EE Tuerca mariposa de la taza 2 NN Contratuerca no está a escala 1 FF Tornillo de nailon 2 OO Arandela ajustable 2 GG Tapa para perno 2 PP Arandela de plástico blanca 2 HH II Disco biselado Sello del tanque a la taza noestáaescala 2 1 QQ RR Tuerca mariposa de nailon Cubierta decorativa 2 2 Pieza Descripción Cantidad A Taza 1 B Tanque 1 C Asiento para inodoro 1 D Tapa del tanque 1 E Bo...

Page 15: ... taza sobre la brida del piso Baje la taza A hacia los pernos en T AA asegurándose de que estos sobresalgan a través de los orificios de montaje en la base de la taza A NOTA mantenga la taza nivelada a medida que la baja hasta la brida del piso Es posible que necesite ayuda para levantar la taza Una vez que la taza esté en su lugar presiónela hacia abajo girándola un poco desde el centro de la par...

Page 16: ...en su lugar sobre la apertura inferior del tanque Desenrosque las arandelas planas de metal JJ y las tuercas de mariposa MM de los tornillos del tanque CC Baje el tanque B a la taza A y deje que los tornillos del tanque CC sobresalgan por los orificios de montaje en la taza A Desde la parte inferior de la taza A enrosque las arandelas planas de metal JJ y las tuercas de mariposa MM en los tornillo...

Page 17: ...para una descarga de acción completa que elimina sólidos y líquidos Esta descarga utiliza 6 06 litros de agua y es una acción de descarga estándar que elimina los desechos y limpia la taza 8 9 Instale el botón de descarga Coloque el botón de descarga E en la parte superior de la tapa del tanque D para que el botón pequeño con la varilla azul media descarga se alinee con el botón verde en la parte ...

Page 18: ...ría 5 Limpie el filtro 6 Drague el orificio del sello a prueba de agua 1 Ajuste el largo de las varillas de los botones 2 Cambie el sello de goma 3 Cambie o regule el conector de entrada 4 Cambie el sello de goma 5 Ajuste el nivel de agua hasta la posición de la marca 6 Revise el conector acuñado 1 Elimine la suciedad u obstrucción del cabezal de la válvula Descargue la tubería Hay poca descarga F...

Reviews: