7
AQUASURE
PREMIER SERIES
3.
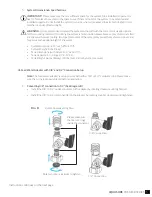
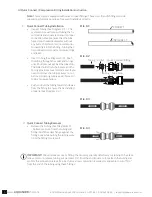
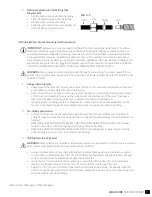
Optional Compression Nut Fitting (See
Diagram B-5)
•
Slip the compression nut onto the tubing.
•
Slide the plastic sleeve onto the tubing
•
Place the insert inside the tubing
•
Slide the compression nut up and tighten it
onto the flange using a wrench.
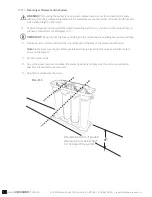
Nut
Sleeve
Tube
Insert
Dia. C-5
V. Drinking Water Faucet Mounting Hole Preparation
IMPORTANT!
Extreme care must be taken in drilling the hole for the dispensing faucet. The surface
material of most sinks is extremely hard and brittle and can be easily chipped or cracked. If you are
uncomfortable performing the following procedure it is recommended that an experienced plumber
is consulted for techniques, installation or other assistance. The system’s manufacturer accepts no
responsibility for sink top damage resulting from system installation. Before grinding or drilling put on
appropriate eye protection (i.e. goggles) to protect yourself from porcelain or metal chips. EXTREME
CAUTION SHOULD BE TAKEN WITH GRANITE, MARBLE AND LIKE MATERIAL.
WARNING:
Many homes are electrically grounded through the plumbing. To protect yourself from
serious injury or fatal shock, use a battery-powered hand drill only to make the hole. DO NOT USE AN
ELECTRIC DRILL.
1.
Using an Existing Hole
•
Spare Hole: If there is a spare hole covered by a rubber or chrome cover, simply remove the cover
and install the drinking water faucet at the location.
•
Spray Hose: If the spray hose is not in use, remove the hose and mount the drinking water faucet
at the location. Remember to plug up the outlet under the main faucet. If the spray hose uses a
diverter at the base of the spout, be sure to remove it to avoid trouble later on.
•
Hanging faucet: If drilling a hole is not feasible (i.e. rental home, drill tool not available etc.), the
faucet can be placed inside the sink cabinet or wherever convenient without mounting.
2.
Pre-drilling preparation
•
Check under the sink in the area that you plan to install the faucet and make sure that there is
ample of room to secure the mounting hardware. A space of approximately 2 inches in diameter is
needed.
•
REMOVE EVERYTHING FROM INSIDE THE SINK AND SURROUNDING AREA. Place paper
towels in the sink to catch the shavings from the grinding and drilling.
•
REMOVE EVERYTHING FROM UNDER THE SINK. Place newspaper or paper towels directly
under drilling location in order to catch the drill shavings.
3.
Drilling Porcelain or Enamel
WARNING:
Metal shavings can oxidize and discolor porcelain. Be extrememly careful to cover porcelain
sinks. Always wear gloves and protective eyewear when drilling.
•
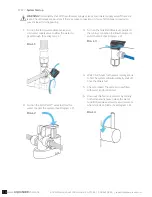
Using a cordless drill with a carbide grinding burr, gently grind away enough porcelain or enamel
to more than accommodate the 7/16” (11 mm) drill bit. Approximately the size of a dime. Enough
surface material must be removed to expose the base metal.
•
Using the 1/4” (6 mm) drill bit, drill a centering or pilot hole in the center of the desired faucet
location. It will make it easier for the 7/16” (11 mm) drill bit to cut through the sink
•
Switch to 7/16” (11 mm) drill bit and operate the drill slowly and carefully— Especially when the
drill bit is about to penetrate the metal. Otherwise, damage to sink may occur. Use lubricating oil to
keep the drill bit cool while drilling.
Instruction continues on the next page
Summary of Contents for AS-PR100E
Page 1: ...PREMIER SERIES DRINKING WATER SYSTEM OWNER S MANUAL FOR MODEL NO AS PR50S AS PR75A AS PR100P ...
Page 2: ......
Page 11: ...9 AQUASURE PREMIER SERIES ...
Page 23: ...21 AQUASURE PREMIER SERIES ...
Page 30: ......
Page 31: ......


