background image

— 4 —

Aquatic Bath • 8101 E. Kaiser Blvd., Anaheim, CA • (800) 945-2726 • www.aquaticbath.com

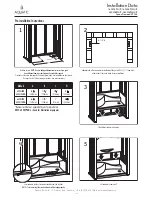
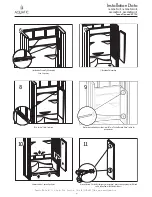
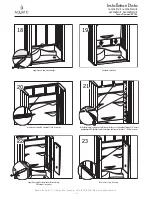
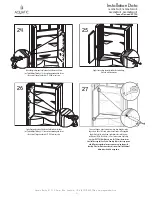
Level back wall vertically & horizontally. 

Shim if necessary.

66

Check for level. Shim if necessary.

88

Remove back wall, side wall, and base.

10

10

Slide side wall into position.

77

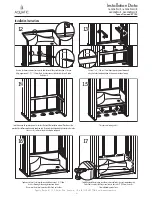
Mark location of plumbing on shower wall. Refer to “Shower Mounted Fitting” section for 

measurements. 

99

Using a hole saw (fine tooth or abrasive grit cutting edge), make necessary openings for filler and 

valves, drilling from inside (smooth side) out.

11

11

Installation Data

160304PSL/R, 160304PSML/R,  

260304PSL/R, 260304PSML/R

Fax on Demand # 9034

Summary of Contents for 160304PSL/R

Page 1: ...l instructions prior to installing your Aquatic Bath fixture Save these instructions for future reference Failure to comply with these instructions may invalidate your warranty For questions concerning installation and maintenance of your Aquatic Bath shower or tub shower contact Technical Services at 800 945 2186 Installation Data 160304PSL R 160304PSML R 260304PSL R 260304PSML R Fax on Demand 90...

Page 2: ...r foundation material may be required for additional support if subfloor is uneven 7 Provide 6 150mm diameter floor opening for 2 50mm IPS and drain connection for shower or a 6 x 12 floor opening for tub 8 Make sure all plumbing is complete and to code 9 To avoid obstruction make sure that supply lines and valve plumbing do not project into framing pocket during the installation process 10 On ins...

Page 3: ...es Stud can be turned for easier installation 6 x12 A A A A C C D D B B 1 1 6 1 2 C L 2 2 Level and mark all sides Front apron should be firmly on the floor NOTE If unit is not level the joints and seams will not align properly 4 4 Lift and place the back wall 5 5 Lift and place the base into framing 3 3 Models A B C D 6030SPAN 6030SPANM 60 1 8 1527mm 31 1 4 794mm 8 1 2 216mm 14 1 4 362mm 6030STUB...

Page 4: ...l side wall and base 10 10 Slide side wall into position 7 7 Mark location of plumbing on shower wall Refer to Shower Mounted Fitting section for measurements 9 9 Using a hole saw fine tooth or abrasive grit cutting edge make necessary openings for filler and valves drilling from inside smooth side out 11 11 Installation Data 160304PSL R 160304PSML R 260304PSL R 260304PSML R Fax on Demand 9034 ...

Page 5: ...laster to displace and spread 14 14 Tap down until level Level lengthwise and widthwise using 3 ft 915mm level by shimming or depressing foundation materials The unit must be set level Apron should be firmly on the floor 16 16 Fasten a 1 x 3 25mm x 75mm ledger strip along rear of alcove and along both sides immidiately below the lower marks made on framing 13 13 Place base into framing pocket 15 1...

Page 6: ... each corresponding stud Pre drill both vertical side flanges and fasten to side studs 8 200mm on center 21 21 Check for level Shim if necessary 23 23 Level back wall vertically horizontally Shim if necessary 20 20 Apply silicone along horizontal and inside vertical edge Slide side wall into position 22 22 Lift and place back wall 19 19 Installation Data 160304PSL R 160304PSML R 260304PSL R 260304...

Page 7: ...as experience varying degrees of humidity Refer to silicone manufacturer s instructions for additional information related to curing times 27 27 Apply silicone along horizontal and inside vertical edge Slide side wall into position 25 25 Fasten flanges along top of left side wall with fasteners of choice see Pre Installation Planning 12 into each corresponding stud Fasten side vertical flanges to ...

Page 8: ...ng else that could scratch or dull the surface of your Aquatic unit Instead use warm water and liquid detergents or non abrasive cleansers especially those bathroom cleansers recommended for fiberglass 2 To keep your Aquatic bath fixture sparkling clean apply a coat of good quality automotive paste wax or polish and buff to a high shine with a soft cloth or towel Repeat every six months for easier...

Reviews: