These instructions are intended to provide the
user of the old Kiev-60 TTL with basic
operating instructions.
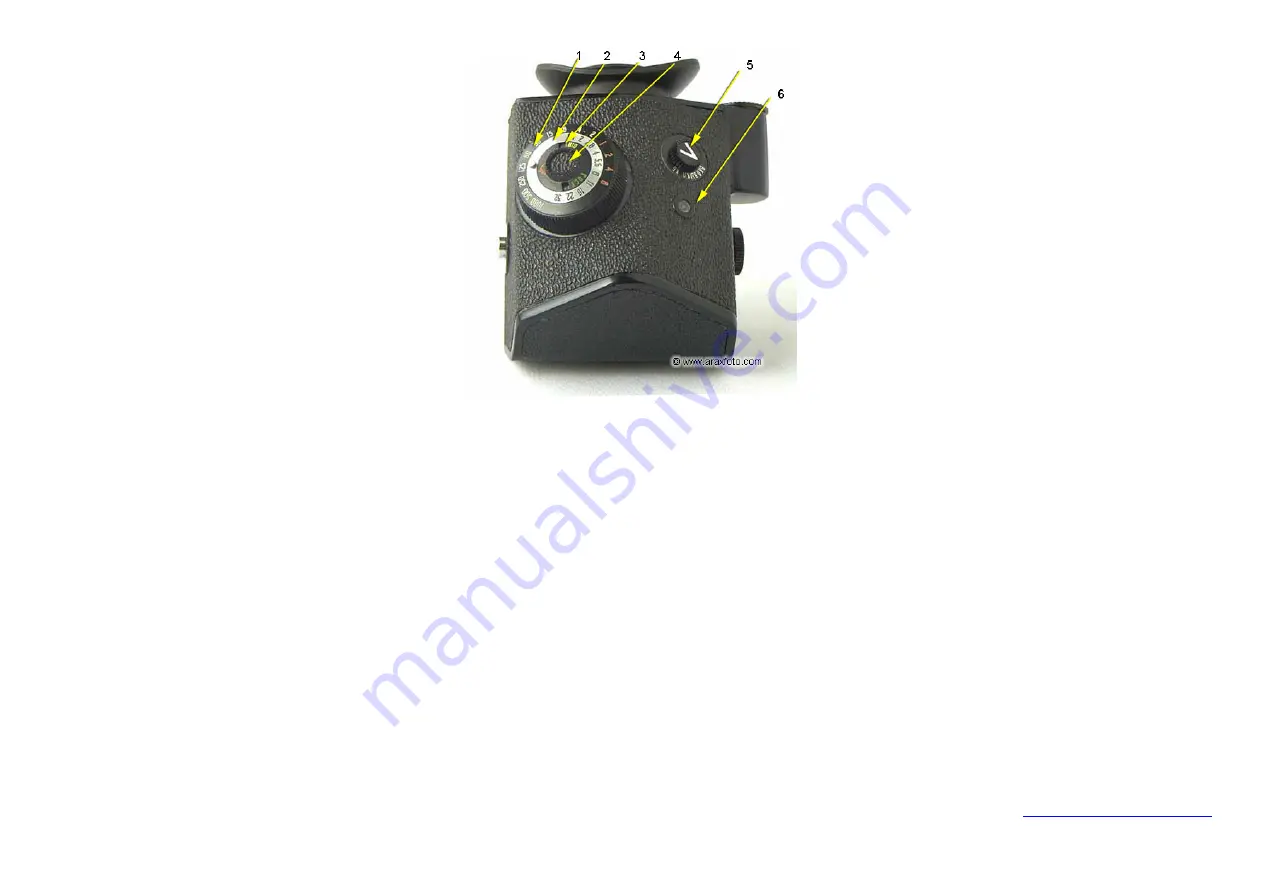
Old Soviet made prisms had two windows
(see pos. 3 on picture) for the film speed,
allowing the speed to be set in old GOST or
European DIN units.
The metered prism is in no way automatic, or
coupled to the camera, so all settings must be
set into the camera manually and separately.
To control the battery, turn the switch 5 to
right position
КБ
(battery control). You
should see the light on indicator 6.
If you not see – change the battery or clear
the contacts on the battery capsule.
To turn OFF – in middle position
ВЫКЛ
.
1.
Batteries. The TTL prisms currently make
use 3 pieces 1.5-volt button cells with plastic
adapter. The choices are. the S-76 silver
oxide cell and the LR-44 Alkaline cells. The
silver oxide cells are preferable due to their
superior power curve, resulting in a longer
accurate life.
The batteries must be installed into the cavity
with the +, or positive side facing towards the
cover.
2.
Using the small knob 4 in the center of the
calculator dial, set in the film speed in soviet
ГОСТ
system, i.e. 130.
3.
Without disturbing the film speed setting,
rotate the thin silver ring 2 with the f stop
sequence on it until the maximum aperture of
the lens you will be using is aligned with the
red arrow on the film speed portion of the
dial. This is necessary to get correct exposure
results.
For example. if you are using the 80mm f 2.8
lens, the 2.8 marking must be aligned with
the red arrow. If you are going to switch to a
lens with a larger or smaller maximum
aperture, the appropriate maximum aperture
must be set to the red arrow to obtain the
correct exposure results.
Having accomplished this, the TTL prism is
set up for use with the film and lens you will
be using.
4.
The metering area is a 30mm high by
50mm wide oval in the center of the focusing
screen, so it is center weighted. Should you
be shooting the Kiev-60 in 6x4.5cm format,
the metering area covers almost the entire
6x4.5 frame giving something akin to a full
frame metering area.
5.
To take a meter reading, turn the switch
button 5 on the position ON/
ВКЛ
. (left
position). Two other point is OFF/
ВЫКЛ
(middle) and battery control /
КБ
(right)
After turning ON inside of prism you’ll see
light indicator. Rotate the large, outer knurled
dial 1 on the right or left hand side of the
prism until both lights are visible at the top of
the focusing screen. If both lights cannot be
gotten to light up at the same time, go for
slight over exposure by having the right hand
light lit up. The exposure calculator dial is
now set so you can select the exposure
setting combination you desire.
NOTE: Don’t forget to turn it off.
6.
Decide which shutter speed and f stop
combination you wish to use from the
calculator dial and set the shutter speed and f
stop settings onto the camera and lens.
7.
An important note. The prisms come with
a rubber eyecup. It is strongly advised that
these be used, as light entering the eyepiece
of the prism can adversely affect the meter
reading causing incorrect exposure settings.


