96
Startup and Basic Operation
10.2.5
IRIG-B Time Data
IRIG-B time is immediately sent out, when the clock is powered ON, from any timing output
port configured for IRIG-B as indicated above. Time will not be accurate until the Unlocked LED
extinguishes.
10.3
Clock Status Display Modes & Fault Table
When first applying power to the clock, the display will indicate several startup messages, then
will revert to Clock Status mode condition called STARTUP. After a short time, while the GPS
receiver begins collecting data from the GPS, it will indicate either UNLOCKED (XX Min), NOT
STABILIZED, LOCKED–AUTO SURVEY, or LOCKED–POSITION HOLD. There are several
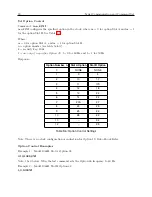
faults that are indicated, if they exist, and are as follows:
Bit
Weight
Function
0
1
OCXO Not Installed (set to 1)
1
2
Stabilized (fault = 0)
2
4
Power Supply Error
3
8
IRIG BUS Fault (was Opt. 18)
4
16
Out of Lock
5
32
Time Error
6
64
VCXO Error (out of bounds)
7
128
Receiver Failure
Table 10.1: Fault Conditions
For additional information on internal faults, please see Chapter 2, Front and Rear Panels, and
Chapter 9, Serial Communications and Command Set, status commands, page 72.
10.4
Time Display Modes
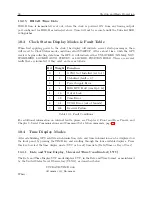
After establishing GPS satellite synchronization, date and time information can be displayed on
the front panel by pressing the TIME key and scrolling through the four available displays. Press
this key to select the time display mode (UTC or Local) time data (Date/Time or Day of Year).
10.4.1
Date and Time Display, Universal Time Coordinated (UTC)
The Date and Time Display UTC mode displays UTC, in the Date and Time format, as maintained
by the United States Naval Observatory (USNO), as described below:
UTC DATE/TIME www
dd mmm yyyy hh:mm:ss
Where:
Summary of Contents for 1088A
Page 4: ...iv ...
Page 6: ...vi ...
Page 18: ...xviii LIST OF FIGURES ...
Page 23: ...1 4 Attaching Rack Mount Ears to 1088A B Series Clocks 3 Figure 1 2 Attaching Rack Mount Ears ...
Page 24: ...4 Unpacking the Clock ...
Page 32: ...12 Front and Rear Panels ...
Page 38: ...18 Connecting Inlet Power Input and Output Signals ...
Page 46: ...26 GPS Antenna and Cable Information ...
Page 48: ...28 Setting Internal Jumpers Figure 5 1 Model 1088B Main Board ...
Page 76: ...56 The Setup Menus ...
Page 112: ...92 Serial Communication and Command Set ...
Page 127: ...B 4 Physical Dimensions 107 Figure B 1 Suggested Mounting of the AS0094500 Surge Arrester ...
Page 128: ...108 Using Surge Arresters ...
Page 145: ...C 5 Option 04 Parallel BCD Output 125 Figure C 4 Option 04 Output Jumper Settings ...
Page 146: ...126 Options List Figure C 5 Option 04 Board Layout and Jumper Locations ...
Page 166: ...146 Options List Figure C 12 Option 17 Board Layout and Jumper Locations ...
Page 187: ...C 16 Option 20A Four Fiber Optic Outputs 167 Figure C 22 Option 20A Jumper Locations ...
Page 194: ...174 Options List Figure C 24 Option 23 Internal Jumper Setup ...
Page 196: ...176 Options List Figure C 25 Option 27 Jumper Locations ...
Page 214: ...194 Options List Figure C 28 Option 29 Connector Signal Locations ...
Page 270: ...250 Options List ...


