GETTING STARTED WITH YOUR NOISE CANCELLING ARBORCOM HEADSET
To get the most out of your
ArborCom
headsets please ensure the batteries are fully charged and the
ear muffs are fitted correctly to your helmet.
Basic instructions for getting started with your
ArborCom
headset are listed below.
‘PAIRING’ YOUR ARBORCOM HEADSETS
ArborCom
headset are designed to work in
PAIRS
with an operating range of up to 200m (maximum
two headsets).
Your ArborCom headsets should be
PAIRED
when you recieve them from Treetools. If you ever need
to
PAIR
the headsets again the procedure is as follows.
Keep the headsets on your head or hold
them so you can hear the loudspeaker during the PAIRING process.
‘PAIRING’ YOUR ARBORCOM HEADSETS WITH A BLUETOOTH-CAPABLE CELLULAR PHONE
Your
ArborCom
headset can be paired with a cellular phone but not at the same time as another
ArborCom
headset. The phone will always be the
GATEWAY HEADSET
and ear muff itself should
always be programmed as the
SLAVE HEADSET
.
• Put your cellular phone in
SEEKING MODE
(Seeking other Bluetooth Devices)
• The phone will ask your to enter the code: four zeros
(0000)
.
• ‘
Free2Move
’ will appear on your mobile phone display when the two products are
PAIRED
.
• The phone must be within a 10m range of the
SLAVE HEADSET
at all times.
CHANGING THE BATTERIES
Your
ArborCom
headset comes complete with two re-chargeable AA batteries (HR6) and a 240-V
re-charging unit. Standard AA batteries will also work with your
ArborCom
headset Using full duplex
communication a pair of batteries will last about 10 hours depending on the quality of the batteries.
• To access the batteries, uncscrew the plate on the left hand ear muff.
Powering up your ArborCom Headset
• Press in
ON/OFF
power button located in the end of the
VOLUME CONTROL
knob
.
• You will hear a
BEEP
sound and
LED INDICATOR
will flash green
Step One: create a ‘Gateway Headset’
• Push the
MUTE/FUNCTION
button and keep it depressed while you push the
ON/OFF
power button.
• You will hear a high-tone
BEEP
(on signal) followed by two low-tone
BEEPS
(there will be 2-3
second delay between the
BEEPS
).
• Release the
ON/OFF
button first and then release the
MUTE/FUNCTION
button.
• This headset is now programmed as the
GATEWAY HEADSET
Powering down your ArborCom Headset
• Press in
ON/OFF
power button located in the end of the
VOLUME CONTROL
knob
.
• The voice will say ‘
TURNING OFF’
and the
LED INDICATOR
will cease flashing.
Adjusting the volume on your ArborCom Headset
• Rotate the
VOLUME CONTROL
clockwise to increase volume and counter-clockwise to decrease.
Microphone Mute
• Press the
MUTE/FUNCTION
button to mute the noise cancelling microphone. You will hear a
confirmation
BEEP
.
• Press the
MUTE/FUNCTION
button to return to normal operation.
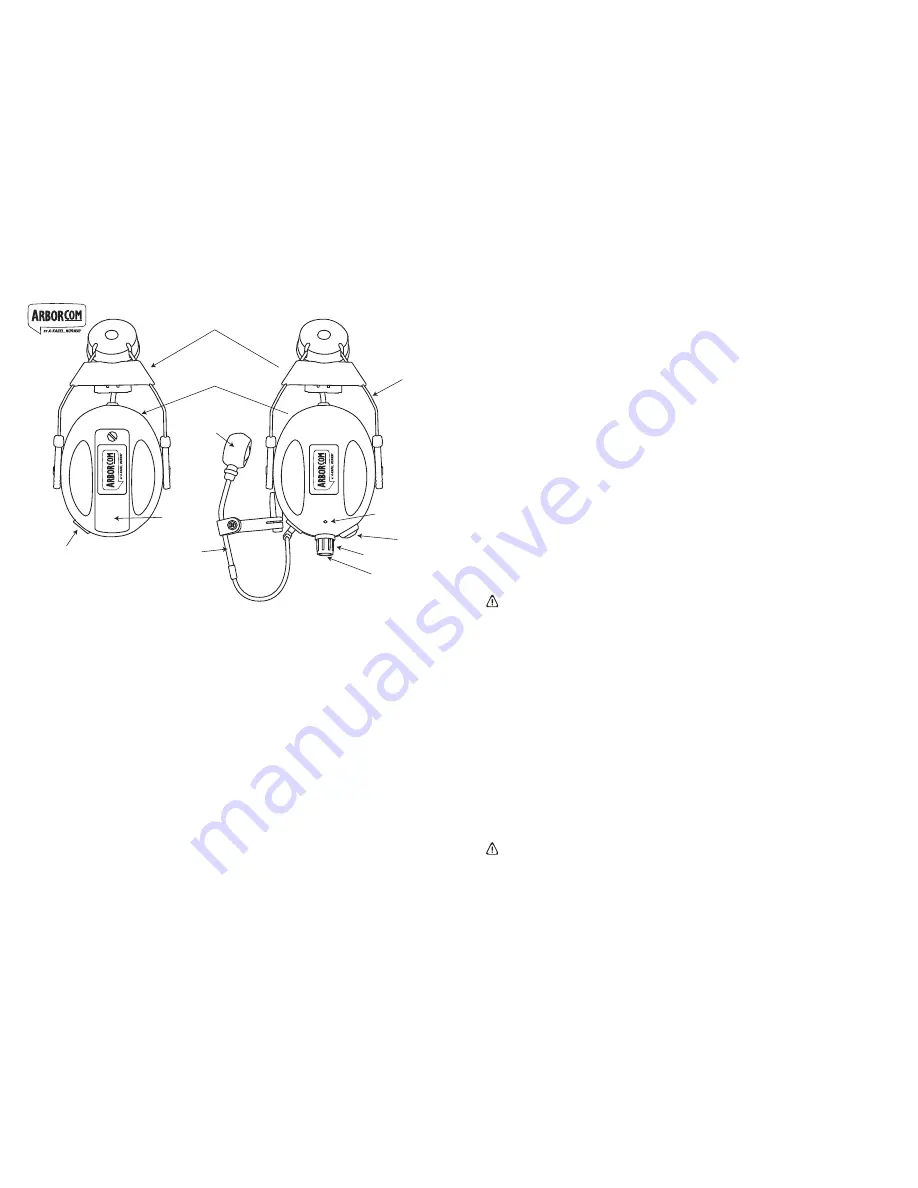
LED INDICATOR
ROBUST STAINLESS
ATTACHMENTS
NOISE
CANCELLING
EAR MUFFS
VOLUME CONTROL
MUTE/FUNCTION
BUTTON
ON/OFF POWER
BUTTON
STAINLESS STEEL
MICROPHONE BOOM
BATTERY RE-CHARGE
INPUT JACK
BATTERY
COVER
EXTRA SOFT
EAR CUSHIONS
NOISE CANCELLING
MICROPHONE
EURO SLOT ADAPTOR TO
SUIT PETZL AND STEIN HELMETS
RIGHT EAR MUFF
LEFT EAR MUFF
Step Two: create a ‘Slave Headset’
• Push the
MUTE/FUNCTION
button and keep it depressed while you push the
ON/OFF
power button.
• Release the
ON/OFF
button first and then release the
MUTE/FUNCTION
button when you hear
the high-tone
BEEP
(on signal) followed by
ONE
low-tone
BEEP
(there will be 2-3 second delay
between the
BEEPS
).
• Communication will be established after 10-20 seconds.
• This second headset is now programmed as the
SLAVE HEADSET
.
Programming your ArborCom headsets only needs to be done ONCE. The Bluetooth
connection remains in place even when the device is turned off and then back on.
WARNING
Only use the original battery recharger enclosed with this package.
DO NOT
use non-rechargeable
batteries together with the charger! It is normal for re-charging to take up to 6-8 hours


