SET-UP AND SAFE OPERATING PROCEDURES
6-17
89210000
SECTION 6:
ASSEMBLY AND INSTALLATION
CAUTION
Be sure to read this manual completely before trying to install or use this equipment.
Call your Arcair Representative or Distributor if you have any questions.
RECEIVING AND HANDLING
Remove all components from skids and boxes. Using the packing lists, check to be sure you
have all parts. Inspect each part for damage. Buyers may file claims for loss or damage with
the carrier.
THE CONTROLLER OF THE N6000 SYSTEM MUST BE HANDLED WITH CARE TO AVOID
DAMAGE.
When asking about your equipment, be sure to give its full serial and model numbers that
appear on the nameplate of each component.
INSTALLING THE N6000 SYSTEM
Do not force connections. All connectors should fasten easily. Be sure to tighten connections
as you go through each step. Avoid crimping hoses or wires.
NOTICE When using the N6000 System with a Climber Tractor or equivalent travel system,
the Contactor should be centrally placed.
CONNECTING STEPS
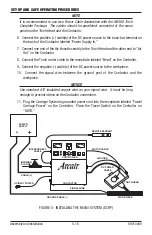
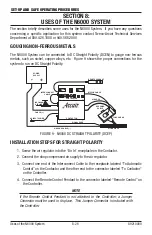
1. Screw the air regulator into the “Air In” receptacle on the Contactor.
2. Connect the shop compressed air supply to the air regulator.
3. Connect one end of the Interconnect Cable to the receptacle labeled “To Automatic
Control” on the Contactor and the other end to the connector labeled “To Contactor”
on the Controller.
4. Connect the Remote Control Pendant to the connector labeled “Remote Control” on
the Controller.
NOTE
If the Remote Control Pendant is not attached to the Controller, a Jumper
Connector must be used in its place. This Jumper Connector is included with
the Controller.
5. Connect the end(s) of the power cables to the Torch Head and the other end(s) to the
buss-bar terminal labeled “Power Supply Out” on the back of the Contactor. Slide
the cable boot over the buss bar on the Torch Head.
Assembly and Installation


