background image

9 / 29 EN

Refrigerator / User Guide

Installation

4.1 The right place for installation

  Your product requires adequate air circulation to 
function efficiently. If the product will be placed 
in an alcove, remember to leave at least 5 cm 
clearance between the product and the ceiling, 
rear wall and the side walls.
If the product will be placed in an alcove, 
remember to leave at least 5 cm clearance 
between the product and the ceiling, rear wall and 
the side walls. Check if the rear wall clearance 
protection component is present at its location (if 
provided with the product). If the component is 
not available, or if it is lost or fallen, position the 
product so that at least 5 cm clearance shall be 
left between the rear surface of the product and 
the wall of the room. The clearance at the rear is 
important for efficient operation of the product.

4.2 For Products With Water 

Fountain / Ice Maker

• The hose sets supplied with the product shall be 

used. Do not use the old hose sets. Do not extend 
the hoses!

• Always connect your product to cold water inlet. 

Do not perform installation on the hot water inlet. 
The pressure for the cold water inlet shall be 80 PSi 
(550 kPa) maximum. If your water pressure exceeds 
80Psi or has a water impact effect, use a pressure 
limiting valve on your mains system. Ask help from 
professional plumbers if you do not know how to 
control your water pressure.
High pressure may cause damage to the hose 
connections and pose a risk of flooding.

• Take required precautions against the risk of 

freezing of hoses. The operating water temperature 
interval shall be 0.6°C (33°F) minimum and 38°C 
(100°F) maximum. There is a risk of flooding if the 
hose is cracked/perforated.

A

WARNING: 

Do not use extension or multi 

sockets in power connection.

B

WARNING: 

The manufacturer assumes 

no responsibility for any damage caused 

by the work carried out by unauthorized 

persons.

B

WARNING: 

The product's power cable 

must be unplugged during installation. 

Failure to do so may result in death or 

serious injuries!

A

WARNING: 

: If the door span is too 

narrow for the product to pass, remove 

the door and turn the product sideways; if 

this does not work, contact the authorized 

service.

• Place the product on a flat surface to avoid 

vibration.

• Place the product at least 30 cm away from the 

heater, stove and similar sources of heat and at 

least 5 cm away from electric ovens. 

• Do not expose the product to direct sunlight or 

keep in damp environments.

• The product requires adequate air circulation to 

function efficiently. If the product will be placed 

in an alcove, remember to leave at least 5 cm 

distance between the product and the ceiling 

and the walls.

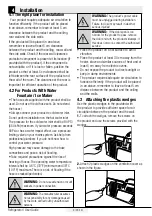
4.3  Attaching the plastic wedges

Use the plastic wedges in the provided with 

the product to provide sufficient space for air 

circulation between the product and the wall. 

1. 

To attach the wedges, remove the screws on 

the product and use the screws provided with the 
wedges.

2. 

Attach 2 plastic wedges on the ventilation cover as 

shown in the figure.

Summary of Contents for 583630EI

Page 1: ...583630EI EN 58 6849 0000 AH EN Refrigerator User Manual...

Page 2: ...ate of the art tech nology To do this carefully read this manual and any other documentation provided before using the product and keep it as a reference Heed all information and warnings in the user...

Page 3: ...duct 12 6 1 Turning off the product 12 6 Operation of the Product 13 6 2 Indicator panel 13 6 3 Support Service Feature 15 6 4 Entering Phone Number for Support Service 15 6 5 Creating a Request Via S...

Page 4: ...risk of fire 1 2 Safety for children vul nerable persons and pets This product can be used by children at and above 8 years old and by persons with limited physical sensory or mental capabilities or w...

Page 5: ...y Prior to installation check if the product has any defects on it If the product is damaged do not have it installed Place the product on a clean flat and solid surface and balance it with adjustable...

Page 6: ...ice cream ice cubes or frozen food right after removing them from the refrigerator There is the risk of frostbite When your hands are wet do not touch the inner walls or metal parts of the freezer or...

Page 7: ...e the product for cleaning purposes Handle may break and cause injuries if you exert excessive force on it Do not spray or pour water on or inside the product for cleaning purposes There is the risk o...

Page 8: ...horities or re tailer where the product was puchased Each household performs important role in recovering and recycling of old appliance Appropriate disposal of used appliance helps prevent potential...

Page 9: ...and ethylene filter 9 The dairy cold storage compartment 10 Filter 11 Glass shelves 12 Fan 13 Icematics 14 Freezer compartment glass shelf 15 Freezer compartment 16 Cooler compartment 3 Your Refriger...

Page 10: ...may cause damage to the hose connections and pose a risk of flooding Take required precautions against the risk of freezing of hoses The operating water temperature interval shall be 0 6 C 33 F minimu...

Page 11: ...horized Service Our firm will not assume responsibility for any damages due to usage without earthing and power connection in compliance with national regulations The power cable plug must be easily a...

Page 12: ...are not opened your product will optimize itself in conditions sufficient to protect your food In this energy saving function functions and components such as compressor fan heater defrost lighting di...

Page 13: ...onents to be damaged The product shall be used for storing food only Turn off the water valve if you will be away from home e g at vacation and you will not be using the Ice Maker or the water dispens...

Page 14: ...match your product If your product does not comprise the relevant parts the information pertains to other models 1 2 3 5 6 7 8 9 10 1 Fault Condition Indicator 2 Energy Saving Display Off Indicator 3...

Page 15: ...you may activate deactivate the connection with a short press on this key The wireless connection symbol shall flash quickly at 0 2 second intervals until the connection is established When the conne...

Page 16: ...aneously for 3 seconds All user information recorded previously are removed on a product where wireless connection settings are reset restored to factory defaults 6 3 Support Service Feature May not b...

Page 17: ...the symbol does not illuminate constantly turned off immediately or if it is constantly blink 1 Ensure that your product is connected to the internet 2 Ensure that you have a HomeWhiz account and that...

Page 18: ...place heavy and hard vegetables at the bottom and light and soft ones on the top taking into account the specific weights of vegetables Do not put fruits that have a high ethylene gas production such...

Page 19: ...m dioxide coated odour filter Providing a hygienic and odour free air circulation this module will be activated automatically periodically If the door of the fresh food compartment is opened while the...

Page 20: ...easily from the refrigerator Using the ice bucket 1 Remove the water tank in the cooler compartment 2 Fill the water tank with water 3 Place the water tank back First ice will be ready in about 4 hour...

Page 21: ...les which generate high amount of ethylene gas separately with other vegetables and fruits in the same crisper thanks to the vegetable separator The ethylene gas released from these fruits may cause y...

Page 22: ...s water and detergents Communicate with the service to replace your filter with a new one after such contact 6 17 Cleaning of the Crisper Separator To prevent blockage of the clean air holes of the cr...

Page 23: ...aditional packaging paper Mark each food pack by writing the date on the package before freezing This will allow you to determine the freshness of each pack every time the freezer is opened Keep the e...

Page 24: ...ritional values and eating qualities will be negatively affected A rotting threatening human health is not in question 6 21 Placing food Freezer compartment shelves Various frozen goods including meat...

Page 25: ...roplets and icing up to a thickness of a finger may occur on the rear wall of the freezer compartment Do not clean and never apply oils or similar materials Use a mildly dampened micro fiber cloth to...

Page 26: ...g the food in inappropriate sections and improper cleaning of internal surfaces may lead to odours To avoid this clean the inside with carbonated water every 15 days Keep the foods in sealed holders M...

Page 27: ...open Do not keep the product s door open for long periods The thermostat is set to a very cool temperature Set the thermostat to an appropriate temperature Compressor is not working In case of sudden...

Page 28: ...ezer temperature is adequate The cooler compartment temperature is set to a very low degree Set the freezer compartment temperature to a higher degree and check again The food items kept in cooler com...

Page 29: ...odour The foods were placed in unsealed holders Keep the foods in sealed holders Micro organisms may spread out of unsealed food items and cause malodour Remove any expired or spoilt foods from the pr...

Page 30: ...to carrying out any repair Ar elik may not be held responsible for safety issues that may arise because of repairs or attempts not carried out in accordance with instructions specified at user manual...

Reviews: