background image


12/EN 

Electrical connection 

Connect the product to a grounded outlet/line 
protected by a fuse of suitable capacity as stated 
in the "Technical specifications" table. Have the 
grounding installation made by a qualified 
electrician while using the product with or 
without a transformer. Our company shall not be 
liable for any damages that will arise due to 
using the product without a grounding installation 
in accordance with the local regulations. 


DANGER: 

The product must be connected to the 
mains supply only by an authorised and 
qualified person. The product's 
warranty period starts only after correct 
installation. 

Manufacturer shall not be held responsible 
for damages arising from procedures 
carried out by unauthorised persons. 


DANGER: 

The power cable must not be clamped, 
bent or trapped or come into contact 
with hot parts of the product. 

A damaged power cable must be replaced 
by an Authorised Service Agent. Otherwise, 
there is risk of electric shock, short circuit 
or fire! 

The mains supply data must correspond to the 
data specified on the type label of the product. 
The rating plate is either seen when the door or 
the lower cover is opened or it is located at the 
rear wall of the unit depending on the unit type. 
Power cable of your product must comply with 
the values in "Technical specifications" table. 


Power cable plug must be within easy reach 
after installation (do not route it above the 
hob). 


DANGER: 

Before starting any work on the 
electrical installation, disconnect the 
product from the mains supply. 

There is the risk of electric shock! 

Plug the power cable into the socket. 

Gas connection 


DANGER: 

Product can be connected to gas 
supply system only by an authorised 
and qualified person. 

Risk of explosion or toxication due to 
unprofessional repairs! 
Manufacturer shall not be held responsible 
for damages arising from procedures 
carried out by unauthorised persons. 


DANGER: 

Before starting any work on the gas 
installation, disconnect the gas supply. 

There is the risk of explosion! 


Gas adjustment conditions and values are 
stated on labels (or ion type label). 


Your product is equipped for natural gas 
(NG). 


Natural gas installation must be prepared 
before installing the product. 


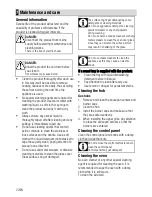
If necessary, interchange the sharp hose tip 
and the blind plug at the rear of your oven 
by selecting a suitable place on basis of the 
location of the natural gas valve. 


Blind plug 

Hose tip 


There must be a flex pipe at the outlet of 
the installation for the natural gas 
connection of your product and the tip of 
this pipe must be closed with a blind plug. 
Service Representative will remove the blind 
plug during connection and connect your 
product by means of a straight connection 
device (coupling). 


Make sure that the natural gas valve is 
readily accessible. 

Summary of Contents for 9540 HDG

Page 1: ...285300131 Oven 9540 HDG ...

Page 2: ...erence for future use If you handover the product to someone else give the user manual as well Follow all warnings and information in the user manual Remember that this user manual is also applicable for several other models Differences between models will be identified in the manual Explanation of symbols Throughout this user manual the following symbols are used Important information or useful h...

Page 3: ...lation and connection 11 4 Preparation 14 Tips for saving energy 14 Initial use 14 First cleaning of the appliance 14 Initial heating 14 5 How to use the hob 15 General information about cooking 15 Using the hobs 15 6 How to operate the oven 17 General information on baking roasting and grilling 17 How to use the electric oven 17 Operating modes 18 Using the oven clock 19 Cooking times table 19 Ho...

Page 4: ...ntrol panel 7 Burner plate 8 Top lid 9 Fan motor behind steel plate 10 Lamp 11 Grill heating element 12 Shelf positions 1 Thermostat lamp 2 Mechanical timer 3 Thermostat knob 4 Function knob 5 Normal burner Rear left 6 Rapid burner Front left 7 Auxiliary burner Front right 8 Normal burner Rear right ...

Page 5: ...rmal burner Dimension 18 20 cm Power 2000 W OVEN GRILL Main oven Multifunction oven Energy efficiency class A Inner lamp 15 25 W Grill power consumption 2 2 kW Basics Information on the energy label of electrical ovens is given in accordance with the EN 50304 standard Those values are determined under standard load with bottom top heater or fan assisted heating if any functions Technical specifica...

Page 6: ... as cookies and biscuits Small baking tray Can be used for small portions This baking tray is placed onto the wire shelf Wire shelf Can be used for roasting and as deposit for baking roasting and casserole dishes Proper positioning of the wire shelf and tray on sliding shelves Trays and wire shelves used with the sliding shelf model dependant must be positioned correctly with the inner edges of th...

Page 7: ...the product with or without a transformer Our company shall not be liable for any problems arising due to the product not being earthed in accordance with the local regulations If the supply cord is damaged it must be replaced by the manufacturer its service agent or similary qualified persons in order to avoid a hazard Do not operate the product if it is defective or has any visible damage Do not...

Page 8: ...ren Keep the packaging materials away from children Please dispose of all parts of the packaging according to environmental standards SAVE THESE INSTRUCTIONS Safety when working with gas Any works on gas equipment and systems may only be carried out by authorised qualified persons who are Gas Safe registered Prior to the installation ensure that the local distribution conditions nature of the gas ...

Page 9: ... dish cloths etc by hanging them on the oven door handles This product should also not be used for room heating purposes The manufacturer shall not be liable for any damage caused by improper use or handling errors The oven can be used for defrosting baking roasting and grilling food Service life of your product is 10 years Manufacturer shall provide the required spare parts for the product to per...

Page 10: ...he oven door that lines up with the position of the trays Tape the oven door to the side walls Secure the caps and pan supports with adhesive tape Do not use the door or handle to lift or move the product Do not place any objects onto the product and move it in upright position Check the general appearance of your product for any damages that might have occurred during transportation ...

Page 11: ...require an openable window or equvalent and some rooms will require a permanent vent as well The air for combustion is taken from the room air and the exhaust gases are emitted directly into the room Good room ventilation is essential for safe operation of your appliance If there is no window or door available for room ventilation an extra ventilation must be installed The appliance may be located...

Page 12: ...alues in Technical specifications table Power cable plug must be within easy reach after installation do not route it above the hob DANGER Before starting any work on the electrical installation disconnect the product from the mains supply There is the risk of electric shock Plug the power cable into the socket Gas connection DANGER Product can be connected to gas supply system only by an authoris...

Page 13: ...Vibrations during use may cause cooking vessels to move This dangerous situation can be avoided if the product is level and balanced For your own safety please ensure the product is level by adjusting the four feet at the bottom by turning left or right and align level with the work top Final check 1 Check electrical functions 2 Open gas supply 3 Check gas installations for secure fitting and tigh...

Page 14: ... not use harsh abrasive cleaners or sharp metal scrapers to clean the oven door glass since they can scratch the surface which may result in shattering of the glass 1 Remove all packaging materials 2 Wipe the surfaces of the appliance with a damp cloth or sponge and dry with a cloth Initial heating Heat up the product for about 30 minutes and then switch it off Thus any production residues or laye...

Page 15: ...ropriate amount of food in saucepans and pans Thus you will not have to make any unnecessary cleaning by preventing the dishes from overflowing Do not put covers of saucepans or pans on cooking zones Place the saucepans in a manner so that they are centered on the cooking zone When you want to move the saucepan onto another cooking zone lift and place it onto the cooking zone you want instead of s...

Page 16: ... seconds more to engage the safety system If the gas does not ignite after you press and release the knob repeat the same procedure by keeping the knob pressed for 15 seconds DANGER Release the button if the burner is not ignited within 15 seconds Wait at least 1 minute before trying again There is the risk of gas accumulation and explosion ...

Page 17: ...and poultry and will achieve a nice brown surface without it drying out to much Flat pieces meat skewers and sausages are particularly suited for grilling as are vegetables with a high water content such as tomatoes and onions Distribute the pieces to be grilled on the wire shelf If the grilling is on the wire shelf locate a dripping pan under it in order to collect the fat Add some water in the d...

Page 18: ...e hot air is distributed evenly and quickly all over the oven by the fan Cook with one tray only Operating with fan The oven is not heated Only the fan in the rear wall is in operation Frozen granular food is thawed slowly at room temperature and cooked food is cooled down Hot air The heating ring with fan in the rear wall is in operation The hot air is distributed evenly and quickly all over the ...

Page 19: ... set time is over is heard and the power is cut If you do not want to use the timer function turn the knob counterclockwise towards the hand symbol 5 Turn off the oven with the Time Setting knob function knob and temperature knob Turning off the oven before the set time 1 Turn the Time Adjustment knob counterclockwise until it stops 2 Turn off the oven with the Function knob and Temperature knob C...

Page 20: ...id lower the temperature and increase the cooking time Tips for baking pastry If the pastry is too dry increase the temperature by 10 C and decrease the cooking time Dampen the layers of dough with a sauce composed of milk oil egg and yoghurt If the pastry takes too long to bake pay care that the thickness of the pastry you have prepared does not exceed the depth of the tray If the upper side of t...

Page 21: ...t the function knob onto the grill symbol 2 Set grill temperature 3 Preheat for approximately 5 minutes if it is necessary The thermostat lamp is switched on Switch off grill 1 Turn grill control knob to off position top Shelf positions For optimum grill coverage position the wire shelf towards the front of the oven just out of contact with the glass door Placing the wire shelf fully to the rear o...

Page 22: ...g materials to clean the glass cover Glass surface can get damaged The surface might get damaged by some detergents or cleaning materials Do not use aggressive detergents cleaning powders creams or any sharp objects during cleaning Do not use harsh abrasive cleaners or sharp metal scrapers to clean the oven door glass since they can scratch the surface which may result in shattering of the glass D...

Page 23: ...ide wall has been placed properly Catalytic walls Side walls or just back wall of oven interior may be covered with catalytic enamel The catalytic walls of the oven must not be cleaned The porous surface of the walls is self cleaning by absorbing and converting spitting fat steam and carbon dioxide Clean oven door Don t use any harsh abrasive cleaners or sharp metal scrapers for cleaning the oven ...

Page 24: ...der to avoid the risk of an electrical shock Hot surfaces may cause burns The oven lamp is a special electric light bulb that can resist up to 300 C See Technical specifications page 5 for details Oven lamps can be obtained from Authorised Service Agents Position of lamp might vary from the figure If your oven is equipped with a round lamp 1 Disconnect the product from mains 2 Turn the glass cover...

Page 25: ...me In products with microwave oven timer controls only microwave oven Power is cut Check if there is power Check the fuses in the fuse box If necessary replace or reset the fuses There is no ignition spark No current Check fuses in the fuse box Time is not set Set the time There is no gas Main gas valve is closed Open gas valve Gas pipe is bent Install gas pipe properly Burners are not burning pro...

Reviews: