background image

PAPR

-8-

Filter Installation:

1. Open the filter cover (Fig. 4).

2. Remove the old filter (if installed) with a slight twisting motion as you pull it away from blower.

3. Install the new filter onto the blower using the same rotating motion as you push (Fig. 5).

4. Close the filter cover onto the blower, making sure the right tab snaps onto the blower.

5. Check that the filter cover is secured.

2.4 Blower

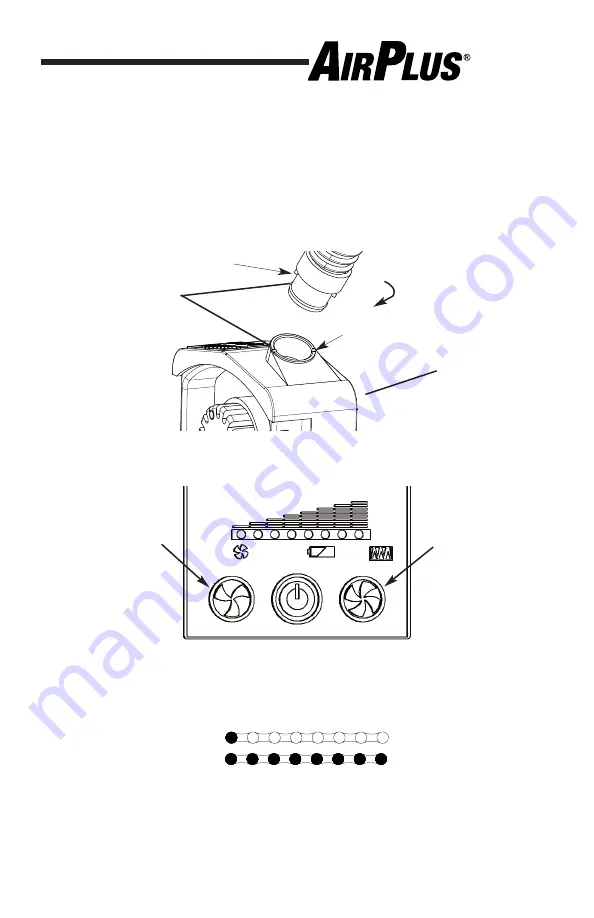
1. Install the Breathing Tube into the Blower as shown (Fig. 6).

2. Operate the Blower (Fig. 7).

Become familiar with the operation of your 

A

RC

O

NE

® 

A

IR

P

LUS

®

PAPR

system blower unit before

initial operation. The controls operate as follows:

Power Button - turn the blower unit on or off.

High Speed Fan - increase airflow indicated by GREEN LED panel above power button.

Low Speed Fan - decrease airflow indicated by GREEN LED panel above power button.
Filter/Airflow status indicated with GREEN LEDs.
Filter/Airflow status: GOOD.
Filter/Airflow status: Near Full.

Battery: When blower is turned on the LEDs will flash RED. (ALWAYS begin each shift with a

fully charged battery.)

Audible Alarm: Airflow blocked/change Filter soon.

Audible Alarm plus Vibration: Airflow blocked/Replace Filter.

Audible Alarm (short beep) & RED LEDs flash: RECHARGE BATTERY.

PD F created w ith pdfFactory t

rial version 

www.pdffactory.com

Figure 6

Breathing Tube

Insert

Turn to Lock after Inserting

into Blower Connector

Blower

Align Pin into Slot on

Blower Connector

Fan (High Speed)

Figure 7

Fan (Low Speed)

AIR

BATTERY

FILTER

Power Button

Summary of Contents for AIRPLUS

Page 1: ...USER INSTRUCTION MANUAL 85 Independence Drive Taunton MA 02780 TEL 508 884 9600 TOLL FREE 800 223 4685 FAX 508 884 9666 AP01 UI Rev E Powered Air Purifying Respirator ...

Page 2: ...xposure which may lead to serious bodily injury or loss of life Use by unqualified or untrained persons or use other than in accordance with this instruction manual is dangerous and could expose user to serious bodily injury or loss of life Do not make any modifications to any part of this system other than those specified in this manual Do not use any replacement parts other than those specified ...

Page 3: ...ops 2 7 Waist Belt 2 8 Pre Operational Inspection 2 9 Wearing Donning PAPR 2 10 Removing Doffing PAPR 2 11 Troubleshooting 3 0 Inspection Maintenance and Storage 3 1 Record Keeping 3 2 Cleaning 3 3 Inspection 3 4 Storage 4 0 Replacement 4 1 Battery 4 2 Filter 4 3 Blower 4 4 Breathing Tube 4 5 Face Seal 4 6 Waist Belt 4 7 Special Instructions 5 0 Customer Information 5 1 Replacement Parts and Access...

Page 4: ... Helmet Headtop with Face Seal A Choice of Auto Darkening Welding Filters One 1 HE Particulate Filter Blower Unit 7 4V Lithium Ion Battery and Charger Breathing Tube with Flame Retardant Cover Adjustable Waist Belt Airflow Indicator not shown Carrying Case not shown 3 ...

Page 5: ...y remain safe in your work environment for a longer period of time and is of particular benefit where working conditions are hot or humid The ARCONE AIRPLUS Lithium Ion battery provides power for two 2 eight 8 hour shifts when the blower is set on low fan and one 1 eight 8 hour shift when the blower is set on high fan This rechargeable battery is encased in durable lightweight plastic and attaches...

Page 6: ... Immediately replace worn or damaged components with ARCONE AIRPLUS PAPR components approved by NIOSH for use with this PAPR system 6 DO NOT use the ARCONE AIRPLUS PAPR system in inadequately ventilated areas where oxygen is less than 19 5 or in confined spaces such as tanks small rooms tunnels or vessels unless the confined space is well ventilated and contaminant concentrations are below the recom...

Page 7: ...ation for Safe Use Before using the ARCONE AIRPLUS PAPR system you should ensure that all conditions for safe use have been satisfied Refer to Section 1 3 and Approval Labels enclosed 2 2 Battery The Lithium Ion battery included with your system does not need to be manually discharged Charge Recharge Battery 1 Turn off the blower if the battery is connected to the blower Note the battery may be eit...

Page 8: ...e maintained see Section 2 5 Airflow Test THIS FILTER IS NOT MEANT TO BE REUSED DO NOT CLEAN AND REUSE THE FILTER SHOULD NEVER BE USED FOR PROTECTION AGAINST GASES OR VAPORS REFER TO SPECIFIC NIOSH FILTER APPROVAL LABELS FOR SPECIFIC INFORMATION ON USAGE AND LIMITATIONS PDF cr eat ed wi t h pdf Fact or y t r i alver si on www pdffactory com BLOWER BATTERY BATTERY EDGES LINE UP BOTH SIDES BLOWER ED...

Page 9: ... blower unit on or off High Speed Fan increase airflow indicated by GREEN LED panel above power button Low Speed Fan decrease airflow indicated by GREEN LED panel above power button Filter Airflow status indicated with GREEN LEDs Filter Airflow status GOOD Filter Airflow status Near Full Battery When blower is turned on the LEDs will flash RED ALWAYS begin each shift with a fully charged battery A...

Page 10: ...nd Airflow Indicator vertically 5 The airflow is sufficient only if the indicator ball reaches the minimum flow rate level Fig 9 6 If the Airflow Indicator ball sits below the minimum flow rate level it is necessary to charge the battery or change the filter Sections 2 2 2 3 2 6 Headtop 2 6 1 Vision Welding Helmet 1 Install and lock the breathing tube into the airduct on the Headtop Fig 10 2 Don t...

Page 11: ...ore air flow at the top of the airduct Fig 13a and 13b b A closed valve allows more air flow at the sides of the airduct Fig 14a and 14b 3 Don the Headtop over your face Adjust the headgear rachet wheel by pushing in and turning until a satisfactory tightness is achieved 4 Adjust the Face Seal fit with the pull cord by pressing on the lock and adjusting the cord length until a tight fit is achieve...

Page 12: ...C B A A Figure 13a Figure 13b Figure 14a Figure 14b Eagle Internal Flow Direction Regulation 11 ...

Page 13: ... and the filter cover is secured 6 Breathing Tube is connected and secured to the Blower unit 7 Breathing Tube is connected and secured to the Headtop 8 Face Seal is installed and secured to the Headtop 9 Face Seal and helmet are free of holes rips cuts and tears 10 Face Seal is clean and free of contaminants 11 Blower is operational and once turned on check that a The Battery status is above rech...

Page 14: ...op 3 Remove Headtop 4 Unclip Waist Belt and remove from waist OSHA 1910 134 does not require fit testing for loose fitting face pieces however excessive facial hair may cause an incomplete seal When in doubt remove excessive facial hair where it interferes with the seal between the users face and the face seal Failure to properly connect the Breathing Tube to the Headtop Assembly and confirm airfl...

Page 15: ... blower connection battery is snapped in place Blower does not turn on Battery not installed Install battery Battery not charged Recharge battery Defective switch Contact ARCONE Technical Support 800 223 4685 Motor defective Contact ARCONE Technical Support 800 223 4685 Battery fails to charge Check outlet voltage Connect to good 110 Volt outlet Defective charger Contact ARCONE Technical Support 8...

Page 16: ...tized after each use If not cleaned contamination may cause illness or disease Allow components to air dry before reassembling 3 2 Cleaning 1 ALWAYS INSPECT your ARCONE AIRPLUS PAPR system before each use and after cleaning Clean the external surfaces of the PAPR system with a soft cloth dampened in a mild solution of clean water and mild detergent Never use abrasive cleaners During cleaning ensur...

Page 17: ... prevent contaminants from entering into the ARCONE AIRPLUS PAPR system could lead to contaminant exposure resulting in serious bodily injury or loss of life Consult your local safety professional in event contaminant entry into the breathing tube or blower unit is suspected 16 Do not clean the HE filter by any means including forced air Doing so will damage the filter and void the Blower Unit war...

Page 18: ...nd battery charger are not user serviceable Maintenance or replacement of parts should only be performed by ARCONE who has the necessary test equipment to ensure that all repairs are completed safely and recertified 17 Pull Away from Blower 2 Blower Battery Figure 17 DO NOT store respirator system in your work area or leave it unattended in a contaminated environment Respirable contaminants can re...

Page 19: ...Retain pins in Eagle shell 3 Carefully pull the Face Seal away from the Headtop Installation 1 Align the Face Seal with the holes surrounding the Headtop Fig 19a and 19b 2 Be sure to place the pull string on the bottom of the Headtop Fig 20 3a Vision Use the screwdriver to screw in the screws and nuts through the helmet shell and corresponding Face Seal hole 3b Eagle Push the pins through the helm...

Page 20: ...wer Installation 1 Thread the Waist Belt Strap through the side slots on the Blower Fig 22 2 Thread the Waist Belt Strap through the belt loops Fig 23 3 Thread the Waist Belt strap through the Clip and pull tight to secure the Blower to the Waist Belt Fig 24 19 Figure 23 Belt Loops Figure 22 Figure 24 Clip ...

Page 21: ...figured from approved components as referenced on the NIOSH Approval Label for the applicable systems Powered Air Purifying Respirator Replacement Parts Part No Description AP1 15XX US Vision facepiece includes face seal and headgear airduct assembly XX color paint option as follows 00 Black 23 Speedway 26 Red Rock 33 Dragon Fire 43 Dream Weaver 55 Tank 68 Easy Rider AP1 02XX Eagle facepiece inclu...

Page 22: ...pe Lithium Ion Voltage 7 4 V Current Hours 8400 mAh Operating Time Fully charged battery sixteen 16 hours at minimum speed eight 8 hours at maximum speed Charging Time 5 7 hours Charging Cycles 600 under ideal conditions may vary due to use or storage conditions Housing Impact proof ABS Weight 82 lb 0 37 kg Dimensions 5 9 in x 2 9 in x 1 65 in 150 mm x 74 mm x 42 mm Color Black Charger Type DC Rec...

Page 23: ... replacements please proceed as follows PLEASE DO NOT CONTACT THE DISTRIBUTOR OR RETAILER FROM WHOM YOU PURCHASED THE RESPIRATOR 1 Contact ARCONE Technical Service 800 223 4685 for a Return Goods Authorization Number RGA 2 Send the complete respirator freight prepaid in a box with packaging material to protect the product from damage directly to ARCONE Technical Service 85 Independence Drive Taunt...

Page 24: ...IS A DIVISION OF A C E INTERNATIONAL COMPANY 85 Independence Drive Taunton MA 02780 TEL 508 884 9600 TOLL FREE 800 223 4685 FAX 508 884 9666 Please visit our website and register product at www arc1weldsafe com ...

Reviews: