background image

12 


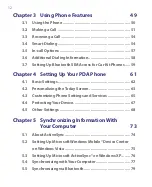
Chapter 3  Using Phone Features 

49

3.1  Using the Phone ............................................................... 50
3.2  Making a Call .................................................................... 51
3.3  Receiving a Call ................................................................. 54
3.4  Smart Dialing .................................................................... 54
3.5  In-call Options .................................................................. 57
3.6  Additional Dialing Information ....................................... 58
3.7  Setting Up Bluetooth SIM Access for Car Kit Phones ..... 59

Chapter 4  Setting Up Your PDA Phone 

61

4.1  Basic Settings .................................................................... 62
4.2  Personalizing the Today Screen ...................................... 63
4.3  Customizing Phone Settings and Services ..................... 65
4.4  Protecting Your Device ..................................................... 67
4.5  Other Settings .................................................................. 68

Chapter 5  Synchronizing Information With  

Your Computer 

73

5.1  About ActiveSync ............................................................. 74
5.2  Setting Up Microsoft Windows Mobile® Device Center  
 

on Windows Vista ............................................................. 75

5.3  Setting Up Microsoft ActiveSync® on Windows XP ........ 76
5.4  Synchronizing with Your Computer ................................ 77
5.5  Synchronizing via Bluetooth ........................................... 79

Summary of Contents for PDA Phone

Page 1: ...PDA User Manual ...

Page 2: ...ICE S OUTER CASING PRIVACY RESTRICTIONS Some countries require full disclosure of recorded telephone conversations and stipulate that you must inform the person with whom you are speaking that the conversation is being recorded Always obey the relevant laws and regulations of your country when using the recording feature of your PDA Phone COPYRIGHT INFORMATION Copyright 2007 High Tech Computer Cor...

Page 3: ...504 773 5 101 501 5 778 338 5 506 865 5 109 390 5 511 073 5 228 054 5 535 239 5 710 784 5 267 261 5 544 196 5 267 262 5 568 483 5 337 338 5 659 569 5 600 754 5 414 796 5 657 420 5 416 797 All other company product and service names mentioned herein are trademarks registered trademarks or service marks of their respective owners HTC shall not be liable for technical or editorial errors or omissions...

Page 4: ...evice This product equipped with a USB Cable for connecting with desk top or notebook computer Be sure your computer is properly grounded earthed before connecting this product to the computer The power supply cord of a desktop or notebook computer has an equipment grounding conductor and a grounding plug The plug must be plugged into an appropriate outlet which is properly installed and grounded ...

Page 5: ...UCE RISK OF FIRE OR BURNS DO NOT DISASSEMBLE CRUSH PUNCTURE SHORT EXTERNAL CONTACTS EXPOSE TO TEMPERATURE ABOVE 60 C 140 F OR DISPOSE OF IN FIRE OR WATER REPLACE ONLY WITH SPECIFIED BATTERIES RECYCLE OR DISPOSE OF USED BATTERIES ACCORDING TO THE LOCAL REGULATIONS OR REFERENCE GUIDE SUPPLIED WITH YOUR PRODUCT SAFETY PRECAUTIONS FOR DIRECT SUNLIGHT Keep this product away from excessive moisture and ...

Page 6: ... to turn off the phone by switching to Flight Mode ENVIRONMENT RESTRICTIONS Do not use this product in gas stations fuel depots chemical plants or where blasting operations are in progress or in potentially explosive atmospheres such as fuelling areas fuel storehouses below deck on boats fuel or chemical transfer or storage facilities and areas where the air contains chemicals or particles such as...

Page 7: ...ccessories that do not contain any metal Use of non original manufacturer approved accessories may violate your local RF exposure guidelines and should be avoided INTERFERENCE WITH MEDICAL EQUIPMENT FUNCTIONS This product may cause medical equipment to malfunction The use of this device is forbidden in most hospitals and medical clinics If you use any other personal medical device consult the manu...

Page 8: ...ice needed on components inside these compartments should be done by an authorized service technician or provider Damage requiring service Unplug the product from the electrical outlet and refer servicing to an authorized service technician or provider under the following conditions Liquid has been spilled or an object has fallen into the product The product has been exposed to rain or water The p...

Page 9: ...gs in the product Slots and openings are provided for ventilation These openings must not be blocked or covered Mounting Accessories Do not use the product on an unstable table cart stand tripod or bracket Any mounting of the product should follow the manufacturer s instructions and should use a mounting accessory recommended by the manufacturer Avoid unstable mounting Do not place the product wit...

Page 10: ...ds could be destroyed Please make sure that there is an adequate distance from the device or its keyboard other magnetic sensitive devices e g a mechanical watch or measure instruments For pacemakers The functionality of pacemakers can be interfered by the device and its keyboard Always keep the device and its keyboard in a fair distance to your pacemaker which at least will be 5 cm In any case pl...

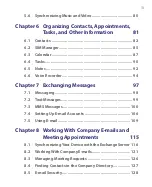
Page 11: ...ay 31 1 6 Using the Programs 32 1 7 Device Settings 34 Chapter 2 Entering and Searching Information 39 2 1 Using the Hardware Keyboard 40 2 2 Entering Information 42 2 3 Using the On screen Keyboard 43 2 4 Using Letter Recognizer 43 2 5 Using Block Recognizer 44 2 6 Using Transcriber 44 2 7 Using Symbol Pad 46 2 8 Using Notes to Draw Write and Record Voice Notes 47 2 9 Searching Information 47 ...

Page 12: ... Up Your PDA Phone 61 4 1 Basic Settings 62 4 2 Personalizing the Today Screen 63 4 3 Customizing Phone Settings and Services 65 4 4 Protecting Your Device 67 4 5 Other Settings 68 Chapter 5 Synchronizing Information With Your Computer 73 5 1 About ActiveSync 74 5 2 Setting Up Microsoft Windows Mobile Device Center on Windows Vista 75 5 3 Setting Up Microsoft ActiveSync on Windows XP 76 5 4 Synchr...

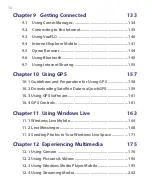
Page 13: ...apter 7 Exchanging Messages 97 7 1 Messaging 98 7 2 Text Messages 99 7 3 MMS Messages 100 7 4 Setting Up E mail Accounts 106 7 5 Using E mail 109 Chapter 8 Working With Company E mails and Meeting Appointments 115 8 1 Synchronizing Your Device with the Exchange Server 116 8 2 Working With Company E mails 121 8 3 Managing Meeting Requests 126 8 4 Finding Contacts in the Company Directory 127 8 5 E ...

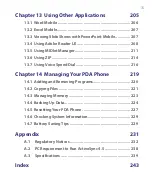
Page 14: ... 10 1 Guidelines and Preparation for Using GPS 158 10 2 Downloading Satellite Data via QuickGPS 159 10 3 Using GPS Software 161 10 4 GPS Controls 161 Chapter 11 Using Windows Live 163 11 1 Windows Live Mobile 164 11 2 Live Messenger 168 11 3 Sending Photos to Your Windows Live Space 171 Chapter 12 Experiencing Multimedia 175 12 1 Using Camera 176 12 2 Using Pictures Videos 190 12 3 Using Windows M...

Page 15: ...g ZIP 214 13 7 Using Voice Speed Dial 216 Chapter 14 Managing Your PDA Phone 219 14 1 Adding and Removing Programs 220 14 2 Copying Files 221 14 3 Managing Memory 223 14 4 Backing Up Data 224 14 5 Resetting Your PDA Phone 227 14 6 Checking System Information 229 14 7 Battery Saving Tips 229 Appendix 231 A 1 Regulatory Notices 232 A 2 PC Requirement to Run ActiveSync 4 5 238 A 3 Specifications 239 ...

Page 16: ...16 ...

Page 17: ...er 1 Getting Started 1 1 Getting to Know Your Device and Accessories 1 2 About the USIM SIM Card and Battery 1 3 Starting Up 1 4 The Today Screen 1 5 The Subdisplay 1 6 Using the Programs 1 7 Device Settings ...

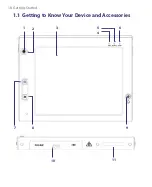
Page 18: ...18 Getting Started 1 1 Getting to Know Your Device and Accessories 3 4 1 9 5 7 8 6 2 10 11 ...

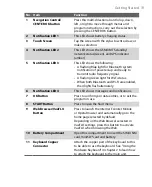
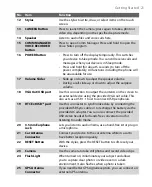
Page 19: ...ng Green light for Wi Fi status When both Bluetooth and Wi Fi are enabled their lights flash alternately 6 Notification LED 4 This LED shows messages and notifications 7 OK Button Press to confirm your data entries or to exit the program in use 8 START Button Press to open the Start menu 9 Web Browser VueFLO Button Press to launch the Interner Exolorer Mobile or Opera Browser and automatically go ...

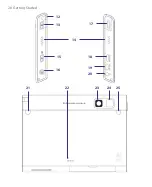
Page 20: ...20 Getting Started 14 15 19 20 12 16 17 18 13 23 24 22 21 25 ...

Page 21: ...nection to output the contents on the screen to an external device using the provided VGA out cable This also acts as a USB 1 1 host to connect USB peripherals 19 HTC ExtUSB port Use this connector to synchronize data by connecting the provided USB Sync cable or to recharge the battery via the provided AC adapter You can also connect the provided USB stereo headset for hands free conversation or f...

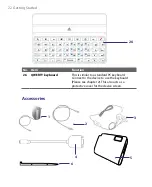
Page 22: ...Item Function 26 QWERTY keyboard This is similar to a standard PC keyboard Connect to the device to use the keyboard Please see chapter 2 This also acts as a protective cover for the device screen Accessories 2 1 3 4 5 6 26 ...

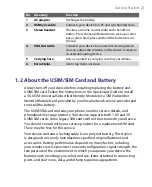
Page 23: ...install a 3G USIM Universal Subscriber Identity Module or a SIM Subscriber Identity Module card provided by your local network service provider and to install the battery The USIM SIM card contains your phone number service details and phonebook message memory Your device supports both 1 8V and 3V USIM SIM cards Some legacy SIM cards will not function with your device You should consult with your ...

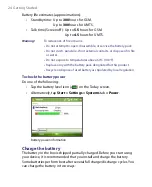
Page 24: ...above 60o C 140o F Replace only with the battery pack designated for this product Recycle or dispose of used battery as stipulated by local regulation To check the battery power Do one of the following Tap the battery level icon on the Today screen Alternatively tap Start Settings Systems tab Power Battery power information Charge the battery The battery in the box is shipped partially charged Bef...

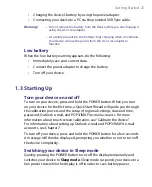
Page 25: ...ld the POWER button When you turn on your device for the first time a Quick Start Wizard will guide you through the calibration process and the setup of regional settings date and time password Outlook e mail and POP3 IMAP4 e mail accounts For more information about touch screen calibration see Calibrate the device For information about setting up Outlook e mail and POP3 IMAP4 e mail accounts see ...

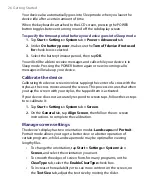
Page 26: ...of a cross with the stylus as the cross moves around the screen This process ensures that when you tap the screen with your stylus the tapped item is activated If your device does not accurately respond to screen taps follow these steps to re calibrate it 1 Tap Start Settings System tab Screen 2 On the General tab tap Align Screen then follow the on screen instructions to complete the calibration ...

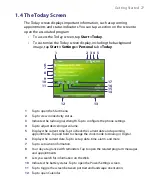
Page 27: ...us 3 Indicates the radio signal strength Tap to configure the phone settings 4 Tap to adjust device ringer volume 5 Displays the current time Tap to check the current date and upcoming appointments Tap and hold to change the clock mode to Analog or Digital 6 Displays the current date Tap to set up date time alarm and more 7 Tap to set owner information 8 Your day at a glance with reminders Tap to ...

Page 28: ... that you may see on the device Icon Description New text messages SMS notification of voice mail New MMS message received Receiving MMS message Sending MMS message Cannot send MMS message There are more notifications Tap the icon to view all Speakerphone on Dialing while no USIM SIM card is inserted Voice call in progress Calls are forwarded Call on hold Missed call Maximum signal strength No sig...

Page 29: ... available EDGE connecting EDGE in use Roaming Connection is active Connection is not active Synchronization in progress Synchronization error ActiveSync notification Wi Fi function enabled but device not connected to a wireless network yet Wireless network s detected Connecting to wireless network arrows moving Connected to wireless network Synchronizing via Wi Fi ...

Page 30: ... is very low Battery charging Bluetooth headset detected QuickGPS update notification Serial USB connection active Note The USB to PC icon appears on the Today Screen when your device is connected to your computer and you enable a serial USB connection between them For more information about USB to PC see Device Settings later in this chapter ...

Page 31: ... Menus 4 Tap to view and select more programs that are installed on your device 5 Tap to change device settings 6 Tap to see a Help topic for the current screen 1 2 5 4 6 3 1 5 The Subdisplay The Subdisplay lets you view notifications music info weather temperature and time on a designated area on the LCD screen when the keyboard is attached to the LCD screen of the main unit The Subdisplay is aut...

Page 32: ...tments and create meeting requests Contacts Keep track of your friends and colleagues Internet Explorer Mobile Browse Web and WAP sites as well as download new programs and files from the Internet Messaging Send and receive e mail MMS and text messages Phone Make and receive calls switch between calls and set up conference calling Help See Help topics for a program on your device Programs screen I...

Page 33: ...tebook computer to the Internet using your device s data connection Messenger Use this mobile version of Windows Live Messenger MIDlet Manager Download and install Java applications such as games and tools on your device Notes Create handwritten or typed notes drawings and recordings Opera Browser Browse Web sites Pictures Videos View and manage pictures animated GIFs and video files on your devic...

Page 34: ...les ZIP Save memory and free up storage space on your device by compressing files in the conventional ZIP format 1 7 Device Settings You can adjust the device settings to suit the way you work To see all available settings tap Start Settings then tap the Personal System and Connections tabs located at the bottom of the screen Personal tab Icon Description Buttons Assign a program or function to a ...

Page 35: ...t settings Clock Alarms Set the device clock to the date and time of your locale or to a visiting time zone when you re traveling Alarms can also be set at specified days and times of a week Customer Feedbcak Send feedback to the Customer Experience Improvement Program of Microsoft Device Information See information about the firmware version hardware identity and the duration of calls made on you...

Page 36: ...al configuration to use including the format for displaying numbers currency date and time on your device Remove Programs Remove programs that you installed on your device Screen Change the screen orientation re calibrate the screen and change the screen text size Task Manager Set the Exit button to end programs or to just hide program screens when you tap the button You can also choose to show or...

Page 37: ...r a private local network CSD Line Type Set the line type to use when making a circuit switch data CSD connection Normally you do not need to change the setting unless you encounter a problem on establishing a connection GPRS Setting Set the GPRS authentication method This has been configured for the MEdia Net network SMS Service Send SMS text messages via a data connection such as GPRS or a circu...

Page 38: ...38 Getting Started ...

Page 39: ...the Hardware Keyboard 2 2 Entering Information 2 3 Using the On screen Keyboard 2 4 Using Letter Recognizer 2 5 Using Block Recognizer 2 6 Using Transcriber 2 7 Using Symbol Pad 2 8 Using Notes to Draw Write and Record Voice Notes 2 9 Searching Information ...

Page 40: ...oard through a magnet To separate the main unit from the keyboard simply pull them apart Note When separating the keyboard from the main unit please do so in a gentle way Warning Please avoid placing credit cards diskettes audio or video cassettes or any other form of magnetic data carriers near the device or the keyboard as this could otherwise lead to loss of data stored on such objects Other ma...

Page 41: ...OFT KEY to perform the command shown in the label above the key Press to verify your data entries or exit the program in use Press to open the Start menu Press the arrow keys for directional movement To type accented characters like á ã ç ê í ó ü etc press the letter key first and then hold and at the same time press the space bar several times until you find the correct character you need Press to ...

Page 42: ...a text input method and customize input options After selecting a text input method the corresponding Input Panel is then displayed and you can use it to enter text To toggle between showing and hiding the Input Panel simply tap the Input Panel icon Input Panel Keyboard Input Selector arrow Input Panel icon Icon Input method On screen keyboard Letter Recognizer or Block Recognizer Symbol Pad Trans...

Page 43: ...cognizer With Letter Recognizer you can write individual letters numbers and punctuation which are then converted into typed text To use Letter Recognizer 1 From a program tap the Input Selector arrow and tap Letter Recognizer 2 Write characters numbers and symbols in the designated writing area Enter capital letters by writing in the ABC left area of the box Enter lower case letters by writing in...

Page 44: ...Block Recognizer tap the question mark near the writing area 2 6 Using Transcriber Transcriber is a handwriting recognition program that allows you to write in cursive print or a combination of both Transcriber works transparently in the background of programs recognizing words with its integrated dictionary When Transcriber is turned on it interprets stylus movement anywhere on the screen as hand...

Page 45: ...le bar then drag to the desired location When no text is selected you can also open the keyboard by doing the gesture For more information about using Transcriber gestures see Help on your device To edit text 1 In a program draw a line across the text you want to edit 2 After you lift the stylus from the screen the line will disappear and the selected text will be highlighted 3 Do either of the fo...

Page 46: ...IGHT to navigate through the available symbols on screen then press ENTER to select a symbol Tap to close the Symbol Pad without selecting any symbol Symbol Pad icon This indicates the current page and the total number of symbol pages To open the Symbol Pad and select a symbol 1 Create or open a document such as a Word document 2 To open the Symbol Pad Tap the Input Selector arrow then tap Symbol ...

Page 47: ...ords located in the item For example you can search in e mail messages notes appointments contacts and tasks as well as in online Help To search for a file or an item 1 Tap Start Programs Search 2 In the Search for field you can Enter the file name word or other information you want to search for Tap the down arrow icon and from the list select one item that you have looked for before 3 In the Type...

Page 48: ...48 Entering and Searching Information ...

Page 49: ...3 Using Phone Features 3 1 Using the Phone 3 2 Making a Call 3 3 Receiving a Call 3 4 Smart Dialing 3 5 In call Options 3 6 Additional Dialing Information 3 7 Setting Up Bluetooth SIM Access for Car Kit Phones ...

Page 50: ... your PIN is entered incorrectly three times the SIM card will be blocked If this happens you can unblock it with the PUK PIN Unblocking Key obtained from your wireless service provider Turn the phone function on and off In many countries you are required by law to turn off your phone while on board an aircraft To turn off the phone function do one of the following Tap the Comm Manager icon on the...

Page 51: ...st the conversation phone volume you must do it during a call Adjusting the volume at another time will affect the ring notification and MP3 sound levels 3 2 Making a Call With your device you can make a call from Phone Contacts Speed Dial Call History and SIM Manager IMPORTANT You need to have a wired or Bluetooth headset connected to your device to talk to or to hear the other party Make a call ...

Page 52: ...Mobile To choose one of the numbers of a contact to dial By default the mobile telephone number m of a contact is dialed when you make a call from Contacts However you can specify that a different phone number is dialed instead 1 Tap Start Contacts 2 Use the NAVIGATION CONTROL to select a contact 2 Press NAVIGATION right or left The letters representing the number will change as you scroll through...

Page 53: ...designate the next available location by default If you want to place a phone number in a position that is already occupied the new number will replace the number that is already there Tips To create a Speed Dial entry from Contacts tap and hold the contact name tap Add to Speed Dial then select the phone number for which to create a Speed Dial and an available location for the new Speed Dial entr...

Page 54: ...aling is a program that makes it easy for you to dial a phone number When you start entering numbers or characters Smart Dialing will automatically search and sort the contact entries on the SIM card in Contacts and the phone numbers in Call History including incoming outgoing and missed calls You can then select the desired number or contact from the filtered list to dial Start Smart Dialing Open...

Page 55: ... want to find a phone number from the saved contacts on your device and SIM card To find a contact name You can just enter the first letter of a contact s first name or surname Smart Dialing will search for the letter starting from the first character of a contact name as well as from the character that appears after a space dash or underscore in a contact name For example if you tap number 2 which...

Page 56: ...er 3 The highlighted item will move one line when you press NAVIGATION up or down the highlighted item will scroll one page when you tap the arrows 4 Do one of the following When the correct contact is selected tap Talk to make a voice call To call a different phone number associated with the selected contact tap and hold the selected contact and tap the phone number you want to call Tap and hold ...

Page 57: ...Select the Expand panel when using hardware keyboard check box to automatically expand the Smart Dialing panel when you are using the hardware keyboard to input In Scroll unit you can set the amount of scrolling when tapping the arrows 3 5 In call Options To put a call on hold Your device notifies you when you have another incoming call and gives you the choice of rejecting or accepting the call I...

Page 58: ...phone is turned off the mute icon appears on the screen Tap Unmute to turn on the microphone again 3 6 Additional Dialing Information Make an emergency call Enter the international emergency number for your locale and tap Talk Tip Additional emergency numbers may be included in your SIM card Contact your service provider for details Make an international call 1 Tap and hold on the Phone keypad unti...

Page 59: ...et to visible mode For information about turning on Bluetooth and enabling visible mode see Bluetooth modes in Chapter 9 2 Tap Start Programs SAPSettings 3 On the BT Remote SIM Access screen select the Remote SIM Access check box then tap Done 4 Connect the car kit phone to your device via Bluetooth To learn how to connect consult your car kit phone s manual 5 If this is the first time you are pai...

Page 60: ...60 Using Phone Features ...

Page 61: ...Chapter 4 Setting Up Your PDA Phone 4 1 Basic Settings 4 2 Personalizing the Today Screen 4 3 Customizing Phone Settings and Services 4 4 Protecting Your Device 4 5 Other Settings ...

Page 62: ...art Settings Personal tab Owner Information 2 On the Options tab select the Identification information check box 3 If you want additional text displayed tap the Notes tab and enter the text for instance Reward if found 4 On the Options tab select the Notes check box then tap OK Time and date To set the time and date 1 Tap Start Settings System tab Clock Alarms Time tab 2 Select the correct time zon...

Page 63: ... your upcoming appointments active tasks and information about incoming messages You can customize what to display on the Today screen To customize the Today screen 1 Tap Start Settings Personal tab Today 2 On the Appearance tab select the desired theme for the background of the Today screen 3 On the Items tab select the items you want to appear on the Today screen Tip To change the order of items...

Page 64: ... appointments Clear the Display all day events check box if you do not want to display all day events For more information about using Calendar see Chapter 6 To set options for displaying tasks on the Today screen If you have a large number of tasks you may want to specify the kind of tasks that are displayed on the Today screen 1 Tap Start Settings Personal tab Today 2 Tap the Items tab 3 Select ...

Page 65: ...ing type and ring tone to be used for incoming calls and the keypad tone to be used when entering phone numbers You can also set up your device to use phone services such as Call Waiting Call Forwarding and more To access phone settings and services Tap Menu Options on the Phone sreen or Tap Start Settings Personal tab Phone Ring tone settings To change the ring tone and ring type 1 On the Phone s...

Page 66: ...enu Options Phone tab 2 In the Keypad list tap the option you want Phone services Your device can directly link to the mobile phone network and allow you to access and change the settings of various phone services for your device Phone services may include Call Forwarding Call Waiting Voicemail and more Contact your wireless service provider to find out about the availability of phone services for...

Page 67: ...g a PIN To protect your device with a password 1 Tap Start Settings Personal tab Lock 2 Select the Prompt if device unused for check box and in the box to the right select how long your device must be idle before a password is required In the Password type box select the type of password you would like to use Enter the password and if necessary confirm the password If your device is configured to co...

Page 68: ... following situations Synchronizing with a PC Connecting to a network Restoring information from a backup Note If you synchronize multiple devices with the same PC each device must have a unique name For information about synchronizing with your PC see Chapter 5 To change the device name 1 Tap Start Settings System tab About 2 Tap the Device ID tab 3 Enter a name Note The device name must begin wi...

Page 69: ...crease the size of text on the screen 1 Tap Start Settings System tab Screen Text Size tab 2 Move the slider to increase or decrease the text size Button settings To configure the button using Task Manager You can configure the button to shut down running programs and free up the memory space that s occupied by them 1 Tap Start Settings System tab Task Manager 2 On the Button tab select the Enable...

Page 70: ...ou want to assign 5 Tap OK Word completion options Word completion helps you enter text faster by suggesting words as you enter letters using the on screen keyboard or the handwriting recognition methods You can set the number of suggested words to display when to show the word list and more 1 Tap Start Settings Personal tab Input Word Completion tab 2 Make sure the Suggest words when entering tex...

Page 71: ...unds tab choose how you want to be notified by selecting the appropriate check boxes 3 On the Notifications tab in Event tap an event name and choose how you want to be notified by selecting the appropriate check boxes You can choose from several options such as a special sound a message or a flashing light Tip Turning off sounds and the flashing light helps conserve battery power TV Out setting To u...

Page 72: ...outputting e g If your video is in the NTSC video standard and you select PAL TV Out will convert your video to PAL before outputting 4 Tap OK Note Audio output is supported To disable TV Out 1 On the Today screen tap Start Settings System tab TV Out 2 On the TV Out Settings screen choose Off on the drop down menu 3 Turn off the external viewing device and then unplug the power cord 4 Disconnect th...

Page 73: ...puter 5 1 About ActiveSync 5 2 Setting Up Microsoft Windows Mobile Device Center on Windows Vista 5 3 Setting Up Microsoft ActiveSync on Windows XP 5 4 Synchronizing with Your Computer 5 5 Synchronizing via Bluetooth 5 6 Synchronizing Music and Video ...

Page 74: ...nd synchronize your device with your computer by using one of the following methods Connect and synchronize using the supplied USB sync cable Upon connecting the sync cable to your device and your computer the synchronization process starts automatically Connect and synchronize using Bluetooth You must first set up a Bluetooth partnership between your device and your computer before you can synchr...

Page 75: ...nsfer media files check for updates and explore your device but not sync Outlook information 4 Select the information types that you want to synchronize then click Next 5 Enter a device name and click Set Up When you finish the setup wizard Windows Mobile Device Center synchronizes your device automatically Notice that Outlook e mails and other information will appear on your device after synchron...

Page 76: ... list of compatible Windows systems please go to http www microsoft com windowsmobile activesync activesync45 mspx Install ActiveSync 1 Insert the Getting Started Disc into the disc drive on your PC 2 ActiveSync is available in English and several other languages Select the desired language then click Next 3 Click Setup and Installation 4 Select the ActiveSync check box and click Install 5 Read th...

Page 77: ...tion Windows Mobile Device Center or ActiveSync then opens and lets you synchronize Note If you are synchronizing directly with Exchange Server you can use this connection to the PC to pass through to the network or you can synchronize without connecting to the PC over a cellular network For more information on synchronizing with the Exchange Server see Chapter 8 Start and stop synchronization You...

Page 78: ...e to clear the check box for the same information type elsewhere in the list 3 To change synchronization settings for an information type for instance E mail select it and tap Settings You can then set the download size limit specify the time period of information to download and more Notes Some information types such as Favorites Files and Media cannot be selected in ActiveSync Options on your de...

Page 79: ...hronize using Bluetooth 1 Follow the instructions in Windows Mobile Device Center Help or ActiveSync Help on the computer for setting up a Bluetooth connection on your computer 2 On your device tap Start Programs ActiveSync 3 Tap Menu Connect via Bluetooth Make sure the Bluetooth function of both your device and the computer are turned on and set to visible mode 4 If this is the first time you hav...

Page 80: ... media can be synchronized you must do the following Install Windows Media Player Version 11 on the PC Windows Media Player 11 works only in Windows XP or later versions Connect your device to the PC with a USB cable If your device is currently connected using Bluetooth you must end that connection before media can be synchronized Set up a sync partnership between your device and your PC s Windows...

Page 81: ...Chapter 6 Organizing Contacts Appointments Tasks and Other Information 6 1 Contacts 6 2 SIM Manager 6 3 Calendar 6 4 Tasks 6 5 Notes 6 6 Voice Recorder ...

Page 82: ...can store phone numbers e mail addresses instant messaging IM names company and home addresses and information such as a job title birthday and a lot more You can also add a picture and assign a ring tone to an Outlook contact SIM contacts Contacts that are stored on the SIM card Only the name and a phone number can be stored for each entry Tip If you use Outlook on your PC you can synchronize con...

Page 83: ...nished tap OK Organize and search To group similar contacts You can group similar contacts for easier management by assigning them to categories 1 Create a new contact or select an existing contact to edit 2 Tap Categories 3 Select a preset category such as Business or Personal or tap New to create your own category 4 When finished tap OK Note If your contact list has been filtered by a category th...

Page 84: ...is displayed To show all contacts again tap the text box and clear the text or tap the arrow to the right of the text box Use the alphabetical index displayed at the top of the contact list Filter the list by categories In the contact list tap Menu Filter then tap a category you ve assigned to a contact To show all contacts again select All Contacts Share contact information To beam a contact s de...

Page 85: ...n MMS message 1 Tap Start Contacts then select a contact 2 Tap Menu Send as vCard 3 A new MMS message is created with the vcard file attached Enter the mobile phone number or e mail address of the recipient then tap Send For more information about sending MMS messages see MMS Messages in Chapter 7 6 2 SIM Manager SIM Manager allows you to view the contents of your SIM card transfer contacts from yo...

Page 86: ...ach number under a different contact name on the SIM card SIM Manager appends an indicator at the end of each name By default M W and H are appended to indicate mobile work and home phone numbers respectively You can edit this indicator first before you start copying contacts to your SIM card Indicators of the other types of phone numbers are left empty for you to define them 1 Tap Start Programs ...

Page 87: ...ber is stored on the SIM card it will show on the SIM Manager screen 6 3 Calendar Use Calendar to schedule appointments including meetings and other events Your appointments for the day can be displayed on the Today screen If you use Outlook on your PC you can synchronize appointments between your device and PC You can also set Calendar to remind you of appointments with a sound or flashing light ...

Page 88: ...of time in Calendar instead they appear in banners at the top of the calendar To cancel an appointment tap the appointment and tap Menu Delete Appointment Tip To have the time entered automatically in Day view tap the time slot for the new appointment and tap Menu New Appointment View appointments By default Calendar displays appointments in Agenda view You can also look at your appointments in Da...

Page 89: ...red or optional only if your device is connected to a Microsoft Exchange 2007 server Otherwise all attendees are designated as required For more information see Chapter 8 4 Tap the name of the contact you want to invite 5 To invite each additional attendee tap Add and tap the name 6 Tap OK to send Tip To choose the e mail account to use for sending meeting requests tap Menu Tools Options Appointme...

Page 90: ...re displayed in red To create a task 1 Tap Start Programs Tasks 2 Tap Menu New Task enter a subject for the task and fill in information such as start and due dates priority and so on 3 Specify the type of category for your task so that it can be grouped with other related tasks Tap Categories then select a preset category Business Holiday Personal or Seasonal or tap New to create your own category...

Page 91: ... dates in the task list 1 Tap Start Programs Tasks 2 Tap Menu Options 3 Select the Show start and due dates check box 4 Tap OK To locate a task When your list of tasks is long you can display a subset of the tasks or sort the list to quickly find a specific task 1 Tap Start Programs Tasks 2 In the task list do one of the following Sort the list Tap Menu Sort By and tap a sort option Filter the lis...

Page 92: ...Writing as the default input mode If you prefer typed text select Typing 1 Tap Start Programs Notes 2 In the note list tap Menu Options 3 In the Default mode box tap one of the following Writing if you want to draw or enter handwritten text in a note Typing if you want to create a typed note 4 Tap OK To create a note 1 Tap Start Programs Notes In the note list tap New 2 Tap the Input Selector arro...

Page 93: ...tap and hold the drawing briefly When you lift the stylus the drawing is selected Record a voice note You can create a stand alone recording voice note or you can add a recording to a note To create a voice note 1 Tap Start Programs Notes 2 Do one of the following To create a stand alone recording record from the note list To add a recording to a note create or open a note 3 If you do not see the ...

Page 94: ...t 2 Tap the Options tab and select the desired format you want in the Voice recording format list 3 Tap OK Note You can also change recording formats from within Notes In the note list tap Menu Options Global Input Options link at the bottom of the page then tap the Options tab 6 6 Voice Recorder Voice Recorder lets you record your voice and then quickly send it via MMS or e mail beam it or set th...

Page 95: ...ordings are saved in the My Voices folder by default You can choose another folder to save voice recordings by tapping beside the folder name on the top left of the screen and then in the menu choose the folder where to save future recordings To play back a voice recording ...

Page 96: ...2 Tap Menu Set as Ringtone To rename or move a recording 1 On the Voice Recorder screen select the voice recording you want to rename or move to another location 2 Tap Menu Rename Move 3 Enter the new Name for the voice recording 4 To move the voice recording select the new destination Folder and Location 5 Tap OK Tip If multiple voice recordings are selected you can only move the files but not re...

Page 97: ...Chapter 7 Exchanging Messages 7 1 Messaging 7 2 Text Messages 7 3 MMS Messages 7 4 Setting Up E mail Accounts 7 5 Using E mail ...

Page 98: ...Messaging Service text messages using your mobile phone network You can also access e mail from work using a VPN connection New message s To select a messaging account Do one of the following Tap Start Messaging The Account Picker screen then appears where you can select an account Account Picker screen While you are in a message list of a certain account for example Text Messages tap Menu Go To t...

Page 99: ... access mobile phone numbers from Contacts tap To 5 Enter your message To quickly add common messages tap Menu My Text and tap a desired message To check the spelling tap Menu Spell Check 6 Tap Send Note If you want to know when a text message is received before sending the message that you are composing tap Menu Message Options then select the Request message delivery notification check box To al...

Page 100: ...eating and sharing multimedia messages MMS with your friends and family are easy with your device You can attach pictures or video and an audio clip in an MMS You can even use the device camera to capture photos and video clips while composing a new MMS message and send them along with your message Notes Please note that MMS is a charged service In order to use MMS successfully this has to be prov...

Page 101: ... with your wireless service provider s MMS server setings If you accidentally lost the preset settings or you changed to another wireless service provider follow the steps below to configure MMS settings To configure MMS settings 1 Tap Start Messaging 2 Tap Menu Tools Options 3 Tap MMS in the accounts list to configure settings The MMS Configuration screen appears 4 In the Preferences tab select o...

Page 102: ...MS Sending size limitation Select the maximum MMS message size allowed by your wireless service provider WAP version Select either WAP 1 2 or WAP 2 0 depending on which one is being used by your wireless service provider 6 Tap OK The MMS server settings will then be added as an entry on the MMS Configuration screen Notes If your device already has preset MMS settings it is recommended that you do n...

Page 103: ...n e mail address from Contacts 4 Enter a subject for your message 5 Tap the Insert icon to select and insert a photo or video clip When selecting a photo or video clip you can Tap to view it first then tap Select to use the selected photo or video clip and insert it into the MMS message you are composing Tap to take a photo and insert it into the MMS message Tap to record an MMS video clip and ins...

Page 104: ...a program Do one of the following In Pictures Videos select a picture from My Pictures and tap Menu Send In Select an account tap MMS Capture a photo or an MMS video clip using the camera and tap the Send icon In the Send File dialog box tap Send via MMS To create an MMS message from a template While on an MMS message tap Menu Template New from Template to compose a message using a predefined templ...

Page 105: ...o stop playback Tap Select to insert it into your MMS message Tap the Exit icon to quit selection and return to your MMS message To record a new audio clip and add it to your MMS message tap The Record pop up window then opens Tap Record to start recording and Stop to end the recording Tap Play to listen to the recorded audio clip then tap Done The new audio clip is automatically inserted into you...

Page 106: ...mail Setup Wizard lets you easily set up your personal and work e mail accounts You can add an e mail account from an Internet Service Provider ISP or other e mail provider as well as Web based accounts Note For more information about setting up your company Outlook e mail account see Chapter 8 To set up a POP3 or IMAP4 e mail account 1 Tap Start Messaging New E mail Account 2 Enter your e mail ad...

Page 107: ...load and format settings 7 Tap Finish To specify e mail server settings If Auto Setup is unsuccessful contact your ISP or e mail provider for the Incoming mail server and Outgoing mail server settings so you can enter them on your device Other options that you can select include the following Select the Outgoing server requires authentication check box if required by your provider If the outgoing ...

Page 108: ...y delivered when you tap Send If you prefer to save outgoing messages to the Outbox folder first clear the check box In this case you will need to manually send messages by tapping Menu Send Receive Use automatic send receive schedule when roaming This allows your device to data roam when there is a set time interval for connecting to the Internet automatically Since this may result in higher conn...

Page 109: ...7 Tap Send Tips To enter symbols tap Shift using the on screen keyboard then tap a symbol or use the Symbol Pad For more information about entering text and symbols see Chapter 2 To set the priority tap Menu Message Options If you are working offline e mail messages are moved to the Outbox folder and will be sent the next time you connect To add an attachment to an e mail message 1 In the message ...

Page 110: ...wnload an attachment An attachment appears below the subject of the message Tapping the attachment opens the attachment if it has been fully downloaded or marks it for download the next time you send and receive e mail Notes If there are multiple attachments in the message all attachments are downloaded For information about setting your device to automatically download file attachments see Custom...

Page 111: ... company is using Microsoft Exchange Server 2007 1 Set the message format to HTML To find out how to set the message format see Customize e mail settings 2 Tap Start Messaging then select an e mail account 3 Open an HTML e mail that you received 4 Tap the Tap to scroll right option to be able to scroll sideways and get a complete horizontal view of the message 5 Tap Get the rest of this message tha...

Page 112: ...VPN server connection you send and receive messages through a remote e mail server Before sending and downloading messages you first need to connect to the Internet or your corporate network 1 Tap Start Messaging then select your POP3 or IMAP4 e mail account 2 Tap Menu Send Receive The messages on your device and e mail server are synchronized new messages are downloaded to the device Inbox folder...

Page 113: ...recipient list Customize ActiveSync so that your e mail address will be excluded from the recipient list 1 Tap Start Programs ActiveSync 2 Tap Menu Options select E mail then tap Settings 3 Tap Advanced 4 In the My e mail addresses text box enter your e mail address 5 Tap OK To automatically receive attachments on Outlook e mails 1 Tap Start Programs ActiveSync 2 Tap Menu Options select E mail the...

Page 114: ... Exchanging Messages To store attachments on a storage card 1 Tap Start Messaging then select an e mail account 2 Tap Menu Tools Options Storage tab 3 Select the Store attachments on storage card check box ...

Page 115: ...Company E mails and Meeting Appointments 8 1 Synchronizing Your Device with the Exchange Server 8 2 Working With Company E mails 8 3 Managing Meeting Requests 8 4 Finding Contacts in the Company Directory 8 5 E mail Security ...

Page 116: ...device Exchange Server name must be the Outlook Web Access server name domain name and the user name and password that you use at work You can set up the Exchange Server connection either from your device or your PC Set up an Exchange Server connection from your device If you have not synchronized your device with your PC follow these steps to set up an Exchange Server connection 1 Tap Start Messa...

Page 117: ...s for synchronization you need to clear the E mail check box under the Windows PC item first before you can select the E mail check box under Exchange Server Tip To change Exchange Server settings open ActiveSync then tap Menu Configure Server Set up an Exchange Server connection from your PC On a Windows Vista PC 1 Set up synchronization between your PC and device See Chapter 5 for details 2 Clic...

Page 118: ...ess your username password and domain 5 Click Set Up 6 On Windows Mobile Device Center s Home screen click Change content sync settings 7 Select the check box of items you want to synchronize with the Exchange Server Tap Sync Settings to choose synchronization settings for the selected items 8 Tap Save ...

Page 119: ...nc in Chapter 5 and make sure to select the Synchronize directly with a server running Microsoft Exchange option in the Synchronization Setup Wizard 4 If you have synchronized your device with your PC before do the following steps to set up synchronization with the Exchange Server a Right click the ActiveSync icon at the bottom right side of your PC then click Open Microsoft ActiveSync b In Active...

Page 120: ...onize wirelessly For more information about connections see Chapter 9 After you finish setting up an Exchange Server connection your device automatically starts synchronization You can manually start synchronization anytime by tapping Sync in ActiveSync Notes You need a data plan from your wireless service provider to be able to synchronize with the Exchange Server If you connect your device to yo...

Page 121: ...ature items such as contacts calendar and tasks are also immediately updated onto your device when these items have been changed or new entries have been added on the Exchange Server To make Direct Push work you need to have a GPRS EDGE connection on your device You need to perform a full synchronization between your device and the Exchange Server first before Direct Push can be enabled Requiremen...

Page 122: ...d synchronization If you do not want to use Direct Push you can set a regular schedule for synchronizing Outlook e mail and information Set how often to synchronize during Peak times which usually refer to your working hours when e mail volume is high as well as Off peak times when e mail volume is low 1 In ActiveSync on your device tap Menu Schedule 2 Select a shorter time interval in the Peak ti...

Page 123: ...message 4 A Downloading message status appears Wait for the remainder of the message body to be downloaded Tip For information about changing e mail sync options such as the initial download size limit for e mail see Customize e mail settings in Chapter 7 Search for e mails on the Exchange Server You can access messages that are not available on your device by searching your Microsoft Exchange Ser...

Page 124: ...higher Flags are disabled or hidden if e mails are synchronized with earlier versions of Microsoft Exchange Server To flag or unflag a message 1 Tap Start Messaging Outlook E mail 2 Select a message or open a message 3 Tap Menu Follow Up and select one of the following options Set Flag Mark the message with a red flag to indicate that it needs follow up Complete Flag Mark the message with a check ...

Page 125: ...n tap Done View a document linked to an e mail message When you receive an e mail that contains a link to a document such as a PDF or Microsoft Office document located on SharePoint or an internal file server you can view the document on your device Requirement You can view the document only if you have a Microsoft Outlook account that synchronizes with Microsoft Exchange Server 2007 or later Exch...

Page 126: ...he features mentioned in this section your company must be using Microsoft Exchange Server 2007 or higher To reply to a meeting request 1 When you receive a meeting request e mail a notification message will be displayed on your device Tap View to open the e mail 2 Tap Accept to reply and accept the meeting request or tap Menu Decline if you cannot attend the meeting Tips Before responding you can ...

Page 127: ... attendee is not in your contacts list tap Company Directory to view the contact information 8 4 Finding Contacts in the Company Directory In addition to having contacts on your device you can access contact information from your organization s Company Directory By having over the air access to the Company Directory you can easily send e mail messages and meeting requests to anyone in your company...

Page 128: ...otects your Outlook e mails through Secure Multipurpose Internet Mail Extension S MIME which allows you to digitally sign and encrypt your messages Digitally signing a message applies your certificate with the authorization key to the message This proves to the recipient that the message is from you and not from an imposter or a hacker and that the message has not been altered Encryption protects ...

Page 129: ...Outlook E mail 2 Tap Menu New to create a new message 3 Tap Menu Message Options 4 From the Security list select whether to encrypt only sign the message only or do both 5 Tap OK To verify the digital signature on a signed message you receive 1 Open the Outlook e mail message that has been digitally signed 2 At the top of the message tap View Signature Status 3 Tap Menu Check Certificate To view t...

Page 130: ...ssages successfully 1 Tap Start Programs ActiveSync 2 Tap Menu Options 3 Select the E mail information type and tap Settings On the E mail Sync Options screen tap Advanced 4 Do one or both of the following To sign all your outgoing e mail messages so that recipients can be certain that the messages were sent by you and have not been altered in any way select the Sign all outgoing e mail messages c...

Page 131: ...osoft Outlook e mail account and if your company is using RMS Server SP1 1 Tap Start Messaging Outlook E mail 2 Create a message then tap Menu Message Options 3 In Permissions do one of the following To allow anyone to read the message select Unrestricted access To prevent the message from being forwarded printed or copied select Do not forward 4 Tap OK Tip An IRM protected message received on you...

Page 132: ...132 Working With Company E mails and Meeting Appointments ...

Page 133: ...Chapter 9 Getting Connected 9 1 Using Comm Manager 9 2 Connecting to the Internet 9 3 Using VueFLO 9 4 Internet Explorer Mobile 9 5 Opera Browser 9 6 Using Bluetooth 9 7 Using Internet Sharing ...

Page 134: ... to configure Wi Fi on your device 3 Tap to open ActiveSync so you can synchronize the device and computer For more information about the configuration settings for ActiveSync see Chapter 5 4 Tap to toggle between enabling or disabling the phone Tap Settings Phone to set the ring tone and other phone settings For more information about customizing phone settings see Chapter 4 5 Tap to toggle betwe...

Page 135: ...t of your service provider When you are in public places such as in a coffee shop or restaurant you will need access to their public wireless access points also referred to as hotspots Note The availability and range of your device s Wi Fi signal depends on the number infrastructure and other objects through which the signal passes To connect to a wireless network 1 Open Comm Manager 2 Tap the WLA...

Page 136: ...rase custom settings on your device Note Wi Fi networks are self discoverable which means no additional steps are required for your device to connect to a Wi Fi network It may be necessary to provide a username and password for certain closed wireless networks however To save battery power while connected to a wireless network 1 Tap Start Settings Connections tab Wireless LAN to open the Wireless ...

Page 137: ...e back and forth while your device is scanning for a wireless LAN signal Once your device successfully connects to a wireless LAN the arrows stop moving Wireless LAN screen Main tab Here it shows the name of the wireless network that your device is currently connected to The configuration and signal quality of the wireless network are also shown Configure Wireless Networks screen Tap Start Settings...

Page 138: ...tion via GPRS To add a new GPRS EDGE connection If GPRS settings are not preset on your device obtain the Access point name from your wireless service provider Also check with your wireless service provider if a user name and password are required 1 Tap Start Settings Connections tab Connections 2 Under MEdia Net tap Add a new modem connection 3 On the Make New Connection screen enter a name for t...

Page 139: ...and password 1 Tap Start Settings Connections tab Connections 2 Under MEdia Net tap Add a new modem connection 3 On the Make New Connection screen enter a name for the connection 4 In the Select a modem list select Cellular Line then tap Next 5 Enter the ISP server phone number then tap Next 6 Enter your user name password and any other information required by your ISP 7 Tap Finish Work network co...

Page 140: ...on If you have set up multiple types of connections on your device you can manually start a connection 1 Tap Start Settings Connections tab Connections 2 Tap Manage existing connections 3 Tap and hold the name of the desired connection then tap Connect To disconnect the GPRS connection Tap the Comm Manager icon on the Today screen then tap the Data Connection button 9 3 Using VueFLO VueFLO lets yo...

Page 141: ... Explorer To set a Home page 1 In the address bar on top of the Internet Explorer screen enter the desired Web page address Tap to open the Web page 2 Tap Menu Tools Options General tab 3 Do one of the following To use the displayed page as the Home page tap Use Current To use the default Home page tap Use Default Tip To go to your Home page tap Menu Home To transfer favorites from your PC You can...

Page 142: ...plorer Mobile tap Menu Zoom and tap the size you want To change how Web pages fill the screen 1 In Internet Explorer Mobile tap Menu View 2 Tap one of the following One Column Arranges the content into one column that is as wide as the screen This means that you will rarely have to scroll horizontally Default Maintains a layout similar to what you see on a desktop computer but it makes items small...

Page 143: ...ay want to delete these files to free storage space 1 In Internet Explorer Mobile tap Menu Tools Options Memory tab 2 Tap Delete Files All pages stored on your device including offline favorites content will be deleted To set up Internet security settings Cookies are small files containing information about your identity and preferences so that a page can tailor information to your needs The page ...

Page 144: ......

Page 145: ... the Bluetooth signal coverage range Bluetooth can be used in the following ways Beam information such as files appointments tasks and contact cards between devices that have Bluetooth capabilities Synchronize information between your device and computer via Bluetooth Use a Bluetooth enabled headset or other Bluetooth enabled hands free device such as a car kit with your device for hands free phone...

Page 146: ...ce again Bluetooth automatically turns on To turn Bluetooth on and make your device visible 1 On your device tap Start Settings Connections tab Bluetooth 2 Select the Turn on Bluetooth and Make this device visible to other devices check boxes 3 Tap OK Bluetooth partnerships A Bluetooth partnership is a relationship that you create between your device and another Bluetooth enabled device in order t...

Page 147: ...9 Select the check boxes of services that you want to use from the paired device 10 Tap Finish To accept a Bluetooth partnership 1 Ensure that Bluetooth is turned on and in visible mode 2 Tap Yes when prompted to establish a partnership with the other device 3 Enter a passcode the same passcode that is entered on the device requesting the partnership to establish a secure connection The passcode m...

Page 148: ...en connecting to a Bluetooth hands free or stereo headset The passcode is fixed and cannot be changed on a Bluetooth headset Before you connect it to your device check for the proper passcode in the manufacturer s documentation To connect a Bluetooth hands free or stereo headset 1 Make sure that both your device and the Bluetooth headset are turned on and within close range and that the headset is...

Page 149: ...ice to your computer or to another Bluetooth enabled device Note If your computer does not have built in Bluetooth capability you need to connect and use a Bluetooth adapter or dongle on your computer To beam information from your device to a computer 1 Turn on Bluetooth on your device and make your device visible For information about this see To turn Bluetooth on and make your device visible 2 Y...

Page 150: ...luetooth partnerships After a partnership has been created successfully your computer is ready to receive Bluetooth beams 4 On your device tap and hold an item to beam The item can be an appointment in your calendar a task a contact card or a file 5 To beam a contact tap Menu Send Contact Beam To beam other types of information tap Menu Beam type of item 6 Tap the device name to which you want to s...

Page 151: ...ther Bluetooth enabled devices will also be able to access your Bluetooth shared folder To enable Bluetooth Explorer and Bluetooth file sharing on your device 1 Tap Start Settings Connections tab Bluetooth FTP tab 2 Select the Enable Bluetooth Explorer check box This makes the Bluetooth device folder visible in the File Explorer 3 Select the Enable File Sharing check box You can use the default Bl...

Page 152: ...omputer does not have built in Bluetooth capability you need to connect and use a Bluetooth adapter or dongle on your computer For the computer to use the Internet connection of your device activate Internet Sharing on your device then set up a Bluetooth Personal Area Network PAN between the computer and your device 1 On your device turn on Bluetooth and set it to visible mode 2 Initiate a Bluetoo...

Page 153: ...n change the display name for the computer then tap Finish 3 Now open the Internet Sharing program on your device Tap Start Programs Internet Sharing 4 Select Bluetooth PAN as the PC Connection 5 From the Network Connection list select the name of the connection that your device uses to connect to the Internet 6 Tap Connect 7 On your computer set up a Bluetooth Personal Area Network PAN with your ...

Page 154: ...o are within close range Note Normally you will need another phone as a modem only if your Pocket PC device has no integrated phone capability To use a Bluetooth phone as a modem for your device 1 On your device tap Start Settings Connections tab Connections 2 Tap Add a new modem connection 3 Enter a name for the connection 4 In the Select a modem list tap Bluetooth 5 Tap Next 6 If the phone appea...

Page 155: ...set up with a data connection yet tap Menu Connection Settings on the Internet Sharing screen For more information about setting up a GPRS or dial up connection see Connecting to the Internet If you want to use a USB cable connection you must first install Microsoft ActiveSync version 4 5 or later on the computer Before using Internet Sharing disable ActiveSync on your computer To set up your devi...

Page 156: ...156 Getting Connected ...

Page 157: ...Chapter 10 Using GPS 10 1 Guidelines and Preparation for Using GPS 10 2 Downloading Satellite Data via QuickGPS 10 3 Using GPS Software 10 4 GPS Controls ...

Page 158: ...hicle please utilize the car holder to mount the Pocket PC securely in place Please avoid the areas shown in the following diagram 1 Do not place where it will block the driver s vision 2 Do not place at where the air bags are 3 Do not place anywhere in the vehicle without securing in the holder 4 Do not place where the air bags could deploy The GPS signal cannot pass through solid non transparent...

Page 159: ...l resulting in unstable signal reception Please do not leave your Pocket PC in the vehicle and expose to direct sunlight to avoid overheating the battery that could pose damage to the device or risk to the vehicle 10 2 Downloading Satellite Data via QuickGPS Before you start to use your device for GPS navigation open the QuickGPS program first to download Ephemeris data current satellite position ...

Page 160: ...validity of the data expires Download options To configure download times tap Menu Options and choose from the following options Remind me when data expires Enables your device to display a reminder message when the validity of the Ephemeris data has expired When you see the reminder message tap Menu to dismiss the reminder or to set the snooze time so that you will be reminded again Tap OK to ope...

Page 161: ...ervers QuickGPS is preconfigured to connect to these servers 10 3 Using GPS Software Your device is preinstalled with the GPS software To open the GPS software Tap Start Programs then tap its program icon or For information about using the GPS software see Help on your device 10 4 GPS Controls When a map or menu is shown on the GPS software use the following controls on your device to navigate On ...

Page 162: ...162 Using GPS ...

Page 163: ...Chapter 11 Using Windows Live 11 1 Windows Live Mobile 11 2 Live Messenger 11 3 Sending Photos to Your Windows Live Space ...

Page 164: ... Live Contacts your address book for storing Live Mail Live Messaging and Hotmail contacts Set up Windows Live Mobile The first time you use Windows Live Mobile sign in by using your Windows Live ID which is your Windows Live Mail or Hotmail address and password To set up Windows Live Mobile for the first time 1 Tap Start Programs Windows Live 2 Tap Sign in to Windows Live 3 On the next screen tap...

Page 165: ...r Hotmail inbox messages will be downloaded to your device 7 Tap Next 8 After synchronization is complete tap Done The Windows Live Mobile interface On the main interface of Windows Live Mobile you will see a search bar navigation bar and an area where you can customize to show your picture 1 This is the Live Search Bar 2 Tap the Left or Right arrow to switch between Windows Live Messenger and Syn...

Page 166: ...ow or hide them open Windows Live and tap Menu Options Today screen options Live Search Bar Use the Live Search Bar to easily find information on the Internet It is integrated in the Windows Live Mobile interface To find information on the Internet 1 Enter your keywords in the search bar 2 Tap or Search The default Web browser then launches and displays links to related Web sites The links are org...

Page 167: ... link to go to the Web site where the information that you want is located To search for a location After entering your keywords in the search bar do the following 1 On the Internet Explorer Mobile screen tap Choose a location under the Local category 2 In the Near box enter the zip or postal code city or state where the place you re looking for is located You may also enter a specific street name ...

Page 168: ...cted to the Internet For information about setting up an Internet connection see Connecting to the Internet in Chapter 9 You also need to have a data plan from your wireless service provider to use Live Messenger Launch the messenger and sign in To open Live Messenger Do one of the following Tap Start Programs Messenger On Windows Live or the Today screen tap the Left or Right arrow until you see ...

Page 169: ...ssary if you will communicate with the contact only through Windows Live Messenger or Live Mail 4 Tap OK 5 Follow the remaining instructions to add the new contact to your Windows Live contact list To delete a contact 1 In the messenger select the contact and tap Menu Contact options Remove contact 2 Choose whether to block the contact 3 Choose whether to also delete the contact from your device s...

Page 170: ...the display picture of the contact whom you want to talk to Pictures of contacts whom you re talking to 5 To end a conversation with the current contact tap Menu End conversation 6 To end all active conversations tap Menu End all conversations To send an instant message with emoticon 1 Select a contact and start a conversation 2 Enter your text message in the text entry area of the message screen ...

Page 171: ...ether or not you re available Tap Menu Change appearance to change your display name add a personal message and add your picture Tap Menu Sort by to organize contacts by online status groups name or e mail address You can also hide offline contacts from the contact list Tap Options to see more settings 11 3 Sending Photos to Your Windows Live Space If you created your own Live Space you can send pic...

Page 172: ...d To go to your Live Space on your device 1 Tap Start Internet Explorer 2 In the address bar enter http spaces live com then tap 3 On Mobile Live Space s Web page tap Sign in 4 On the next Web page scroll down to the bottom of the page then tap Your space Wait for your Live Space to be loaded in Internet Explorer You will see the uploaded picture under Mobile photos Uploaded picture ...

Page 173: ...omputer 1 Open Internet Explorer on your PC 2 On the address bar enter http spaces live com then press ENTER 3 In the Windows Live Spaces Web site click Go to your space 4 Move the mouse pointer over to your Windows Live ID then click Sign In Uploaded picture ...

Page 174: ...174 Using Windows Live ...

Page 175: ...Chapter 12 Experiencing Multimedia 12 1 Using Camera 12 2 Using Pictures Videos 12 3 Using Windows Media Player Mobile 12 4 Using Streaming Media ...

Page 176: ...ograms Pictures Videos Camera icon or To exit the Camera Tap the Exit icon Capture modes The camera on your device allows you to capture pictures and video clips by using various built in modes with flexibility The Camera mode is set to the Photo capture mode by default The upper left corner of the screen displays the active capture mode To switch to other capture modes do any of the following Tap...

Page 177: ...res a sequence of still images 3 5 7 or 10 automatically Burst Captures a sequence of still images maximum 30 as long as the CAMERA button on the device or the CENTER OK button on the NAVIGATION CONTROL is kept pressed File formats supported Using the above capture modes the camera in your device captures files in the following formats Capture type Format Still image JPEG Video MPEG 4 mp4 MMS Vide...

Page 178: ... button shortly then move your device to follow the movement of your subject Press and hold the CAMERA button or the CENTER OK button when taking consecutive shots in Burst mode Press the CAMERA button halfway to activate autofocus Once focused the indicator changes to and you will hear two beeping sounds Press the CAMERA button all the way to take the shot The Navigation Control Press NAVIGATION ...

Page 179: ... the device memory on the memory card on the SIM card MegaSIM card only or on the Microdrive 5 Remaining information indicator In Photo Contacts Picture Picture Theme Panorama Sports and Burst modes this shows the remaining available shots of pictures based on current settings In Video and MMS Video modes this shows the remaining duration that can be recorded While recording video this shows the r...

Page 180: ... still image after the assigned time 2 seconds or 10 seconds 14 Autofocus indicator Shows when autofocus is activated When in Panorama or Picture Theme mode autofocus will be used for each shot When in Sports or Burst mode only the first shot will use autofocus 15 Recording indicator This shows a red blinking indicator while video recording is in progress 16 Progress indicator In Picture Theme Pano...

Page 181: ...ing in terms of time or file size on the Camera Settings screen Video clips will be saved in MPEG 4 format MMS Video capture mode The MMS Video capture mode makes it convenient for you to capture a video file and then send it via MMS Press the CENTER OK button or the CAMERA button to start recording a video clip with audio if desired To stop recording press the CENTER OK button or the CAMERA butto...

Page 182: ...ia e mail or MMS and more Review screen icons Sports and Burst modes 6 Photo Video MMS Video Panorama and Picture Theme modes Contacts Picture mode 5 1 2 3 4 1 Back Tap to go back to Camera screen 2 Delete Tap to remove the captured image or video 3 Send Tap to send via e mail or MMS 4 View Tap to view the image in the Pictures Videos program or play the captured video in Windows Media Player Mobi...

Page 183: ...ve closer and you can zoom out to make the object move farther away In all capture modes press NAVIGATION up on your device or tap the triangular Up arrow above the Zoom Ratio indicator to zoom in your subject When the zooming limit is reached you will hear a beep To zoom out press NAVIGATION down or tap the Down arrow The camera zoom range for a picture or a video clip depends on the capture mode...

Page 184: ...arge 640 x 480 1 0x to 4 0x Medium 320 x 240 1 0x to 8 0x Small 160 x 120 1 0x to 8 0x Sports Large 640 x 480 1 0x to 2 0x Medium 320 x 240 1 0x to 8 0x Burst 1M 1280 x 1024 No zooming available Large 640 x 480 1 0x to 2 0x Medium 320 x 240 1 0x to 8 0x Note The capture sizes available for certain capture formats also vary from one capture mode to another The zoom range has been calculated based o...

Page 185: ...igate the Camera Settings screen You can either tap on screen or press the Navigation Control buttons to navigate the Camera Settings screen 1 2 1 Tap an icon to display the desired menu Alternatively when using the Navigation Control press NAVIGATION down first The background of the icon bar at the bottom then changes color Now press NAVIGATION left right or tap the left right arrow to navigate t...

Page 186: ...conds or 10 seconds delays the capturing by the specified time after you press the CAMERA button or the CENTER OK button Template menu Template Select a template in Picture Theme mode only Panorama Settings menu Direction Choose in what direction images will be stitched in a panorama Stitch Count Select the desired number of snapshots to be taken and stitched into a panorama Auto Stitch When the Au...

Page 187: ...nu Resolution Select the desired image or video size Quality Select the JPEG image quality level for all captured still images You can choose from Basic Normal Fine and Super Fine Storage Select where you want to save your files You can either save the files to the main memory or to a storage card Metering Mode Select a metering mode to allow the camera to measure the amount of light in the center...

Page 188: ... Select the desired file format Shutter Sound Choose whether or not you want the camera to make a shutter sound when you press the CENTER OK button or the CAMERA button to take photos or record video clips Grid Choose whether or not to show a grid on the Camera screen Showing a grid helps you frame and center your subject more easily and accurately Grid Keep Backlight Choose whether to turn the ba...

Page 189: ...a video clip it will have no audio Prefix Specify how to name captured images and video clips When Default is selected the file name of each new captured file is set to IMAGE or VIDEO followed by a sequential number for example IMAGE_001 jpg You may also choose to name files using either the current Date or Date Time as the prefix Counter By default the newly captured image or video files are name...

Page 190: ...ir default 5 Tap to close the submenu without applying and saving the changes 12 2 Using Pictures Videos The Pictures Videos program collects organizes and sorts images and video clips in the following formats on your device File Type File Extensions Image bmp jpg gif GIF animation gif Video avi wmv mp4 3gp You can view the pictures as a slide show beam them send them via e mail edit them or set t...

Page 191: ...y the files from your PC to the folder you created on the memory card To view pictures 1 Tap Start Programs Pictures Videos The images in the My Pictures folder appear as thumbnails by default 2 Select a picture and tap View If you cannot find a picture in the default My Pictures folder go to another folder by tapping the Down arrow To play GIF animation files 1 Tap Start Programs Pictures Videos ...

Page 192: ...tures Videos 2 Tap Menu Play Slide Show Note You can specify how pictures are scaled to optimize their display in a slide show Tap Menu Options then tap Portrait pictures or Landscape pictures on the Slide Show tab Tap anywhere on the screen to display the Slide Show toolbar which you can use to stop or pause the slide show rotate the view and more To sort pictures and video clips If you store a l...

Page 193: ...cture 90 degrees clockwise tap Rotate To crop a picture tap Menu Crop Next tap and drag to select the area to crop Tap inside the box to crop or tap outside the box to cancel cropping To adjust the brightness and contrast levels of a picture tap Menu Auto Correct Note To undo an edit tap Menu Undo To cancel all unsaved edits you made to the picture tap Revert to Saved To set a picture as the Today...

Page 194: ...y before they are sent To assign pictures to contacts You can assign a picture to a contact so that you can easily identify the contact at any point of time 1 Tap Start Programs Pictures Videos 2 Select the picture you want to assign to a contact 3 Tap Menu Save to Contact 4 Tap the contact or navigate and tap Select to choose the contact from your Contacts list To customize more image settings 1 ...

Page 195: ...dows Media Player Mobile you can play both audio and video files These are the following file formats that are supported by this version of Windows Media Player Mobile Video File Formats Supported File Extensions Windows Media Video MPEG4 Simple Profile H 263 Motion JPEG 3GPP2 wmv asf mp4 3gp avi 3g2 Audio File Formats Supported File Extensions Windows Media Audio MP3 MIDI AMR Narrow Band AMR Wide...

Page 196: ...his 1 Plays Pauses a file 2 Displays the video in full screen 3 Displays a Web site where you can find music and videos to play 4 Adjusts the playback progress of a selected file 5 Skips to the beginning of the current file or to the previous file 6 Skips to the next file 7 Decreases the volume level 8 Increases the volume level 9 Turns the sound on or off ...

Page 197: ...p on your device About licenses and protected files Some content such as digital media files downloaded from the Internet CD tracks and videos have associated licenses that protect them from being unlawfully distributed or shared Licenses are created and managed by using digital rights management DRM which is the technology for securing content and managing its access rights Some licenses may prev...

Page 198: ... your PC start Windows Media Player 3 Connect your device to your PC 4 If you have not set up synchronization between your device and PC the Device Setup Wizard opens on your PC 5 In the wizard click Automatic select the Customize the playlists that will be synchronized check box and then select the playlists that you want to synchronize 6 Click Finish 7 The files begin synchronizing to your device...

Page 199: ...layer is configured to automatically set the quality level for audio files copied to your device For more information see desktop Player Help on the PC Play media To play items on your device Use the library on Windows Media Player Mobile to find and play songs videos and playlists that are stored on your device or removable storage card 1 If you are not on the Library screen tap Menu Library 2 On...

Page 200: ...he Open URL command to play a song or video that is stored on the Internet or on a network server 1 If you are not on the Library screen tap Menu Library 2 Tap Menu Open URL 3 Do one of the following In the URL box enter a network address In the History box tap a URL that you have previously used Note To play an item on a network you must be connected to a network For more information about creati...

Page 201: ...hen tap Menu Queue Up This adds the file to the Now Playing list Repeat this step until you have added all desired media files to the Now Playing list Note You cannot select multiple files simultaneously 4 After adding the media files tap Menu Now Playing 5 On the Now Playing screen tap Menu Save Playlist 6 Enter the playlist name then tap Done 7 To play back the playlist you created tap My Playlists...

Page 202: ...until the entire media content is completely downloaded before watching the video or hearing the sound The media is sent in a continuous stream to your device and is played as it arrives along with the audio Button control Function 1 Play Pause 2 Jog Bar for scrubbing video 3 Zoom out 4 Zoom in 5 Stop 6 Mute 7 Decrease volume 8 Increase volume 9 Current volume level 3 4 5 6 7 8 1 2 9 ...

Page 203: ... the desired 3gp mp4 or sdp file 3 On the Web page tap the RTSP link 4 Streaming Media then automatically opens and starts playing the file During playback use the button controls to play pause zoom in or out adjust the sound volume and more To stream media files directly on the Streaming Media Streaming Media only supports RTSP links when you stream 3gp and mp4 files directly on the program Note Be...

Page 204: ...ies from the program To configure streaming video connection settings Tap Menu Options to configure the following settings Connect via Choose whether you want to connect to the Internet or corporate network intranet to locate a streaming video clip UDP port range Specify a range of port numbers to use for streaming Media buffer Specify the memory space in terms of duration to allot for storing vid...

Page 205: ...r 13 Using Other Applications 13 1 Word Mobile 13 2 Excel Mobile 13 3 Viewing Slide Shows with PowerPoint Mobile 13 4 Using Adobe Reader LE 13 5 Using MIDlet Manager 13 6 Using ZIP 13 7 Using Voice Speed Dial ...

Page 206: ...ate 2 Enter text as desired 3 Tap Menu then choose whether to set the font paragraph alignment and indentation insert the date do a spelling check and more 4 When finished tap OK to save and close the file When you close a newly created document it is automatically named after the first several words in the document and placed in the Word Mobile document list You can easily rename the document with ...

Page 207: ... read the worksheet Note Excel Mobile does not fully support some features such as formulas and cell comments Some data and formatting may be lost when you save the workbook on your device To see a complete list of features that are not supported in Word Excel see Help on your device 13 3 Viewing Slide Shows with PowerPoint Mobile With PowerPoint Mobile you can open and view slide show presentatio...

Page 208: ...automatically Notes If you have zoomed in to see a slide in more detail you cannot navigate to another slide until you zoom out Tapping Next or Previous may play an animation on a slide rather than navigate to another slide To stop a slide show In a PowerPoint Mobile presentation tap End Show 13 4 Using Adobe Reader LE Adobe Reader LE allows you to open and view Portable Document Format PDF files ...

Page 209: ... through pages and jump to a desired page number Tap Tools Go To and select an option to go to a specific page in a multi page PDF file To enlarge or reduce the display size 1 Open a PDF file you want to view 2 Tap Tools Zoom 3 Select In or Out to enlarge or reduce the display size Otherwise select Fit Screen or Fit Width 4 Select To to set an arbitrary zoom ratio To change page view and orientatio...

Page 210: ...password protected PDF file you will be prompted to enter the password before the file can be opened To use the toolbar You can also use the Adobe Reader LE toolbar to access the most commonly used functions The following table lists the toolbar controls This Control Does This Fits the entire page to the screen Fits the page width to the screen Displays the first page Displays the previous page Di...

Page 211: ...ll the MIDlets MIDlet suites on your device from a PC using the USB sync cable or Bluetooth MIDlets copied to your device are automatically saved in the My Documents folder However you can copy the MIDlet file s from a PC to any of the following temporary folders on your device from where MIDlet Manager can install them Device memory My Device My Documents My MIDlets Storage card Microdrive My Dev...

Page 212: ...Stop All Manage MIDlets MIDlet suites You can organize the MIDlets into groups and define custom groups You can also change the default settings for a MIDlet To associate a MIDlet MIDlet suite to a group If you installed several MIDlets MIDlet suites to your device you can categorize them into groups 1 Tap and hold on a MIDlet MIDlet suite then tap Group 2 Choose a preset group or tap New if you w...

Page 213: ...nstall only the complete MIDlet suite To check storage space Tap Menu System Info on the MIDlet Manager screen to see how much device storage space is used by MIDlets To select a type of connection Tap Menu Choose Network Type on the MIDlet Manager screen and select the type of connection that you will use for downloading MIDlets to your device To configure MIDlet security You can adjust security ...

Page 214: ...see Help on your device 13 6 Using ZIP This feature allows you to save memory and increase the storage capacity of your device by compressing files in the conventional ZIP format You can view and extract archive files received from various sources You can also create new zip files on your device Start ZIP and Open zip files You can use ZIP to either archive files or open an existing archive file o...

Page 215: ...the Save As screen enter a zip file name and choose a folder in which to save the zip file You can also choose whether the zip file will be saved on the device s main memory or a storage card 3 Tap Save 4 Tap Menu Action Add 5 Double tap the folder that contains the files you want to archive 6 Select files by doing one of the following Tap to select a file To select several files tap and hold on the sc...

Page 216: ... tap Menu Add Voice Tag Tap the desired contact to open the contact s detailed screen then tap Menu Add Voice Tag 3 Select the phone number that you want to create a voice tag then tap the Record button Select the desired phone number Tap the Record button to start recording 4 When completed a Voice Tag icon will be displayed on the right of the item 5 When you create a voice tag for the item you ...

Page 217: ...grams using voice tags 1 Tap Start Programs Voice Speed Dial 2 After a beep sound say the recorded voice tag that you have assigned to the phone number you want to call or the program you want to launch The system will repeat the voice tag and then dial out or launch the program automatically Note If the system cannot recognize your voice try again Reduce the surrounding noises and speak more clea...

Page 218: ...218 Using Other Applications ...

Page 219: ...14 Managing Your PDA Phone 14 1 Adding and Removing Programs 14 2 Copying Files 14 3 Managing Memory 14 4 Backing Up Data 14 5 Resetting Your PDA Phone 14 6 Checking System Information 14 7 Battery Saving Tips ...

Page 220: ...at contains the program into your PC You may see a single exe file a zip file a Setup exe file or several versions of files for different device types and processors Be sure to select a program designed for your device and processor type 2 Read any installation instructions or documentation that comes with the program Many programs provide special installation instructions 3 Connect your device to the ...

Page 221: ...ove information from the PC to your device and vice versa Copying a file results in separate versions of a file on your device and PC Because the files are not synchronized changes made to one file will not affect the other Note If you want to automatically update information on both your device and PC synchronize the information instead For more information about copying and synchronizing files s...

Page 222: ...gate to the folder that contains the file you want to copy b Right click the file then click Copy c Right click the destination folder under Mobile Device then click Paste To automatically save files on a storage card or Microdrive In the Word Mobile or Notes programs you may find it helpful to save all new documents notes and workbooks directly on a storage card 1 From the program file list tap Me...

Page 223: ...rd tab 3 Tap the list box and then select the storage media whose information you want to see Try the following to free memory on your device Close programs you are not currently using Move e mail attachments to a storage card Move files to a storage card Tap Start Programs File Explorer Tap and hold the file and tap Cut Browse to the storage card folder and tap Menu Edit Paste Delete unnecessary fil...

Page 224: ... in Chapter 4 14 4 Backing Up Data Use Sprite Backup to back up data which includes settings files contacts and all other information to a storage card or to a designated folder on your device This section describes the basics on how to install Sprite Backup and use it to back up and restore data on your device For more information about this program see Help on your device To install Sprite Backu...

Page 225: ... to easily back up your entire Pocket PC with the tap of a button Note To change backup options or location you will need to do it in Advanced mode To back up data in Basic mode 1 On the Basic mode screen tap Backup Now 2 Specify a password between 6 to 15 characters in length for the backup file Enter this password twice then tap OK 3 Follow the on screen instructions to complete the backup To res...

Page 226: ... there is a most recent backup file this file will be displayed with its contents Otherwise if you want to use an older backup file tap then select the desired file If the backup file is password protected the password must be entered before the backup file can be displayed in the tree view 3 In the tree view select the check boxes of items you want to be restored 4 Tap the Restore button and follow the...

Page 227: ...Resetting Your PDA Phone Occasionally you may need to reset your device A normal or soft reset of your device clears all active program memory and shuts down all active programs This can be useful when your device is running slower than normal or a program is not performing properly A soft reset is also necessary after the installation of some programs If a soft reset is performed when programs ar...

Page 228: ...se ensure any additional installed programs and or user data have been backed up before a hard reset is performed 1 Slide the Volume slider down and at the same time use the stylus to press the RESET button at the back of your device Volume Slider RESET button 2 After a brief period of time two choices will appear on screen Press the CENTER OK button to perform the hard reset Note If you do not wa...

Page 229: ... Battery Saving Tips How long your battery power lasts depends on battery type and how you use your device Try the following to help preserve battery life To find the operating system version number When the device is not in use press POWER to switch off the display Tap the battery icon on the Today screen On the Advanced tab of the Power settings screen you can specify when your device automatical...

Page 230: ... receive incoming beams setting only while you are trying to receive beamed files To find this setting tap Start Settings Connections Beam Lower the volume Close battery intensive programs such as the Camera when you are done using them Make sure the programs are ended and are not continuously running in the background For more information about ending running programs see To close a program in this...

Page 231: ...Appendix A 1 Regulatory Notices A 2 PC Requirement to Run ActiveSync 4 x A 3 Specifications ...

Page 232: ...Norms in parentheses are the equivalent international standards EN 60950 1 IEC 60950 1 Safety of InformationTechnology Equipment ETSI EN 301 511 Global system for mobile communications GSM Harmonized EN for mobile stations in the GSM 900 and GSM 1800 bands covering essential requirements of article 3 2 of the R TTE directive 1995 5 EC ETSI EN 301 489 1 Electromagnetic compatibility and Radio spect...

Page 233: ...the 2 4 GHz ISM band and using spread spectrum modulation techniques EN 50360 2001 Product standard to demonstrate the compliance of mobile phones with the basic restrictions related to human exposure to electromagnetic fields 300 MHz 3 GHz EN 50392 2002 Generic standard to demonstrate the compliance of low power electronic and electrical apparatus with the basic restrictions related to human expo...

Page 234: ... harmful interference in a residential installation This equipment generates uses and can radiate radio frequency energy and if not installed and used in accordance with the instructions may cause harmful interference to radio communications However there is no guarantee that interference will not occur in a particular installation If this equipment does cause harmful interference to radio or TV r...

Page 235: ...closer you are to a wireless base station antenna the lower the power output Before a phone model is available for sale to the public it must be tested and certified to the FCC that it does not exceed the limit established by the government adopted requirement for safe exposure The tests are performed in positions and locations for example at the ear and worn on the body as required by the FCC for...

Page 236: ... immediately Hearing Aids Some digital wireless phones may interfere with some hearing aids In the event of such interference you may want to consult your service provider or call the customer service line to discuss alternatives Other Medical Devices If you use any other personal medical device consult the manufacturer of your device to determine if they are adequately shielded from external RF e...

Page 237: ...to the specified collection point for recycling of such hazardous waste Isolated collection and proper recovery of your electronic and electrical waste equipment at the time of disposal will allow us to help conserving natural resources Moreover proper recycling of the electronic and electrical waste equipment will ensure safety of human health and environment For more information about electronic...

Page 238: ...Microsoft Windows Server 2003 x64 Edition Service Pack 1 Microsoft Windows XP Professional Service Packs 1 and 2 Microsoft Windows XP Home Service Packs 1 and 2 Microsoft Windows XP Tablet PC Edition 2005 Microsoft Windows XP Media Center Edition 2005 Microsoft Windows XP Professional x64 Edition Microsoft Outlook 98 Microsoft Outlook 2000 and Microsoft Outlook XP and Microsoft Outlook 2003 messag...

Page 239: ...ional Power Battery Rechargeable Lithium ion polymer battery 2100 mAh Charging Time Up to 4 hours Battery Life estimates Standby time Up to 300 hours for GSM Up to 300 hours for UMTS Talk time Screen off Up to 5 5 hours for GSM Up to 4 5 hours for UMTS Video call Up to 2 hours AC Adapter Voltage range Frequency 100 240V AC 50 60 Hz DC output 5V and 1A Display LCD Type 5 transmissive TFT LCD with b...

Page 240: ...h light Resolution Photo 2048 x 1536 QXGA 1600 x1200 UXGA 1280 x1024 SXGA 640 x 480 VGA 320 x 240 QVGA 160 x120 QQVGA Video 352 x 288 CIF 320 x 240 QVGA 176 x144 QCIF 128 x 96 Digital Zoom Up to 8x Connections I O Port HTC ExtUSBTM an 11 pin mini USB 2 0 and audio jack in one ExtUSB is a proprietary connection interface that is trademarked by HTC HTC proprietary16 pin combined port USB 1 1 host VG...

Page 241: ...or amber Notification LED 3 shows the following A blinking Blue light for Bluetooth system notification of powered up and ready to transmit radio frequency signal A blinking Green light for Wi Fi status When both Bluetooth and Wi Fi are enabled their lights blink alternately Notification LED 4 shows messages and notifications Please see Getting to Know Your Device and Accessories in Chapter 1 to k...

Page 242: ...242 Appendix ...

Page 243: ...Index ...

Page 244: ...h Bluetooth Explorer 32 151 Bluetooth file sharing 151 Bluetooth modem 154 Bluetooth shared folder 151 hands free headset 148 modes 146 overview 145 partnership pairing 146 SIM Access Profile SAP 59 stereo headset 148 turn on and off 134 visible 146 Bluetooth Explorer 32 Burst capture mode 177 Button controls and LEDs 241 Button settings 69 C Calculator 33 Calendar 87 create appointments 87 send appo...

Page 245: ...129 130 Digital Rights Management DRM 197 Digital signature verify 129 Dimensions and weight 240 Direct Push 121 134 Disconnect data services 134 Display settings 68 Draw 93 E E mail 109 add an attachment to an e mail message 109 compose and send an e mail message 109 customize e mail settings 112 download e mail messages 112 E mail Setup Wizard 106 security 128 types of e mail accounts 106 Edit p...

Page 246: ...all from Call History 52 from Contacts 52 from Phone program 51 from SIM Manager 53 from Speed Dial 53 Memory 223 239 Messaging MMS 100 overview 32 MIDlet Manager configure MIDlet security 213 install MIDlets from Internet 211 install MIDlets from PC 211 manage MIDlets MIDlet suites 212 overview 33 211 uninstall MIDlets MIDlet suites 213 MMS 100 add audio clip 105 add emoticon 104 add text 104 add ...

Page 247: ...IF animation 191 play videos 191 sort 192 view pictures 191 view slideshows 192 Picture Theme capture mode 177 PIN 50 Playback screen Windows Media Player Mobile 197 Playlists 200 Play GIF animation 191 Play media 199 Play videos 191 PowerPoint Mobile 207 Programs ActiveSync 32 Adobe Reader 32 Bluetooth Explorer 32 Calculator 33 Calendar 32 87 Camera 33 176 Comm Manager 37 134 Contacts 32 82 Excel...

Page 248: ...to PC 37 Wi Fi 37 Wireless LAN 37 Settings Personal tab Buttons 34 Input 34 Lock 34 Menus 34 Owner Information 34 Phone 34 Sounds Notifications 35 Today 35 Voice Speed Dial 35 Settings System tab About 35 Backlight 35 Certificates 35 Clear Storage 35 Clock Alarms 35 Customer Feedbcak 35 Device Information 35 Encryption 35 Error Reporting 35 GPS 35 Key Lock 36 Memory 36 Microphone AGC 36 Power 36 Reg...

Page 249: ...mation 239 T Tasks 34 90 Task Manager 36 69 Temporary Internet files Internet Explorer delete 143 Text Messages 99 receive text messages 99 send text messages 99 Text size screen 69 Web pages 142 Today Screen 27 Transcriber 44 Troubleshoot Windows Media Player Mobile 201 Turn device on and off 25 Turn phone function on and off 50 134 TV Out 36 71 TV Out setting 71 U USB modem 155 USIM card 23 V Ve...

Page 250: ...4 Windows Live Mobile 164 Windows Media Player Mobile file formats 195 menus 197 overview 34 playlists 200 troubleshoot 201 Word completion options 70 Word Mobile 206 Z ZIP create archive 215 open zip file and extract files 214 overview 34 214 Zoom Camera 183 ...

Reviews: