34
MD1343A
CYLINDER/CYLINDER HEAD
ASSEMBLY
NOTE: If the cylinder/cylinder head assembly can-
not be trued, they must be replaced.
Cleaning/Inspecting Cylinder Head
1. Using a non-metallic carbon removal tool, remove
any carbon buildup from the combustion chamber
being careful not to nick, scrape, or damage the com-
bustion chamber or the sealing surface.
2. Inspect the spark plug hole for any damaged threads.
Repair damaged threads using a “heli-coil” insert.
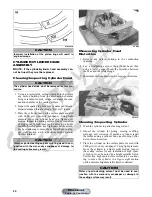
3. Place the cylinder head on the surface plate covered
with #400 grit wet-or-dry sandpaper. Using light
pressure, move the cylinder head in a figure eight
motion. Inspect the sealing surface for any indication
of high spots. A high spot can be noted by a bright
metallic finish. Correct any high spots before assem-
bly by continuing to move the cylinder head in a fig-
ure eight motion until a uniform bright metallic
finish is attained.
CC996
Measuring Cylinder Head
Distortion
1. Remove any carbon buildup in the combustion
chamber.
2. Lay a straightedge across the cylinder head; then
using a feeler gauge, check the distortion between
the head and the straightedge.
3. Maximum distortion must not exceed specifications.
CC141D
Cleaning/Inspecting Cylinder
1. Wash the cylinder in parts-cleaning solvent.
2. Inspect the cylinder for pitting, scoring, scuffing,
warpage, and corrosion. If marks are found, repair
the surface using a cylinder hone (see Honing Cylin-
der in this sub-section).
3. Place the cylinder on the surface plate covered with
#400 grit wet-or-dry sandpaper. Using light pressure,
move the cylinder in a figure eight motion. Inspect
the sealing surface for any indication of high spots.
A high spot can be noted by a bright metallic finish.
Correct any high spots before assembly by continu-
ing to move the cylinder in a figure eight motion
until a uniform bright metallic finish is attained.
CAUTION
Incorrect installation of the piston rings will result in
engine damage.
CAUTION
The cylinder head studs must be removed for this pro-
cedure.
CAUTION
Water or parts-cleaning solvent must be used in con-
junction with the wet-or-dry sandpaper or damage to
the sealing surface may result.
CAUTION
Water or parts-cleaning solvent must be used in con-
junction with the wet-or-dry sandpaper or damage to
the sealing surface may result.
Manual
Table of Contents


