DIV
ISION
II -
OPER
A
T
ION
/
MAINTENANC
E
59
8. Gear Position Indicator - Indicates
which gear is currently selected - R
(reverse)/N (neutral)/L (low range)/
H (high range).
9. High Beam Indicator - The High
Beam icon will appear only when
the headlights are on high beam.
10. 4WD Lock Indicator - Displays
LOCK when the front differential
lock has been engaged. Not utilized
on this model.
11. Drive Select Indicator - Displays
4WD when selected by the drive
select switch or when the 4WD lock
is engaged. The display is blank
when in 2WD.
12. Speedometer/Tachometer - Indicates
the approximate vehicle speed in miles
per hour (MPH), kilometers per hour
(KPH), or RPM.
Condition Warning Display - Uses odom-
eter/trip meter display of the LCD to
warn of a system error condition requir-
ing attention.
A. Volt - The LCD will go blank
except the word VOLT will
flash on the LCD whenever a
low voltage (<9 DC volts) or a
high voltage (>16 DC volts) is
detected. When voltage returns
to normal, the gauge must be
reset by turning the ignition key
to the OFF position and then to
the ON position.
B. EFI - The LCD will go blank
except a diagnostic trouble code
(DTC) code will flash on the
LCD and a wrench icon will be
displayed whenever an elec-
tronic fuel injection malfunction
is detected. After 30 seconds,
the LCD will return to normal;
however, the DTC and wrench
icon will continue to be dis-
played until the malfunction is
corrected.
NOTE: Take the ATV to an autho-
rized Arctic Cat ATV dealer to have
the EFI error corrected and to have
the ECM reset as soon as possible.
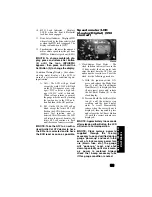
Speedometer/LCD
(Digital) (700/1000
Limited)
EFI-013A
1. Clock/Engine Hour Meter - The clock
function indicates time in the 12-hour
mode; the hour meter indicates the
total time the ATV has run and cannot
be reset to zero. To set the clock, use
the following procedure.
A. With the ignition switch ON,
press and release the Set Button
(4) until the Clock (1) is dis-
played; then press and hold the
Set Button (4) to activate the set
mode (clock display flashing).
B. Press and release the Set Button
(4) to set minutes or the Mode
Button (3) to set hours. Holding
the respective button down will
scroll the display.
NOTE: Clock memory power is
supplied through the 15-amp
accessory fuse and verified during
gauge “power-up” and reset. In the
event of clock memory power fail-
ure (blown fuse, etc.), the gauge
will “power-up,” reset, and shut
down repeatedly until clock mem-
ory power is restored. Always
check the 15-amp accessory fuse
if this gauge condition is noted.
NOTE: The engine hour meter
will not activate until engine speed
exceeds 500 RPM.


