19
The recommended gasoline to use is 87 octane regular
unleaded. In many areas, oxygenates are added to the
gasoline. Oxygenated gasolines containing up to 10%
ethanol are acceptable gasolines.
When using ethanol blended gasoline, it is not neces-
sary to add a gasoline antifreeze since ethanol will pre-
vent the accumulation of moisture in the fuel system.
NOTE: For optimum performance, do not exceed the
recommended 87 octane gasoline. Using a higher
octane gasoline will not increase overall performance.
PREOPERATION CHECKS
1. Visually check all fluid levels. Add fluids as nec-
essary.
2. Visually check the entire snowmobile for any
loose fasteners. Tighten as required.
3. Start and run the engine to operating temperature.
4. Check all switches (tether, dimmer, brakelight,
emergency stop) to make sure all function prop-
erly; then visually check the headlight, taillight,
and brake light for proper illumination.
5. Test the operation of the brakes. The brake lever
must feel firm when the lever is compressed.
Inspect the brake fluid level. The brake fluid level
must be just below the high mark on the brake
fluid reservoir. Add Arctic Cat approved brake
fluid as necessary.
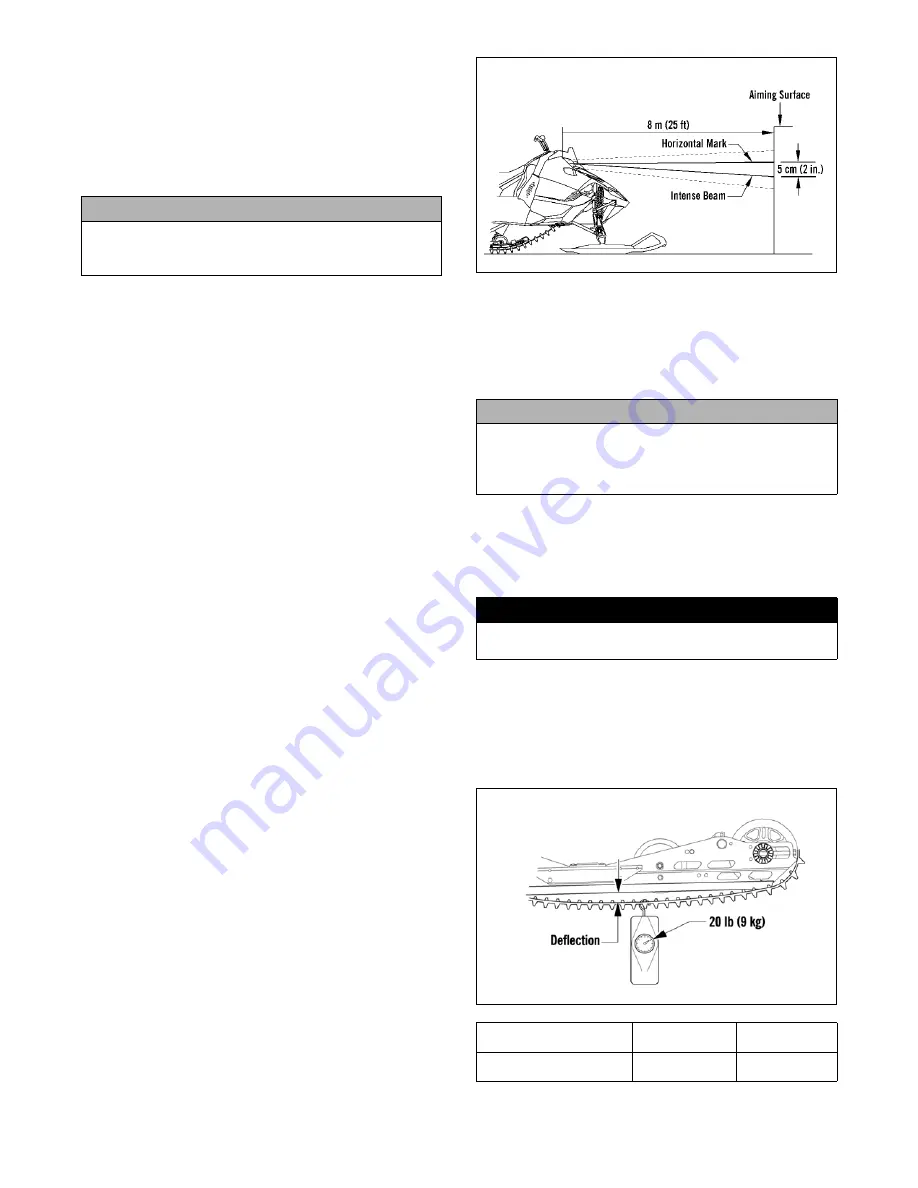
CHECKING HEADLIGHT AIM
1. Position the snowmobile on a level floor so the
headlight is approximately 8 m (25 ft) from an
aiming surface (wall or similar surface).
NOTE: There should be an “average” operating load
on the snowmobile when adjusting headlight aim.
2. Measure the distance from the floor to midpoint of
the headlight.
3. Using the measurement obtained in step 2, make a
horizontal mark on the aiming surface.
4. Make a vertical mark which intersects the horizon-
tal mark on the aiming surface directly in front of
the headlight.
5. Engage the brake lever lock and start the engine.
Move the headlight dimmer switch to the HIGH
beam position. DO NOT USE LOW BEAM.
6. Observe the headlight beam aim. Proper aim is
when the most intense beam is centered on the ver-
tical mark 5 cm (2 in.) below the horizontal mark
on the aiming surface.
0743-091
7. Adjust the headlight adjustment knobs until cor-
rect aim is obtained. Shut the engine off; then dis-
engage the brake lever lock.
TRACK TENSION/TRACK
ALIGNMENT
To adjust track tension/track alignment, use the fol-
lowing procedure.
1. Elevate the snowmobile on a shielded safety stand
high enough to use a spring scale.
2. At mid-point of the track (on the bottom side),
hook a spring scale around a track clip; then pull
down on the scale to 9 kg (20 lb). Measure the
deflection (distance) between the bottom of the
wear strip and the inside surface of the track clip.
Compare the measurement with the chart.
0744-068
3. Using Axle Nut Spanner Wrench (p/n 0644-558)
from the tool kit, loosen the right-side rear axle nut.
CAUTION
Do not use white gas or gasolines containing metha-
nol. Only Arctic Cat approved gasoline additives
should be used.
CAUTION
Track tension has been initially adjusted at the factory
for “run-up testing”; however, track tension (and track
alignment) must be adjusted at the dealership accord-
ing to the following recommendations.
! WARNING
The tips of the skis must be positioned against a wall
or similar object for safety.
Rear Suspension Style
Setup
Tension
After Break-In
Tension
FasTrack
(128 1/2 in. Track) @ 20 lb
35-41 mm
(1 3/8-1 5/8 in.)
38-44 mm
(1 1/2-1 3/4 in.)
Summary of Contents for 2014 SNO PRO 500
Page 1: ...SNO PRO 500 ...
Page 16: ...12 Wiring Diagram Hood Harness p n 1686 587 0744 201 ...
Page 17: ...Wiring Diagram Ignition Main Harness p n 1686 628 0745 605 13 ...
Page 18: ...14 NOTES ...
Page 89: ......
Page 90: ...Printed in U S A Trademarks of Arctic Cat Inc Thief River Falls MN 56701 p n 2259 778 ...


