53
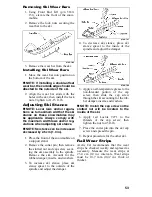
Removing Ski Wear Bars
1. Using Front End Lift (p/n 5639-
151), elevate the front of the snow-
mobile.
2. Remove the lock nuts securing the
wear bar to the ski.
0743-185
3. Remove the wear bar from the ski.
Installing Ski Wear Bars
1. Move the wear bar into position on
the bottom of the ski.
NOTE: If installing a double-offset
wear bar, the carbide edge should be
directed to the outside of the ski.
2. Align the wear bar studs with the
holes in the ski; then install the lock
nuts. Tighten to 11-15 ft-lb.
Adjusting Ski Stance
NOTE: Local laws and/or regula-
tions as to maximum width of the ski
stance on these snowmobiles may
be applicable. Always comply with
the maximum width laws and/or reg-
ulations when adjusting ski stance.
NOTE: Ski stance can be increased/
decreased by 2.5 cm (1.0 in.).
1. Place the front of the snowmobile on
a support stand.
2. Remove the cotter pin; then remove
the slotted nut and cap screw secur-
ing the ski assembly to the spindle.
Remove the ski. Account for the
rubber damper, inserts, and washers.
3. To increase ski stance, place ski
stance spacer to the outside of the
spindle and adjust the damper.
0746-797
4. To decrease ski stance, place ski
stance spacer to the inside of the
spindle and adjust the damper.
0746-796
5. Apply an all-temperature grease to the
non-threaded portion of the cap
screw; then slide the cap screw
through the ski accounting for the rub-
ber damper, inserts, and washers.
NOTE: Install the cap screw so the
slotted nut will be located to the
inside of the ski.
6. Apply red Loctite #271 to the
threads of the cap screw; then
tighten the nut to 45 ft-lb.
7. Place the cotter pin into the ski cap
screw and spread the pin.
8. Repeat procedure for the other ski.
Rail Wear Strips
Arctic Cat recommends that the wear
strips be checked weekly and replaced as
necessary. Measure the wear strips at
25.4 cm (10 in.) intervals. Wear strips
must be 10.7 mm (0.42 in.) thick or
thicker.
Summary of Contents for F 1100 series
Page 7: ...3 Snowmobile Safety Rules...

