background image

information about this product, please call our toll-free number.
SAVE THIS MANUAL

Keep this manual and the original sales invoice in a safe, dry place for future reference.

Notre personnel du service à la clientèle est disponible pour vous aider. En cas de problème avec votre achat, ou pour 

obtenir plus d’informations à propos de ce produit,  veuillez composer notre numéro sans frais.
CONSERVEZ CE GUIDE

Conservez ce manuel avec la facture d’origine dans un endroit sûr et sec pour référence future.

Our customer service staff is available to help you. For any problem with your purchase, or to receive further 

Customer Service / Service à la clientèle: 

WALL-MOUNTED AIR CONDITIONER

Operator's manual

Model/Modèle : 

87795051 

6

J

C

B

-

1

N

R

C

0

1

-

2

W


 U

E

W

M

1-866-206-0888

Summary of Contents for 87795051

Page 1: ...ou pour obtenir plus d informations propos de ce produit veuillez composer notre num ro sans frais CONSERVEZ CE GUIDE Conservez ce manuel avec la facture d origine dans un endroit s r et sec pour r f...

Page 2: ......

Page 3: ...1 23 24 25 34 2 OPERATING INSTRUCTIONS REMOTE CONTROL OPERATING INSTRUCTIONS 3 9 5 4 5 6 7...

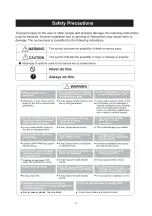
Page 4: ...grounding place grounding A damaged appliance 2 Do not direct airflow directly on room occupants It may cause explosion fire and burns...

Page 5: ...any other purpose than air cooling 3 Failure to do so may cause electric shock and damage Do not place heavy objects on the...

Page 6: ...with a new cord please Please contact Customer Service contact Customer Service Safety Precautions Operation of Current Device 4 vapours air conditioner...

Page 7: ...may have a high pitched chatter during the cooling cycle Gurgle Hiss Gurgling or hissing noise may be heard due to refrigerant passing through evaporator during normal operation Pinging or Switching D...

Page 8: ...Unit Control Panel Operating Instructions 1 2 3 5 4 6 9 7 8 1 2 3 4 17 C 30 C The 62 F and 86 F 6...

Page 9: ...ting Instructions 5 6 7 The unit will initiate automatically the Energy Saver function under Cool Dry Auto only Auto Cooling and Auto Fan modes 8 7 cannot be 2 F 1 C 2 F 1 C LED indicator light illumi...

Page 10: ...vers will allow you to direct the air flow up needed Use the center handles to adjust the air directional louvers side to side until the desired left or right direction is obtained Pivot horizontal lo...

Page 11: ...x4 x14 2 Stuffer Seal 1 x1 x84 1 Seal 1 x1 x25 1 x1 x14 1 x3 8 x25 Seal Seal Seal 1 x3 8 x14 1 x3 4 x14 Seal 3 3 2 2 2 Trim Frame side legs Trim Frame top bottom legs Ground Wire green Toothed Washer...

Page 12: ...type and follow the instructions for that type in the following pages 1 8 This ground wire will later be attached to frame of air conditioner once it is installed 10 Installation Instructions your exi...

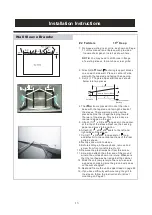
Page 13: ...ENCY USE THE PROVIDED LOUVERED REAR PANEL Installation of new grille provided with unit 1 Remove the existing grille 2 Place the grille included with the new air conditioner towards the rear of the sl...

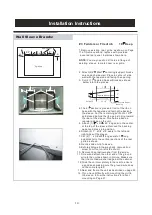
Page 14: ...ections of the rear grille as shown 5 Attach 2 4 x3 x1 centering support blocks one on each side wall Place in center of side wall with the tapered end facing the opening 6 Gently slide unit into slee...

Page 15: ...f the rear grille as shown 8 Gently slide unit into sleeve 9 Before sliding all the way back remove 2nd screw from front on left side of unit 10 Remove the plastic washer from the screw 11 Screw and a...

Page 16: ...top of the sleeve Remove the backing paper and press into position 6 Attach 2 1 x3 8 x14 seals to the left and right sides of the sleeve 7 Cut 2 1 x3 8 x25 long seals to 14 long and attach it to the...

Page 17: ...of the sleeve 6 Cut 2 1 x3 8 x25 long seals to 14 long and attach it to the vertical sections of the rear grille as shown 7 Center unit and gently slide unit into sleeve 8 Before sliding all the way b...

Page 18: ...5 Attach 2 1 x3 8 x14 seals to the left and right sides of the sleeve 6 Cut 2 1 x3 8 x25 long seals to 14 long and attach it to the vertical sections of the rear grille as shown 7 Center unit and gent...

Page 19: ...Cut 2 1 x3 8 x25 long seals to 14 long and attach it to the vertical sections of the rear grille as shown 7 Center unit and gently slide unit into sleeve 8 Before sliding all the way back remove 2nd s...

Page 20: ...h the slot overlapping the seal above 11 Install the divider into the slots of the foam blocks You may need to trim the length to size 12 Repeat steps 9 11 for the other vertical shown portion of the...

Page 21: ...de of the sleeve Attach the other 1 x3 4 x14 long seal 4 from the right side of the sleeve 5 Center unit and gently slide unit into sleeve 6 Before sliding all the way back remove 2nd screw from front...

Page 22: ...n in the picture 12 Attach 2 1 x1 x14 seals along the sides of the sleeve again making sure all seals are flush 13 Cut the 1 x1 x25 seal to fit the top of the sleeve The pieces must be fitted flush to...

Page 23: ...he rear of the unit making sure that a The double set of screw holes are at the bottom b The fins of the grill are pointed away from the unit 3 Align the top of the grille with the top of the unit The...

Page 24: ...and the unit The use of a flat head screwdriver or putty knife is recommended 1 2 2 Assemble the trim frame by inserting top and bottom pieces into side pieces and snapping into place 3 Pull cord thr...

Page 25: ...use hot water over 40 C 104 F to clean the air filter Never attempt to operate the unit without the air filter Cabinet Cleaning Be sure to unplug the air conditioner to prevent shock or fire hazard Th...

Page 26: ...Troubleshooting Tips workmanship c c l h h h l d t 24...

Page 27: ...on the receiver If other electrical appliances react to the remote controller either move these appliances or consult your local dealer Handling the remote controller Step 1 Insert a coin vertically...

Page 28: ...pressing the corresponding button will have no effect When there are wide differences between Remote controller Instructions and USERS MANUAL on function description the description on USERS MANUAL s...

Page 29: ...in NOTE If the unit has ENERGY SAVER function it will initiate automatically the Energy Saver function under Cool Dry and Auto only Auto Cooling and Auto Fan modes Press this button to select the desi...

Page 30: ...28 add space automatically cannot between modes Remote Controller Instructions...

Page 31: ...29 add space cannot Remote Controller Instructions pressing...

Page 32: ...30 to in in Remote Controller Instructions increments...

Page 33: ...31 Remote Controller Instructions...

Page 34: ...32 starts Remote Controller Instructions...
Page 35: ...s described in these instructions apply to the different models available if your model doesn t have a specific function pressing the corresponding button will have no effect must must Remote Controll...

Page 36: ...tact one of our service technicians at our toll free service line at 1 866 206 0888 from 8 AM to 6 PM Monday to Friday Eastern time RONA reserves the right to repair or replace the defective product a...

Reviews: