background image

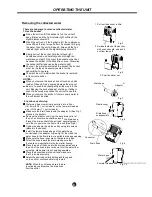
3. Clean the air filter

Remove the filter every two weeks based on normal

operating conditions.

Remove the filter from the top of the unit (see Fig. 11).

Wash the filter with clean water then dry.

Re-install the filter, and replace bucket

.

DO NOT operate the dehumidifier without a filter

because dirt and lint will clog it and reduce the

performance.

CAUTION:

Fig. 11

After turning off the unit, wait one day before emptying

the bucket.

Clean the main unit, water bucket and air filter.

Cover the unit with a plastic bag.

Store the unit upright in a dry, well-ventilated place.

Wrap the cord and bundle it with the band(Fig.12) .

4. When not using the unit for long time periods

Care and cleaning of the dehumidifier

Turn the dehumidifier off and remove the plug 

from the wall outlet before cleaning.

1. Clean the grille and case

Use water and a mild detergent. Do not use bleach

or abrasives.

Do not splash water directly onto the main unit. Doing

so may cause an electrical shock, cause the insulation

to deteriorate, or cause the unit to rust.

The air intake and outlet grilles get soiled easily, so use

a vacuum attachment or brush to clean.

2. Clean the bucket

Every few weeks, clean the bucket to prevent growth of mold,

mildew and bacteria. Partially fill the bucket with clean water

and add a little mild detergent. Swish it around in the bucket,

empty and rinse.

Do not use a dishwasher to clean the bucket.

After cleaning, the bucket must be back in place and securely

seated for the dehumidifier to operate.

NOTE:

Fig. 12

CARE AND MAINTENANCE

9

Summary of Contents for MDNK-45AEN1-BA9

Page 1: ...s MDNK 45AEN1 BA9 Toll free 1 866 646 4332 TM MC...

Page 2: ...TABLE OF CONTENTS SAFETY PRECAUTIONS CONTROL PADS ON THE DEHUMIDIFIER CARE AND MAINTENANCE TROUBLESHOOTING TIPS WAR ANTY R 1 2 2 3 4 5 6 7 7 8 9 10 11 PARTS IDENTIFICATION...

Page 3: ...nit Do not use the machine near flammable gas or combustibles such as gasoline benzene thinner etc CAUTION Do not use the unit in small spaces Lack of ventilation can cause overheating and fire Do not...

Page 4: ...nect the power contact a qualified service technician Do not place flower vases or other water on top of the unit e unit and contains electrical and other specific to this unit Be sure the unit is pro...

Page 5: ...ve Humidity to 85 RH Relative Humidity in 5 increments For drier air press the pad and set to a lower percent value For damper air press the pad and set a higher percent value Press to initiate the Au...

Page 6: ...rt is initiated When the unit is off first press the Timer pad the TIMER ON indicator light illuminates It indicates the Auto Start program is initiated Press the pad again the Time Off indicator ligh...

Page 7: ...ille Water bucket 1 2 3 4 5 1 2 3 4 All pictures in the manual are for explanation purposes only The actual shape of the unit you purchased may be slightly different but its operations and functions a...

Page 8: ...nit Do not use outdoors This dehumidifier is intended for indoor residential A dehumidifier operating in a basement will have little or no effect in drying an adjacent enclosed storage area such as a...

Page 9: ...ed Fig 5 Fig 6 2 Continuous draining Water can be automatically emptied into a floor Fig 8 Plastic cover Drain hose Adaptor Fig 7 Drain hose subassembly Fig 9 Connector Drain hose Fig 10 Water hose Fe...

Page 10: ...Care and cleaning of the dehumidifier Turn the dehumidifier off and remove the plug from the wall outlet before cleaning 1 Clean the grille and case Use water and a mild detergent Do not use bleach o...

Page 11: ...41 F There is a kerosene heater or something giving off water vapours in the room O O The unit makes a loud noise when operating The air filter is clogged The unit is tilted instead of upright as it...

Page 12: ...cessible for servicing 6 Damages to finish after installation EXCLUSIONS This warranty does not cover the following 1 Failure caused by damage to the unit while in your possession other than damage ca...

Reviews: