background image

14

in.k300™

Compact full-function keypad 

The Quick Reference Card provides an overview of your spa’s main functions 

and the operations accessible from your digital keypad.  

This QRC depicts a generic overlay, custom versions may vary.

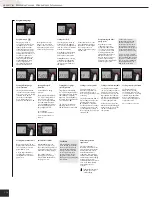
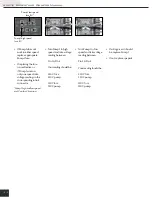
Pump 1

Press 

Pump 1

 key to turn 

Pump 1 on at low speed. 

Press a second time to turn 

pump to high speed (with a 

dual-speed pump*). A third 

time turns pump off. A built-in 

timer automatically turns 

pump off after 20 minutes, 

unless pump has been 

manually deactivated first.

The “Pump 1” indicator  

lights up when Pump 1 is on. 

With a dual-speed pump, 

the indicator will flash when 

pump 1 is on at low speed.

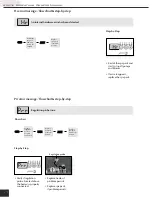
Setting the clock

Enter the program menu by 

holding down the

 Light

 key 

for 5 seconds. The display will 

show the current clock setting 

with the hour flashing.

Depending on factory settings

your system may be set to

24-hour time or 12-hour time.

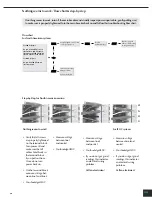
Setting the hour:

 Use the 

Up


or 

Down

 keys to adjust the 

hours. Press the 

Light

 key to 

jump to the next parameter, 

the minutes.

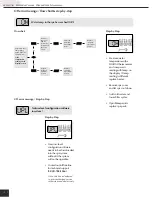
Programming the filter/ 

purge cycles

Depending on system 

configuration your spa 

will perform either a filter 

or a purge cycle. The filter 

cycle menu consists of the 

following parameters: the 

start time (

FS

), the duration 

(

Fd

) and the frequency 

(

FF

). The purge cycle menu 

consists of the following 

parameters: the start time (

FS

and the frequency (

FF

). 

Spa Functions

* If single speed pump: press Pump key to turn pump on. Press Pump key 

again to turn pump off.

Setting the minutes: Use the 

Up

 or 

Down

 keys to adjust 

the minutes. Press the 

Light


key to jump to the next 

parameter, the filter or purge 

start time (

FS

).

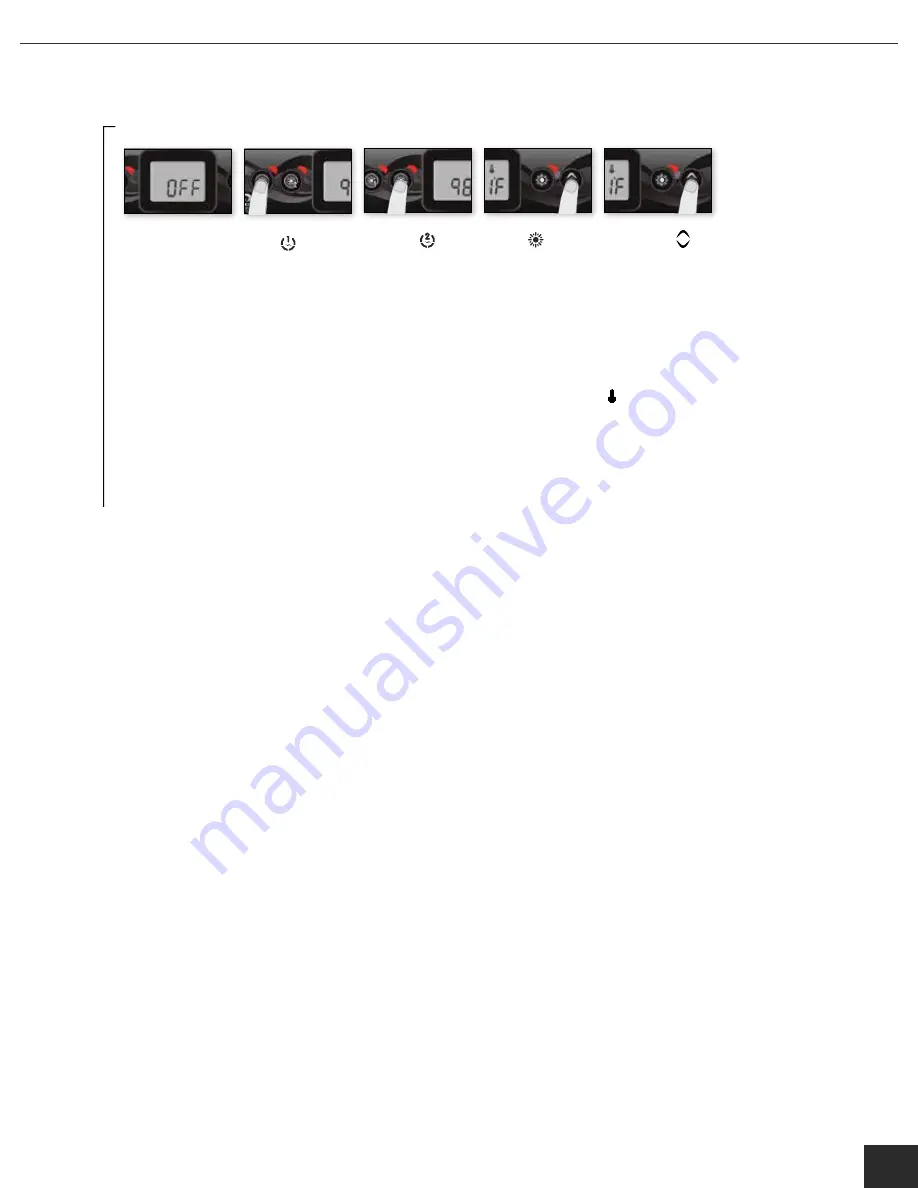
Off Mode

Pressing 

Pump 1

 for 5 seconds 

will enable the Off mode. 

This mode allows you to 

stop all outputs including 

automatic functions such as 

filter cycle, heat request and 

smart winter mode for  

30 minutes to perform quick 

spa maintenance. When Off 

mode is active, the display 

will toggle between the “OFF” 

message, the clock and the 

water temperature.  

The spa light will flash for 

a few seconds before the 

end of the 30 minutes to 

warn you that the system is 

about to resume its normal 

operation. Press 

Pump 1


or 

Pump 2

 (if available) to 

restart the system before the 

expiration of the 30 minute 

delay. When the system 

resumes its normal operation, 

the display shows “On“ for  

3 seconds.

A filter cycle consists of 

starting all the pumps and 

blower in high speed for 

1 minute (purge step) then, 

the pump associated with 

the filter will run in low speed 

for the remaining duration 

of the filter cycle (clean step). 

A purge cycle is used when 

the spa is equipped with a 24 

hour circulation pump which 

provides a continuous clean 

step. It consists of starting all 

the pumps and blower in 

high speed for 1 minute. 

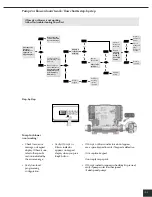
Programming Steps

Program menu

The program menu is 

accessible by holding down 

the 

Light

 key for 5 seconds. 

In the program menu the 

following parameters can be 

set:  clock, the filter or purge 

cycles, economy mode and  

temperature units. While you 

are in the program menu, 

use the 

Up

 or 

Down

 key to 

adjust the parameters and 

use the 

Light

 key to jump 

to the next parameter.  

The changes will be saved 

after the confirmation of 

the last parameter only. 

If there is no action taken 

for 10 seconds, the system 

will exit the program menu 

without saving any changes.

Pump 2 key

Not available on all models

Press 

Pump 2

 key to turn 

Pump 2 on at low speed. 

Press a second time to turn 

pump to high speed (with a 

dual-speed pump*). A third 

time turns pump off. A built-in 

timer automatically turns 

pump off after 20 minutes, 

unless pump has been 

manually deactivated first.

The “Pump 2” indicator 

lights up when Pump 2 is on. 

With a dual-speed pump, 

the indicator will flash when 

pump 2 is on at low speed.

Light key 

Press 

Light

 key to turn light 

on. A second press turns 

light off. A built-in timer 

automatically turns light 

off after 2 hours, unless it 

has been manually 

deactivated first.

The “Light” indicator lights up 

when light is on.

Up/Down keys

Use 

Up

 or 

Down

 key to set 

desired water temperature. 

The temperature setting will 

be displayed for 2 seconds to 

confirm your new selection.

2 pump spas have a 

combined 

Up

/

Down

 key. 

Hold the button to increase 

the parameter and release 

the button to stop. Hold 

the button again to decrease 

the parameter.


The "Set Point" icon 


indicates that the 


display shows the 


desired temperature,  


NOT the current 


 water temperature!

Up

 Down

Light

Pump 1

Indicator lights

Set Point

Smart Winter 

Mode

Heater

Filter

 Up / Down

Indicator lights

Light

Pump 2

Pump 1

Description

1 Pump Model

2 Pump Model

Quick Reference Card

Please consult your spa user manual for complete info on the features of your spa system.

Summary of Contents for ARCTIC ESSENTIALS CSA

Page 1: ...OWNERS MANUAL ARCTIC ESSENTIALS...

Page 2: ...rnings 2 4 Introduction 5 Overview 6 Keypad Installation 7 8 Electrical Wiring 9 Heater Connections 10 Power up breaker setting 11 12 Keypad Overview 13 16 Error Codes 16 21 Troubleshooting 22 32 Wate...

Page 3: ...osing an appropriate replacement suction fitting 5 DANGER Risk of Electric Shock Install at least 5 feet 1 5 m from all metal surfac es As an alternative a hot tub may be installed within 5 feet 1 5 m...

Page 4: ...nts utiliser une cuve de relaxation sans surveillance WARNING Do not use hot tubs unless all suction guards are installed to prevent body and hair entrapment AVERTISSEMENT Pour eviter que les cheveux...

Page 5: ...increase the risk of fatal hyperthermia in hot tubs AVERTISSEMENT La consommation d alcool ou de drogue augmente consid rablement les risques d hyperthermie mortelle dans une cuve de relaxation WARNIN...

Page 6: ...E NATURAL CHOICE FOR ANYONE WHO WANTS AN EASY TO UNDERSTAND MULTI APPLICATION SOLUTION 9OU DONgT HAVE TO WONDER ABOUT COMPATIBILITY INSTEAD THERE S JUST THE COMFORTING CERTAINTY THAT WHEN YOU INVEST I...

Page 7: ...outputs for all your spa needs Light outputs 1 direct 1 switched Main keypad connector Communications link Accessible bonding lugs Front view Side view 4 98 126 mm 2 51 mm 10 75 273 mm 16 55 420 mm 19...

Page 8: ...NECTOR INTO THE APPROPRIATE KEYPAD CONNECTOR AS ILLUSTRATED 2OUTE THE CABLE THROUGH ONE OF THE MOLDED STRAIN RELIEF CHANNELS ON THE BOTTOM RIGHT SIDE OF THE SPA PACK AS ILLUSTRATED ILL THE REMAINING S...

Page 9: ...VER AND A mAT SCREWDRIVER OOSEN THE SCREWS OF THE SPA PACK COVER AND REMOVE IT 2EMOVE MM OF CABLE INSULATION 3TRIP AWAY MM OF EACH WIRE INSULATION 0ULL THE CABLE THROUGH THE CUTOUT OF THE BOX AND SECU...

Page 10: ...ICAL SERVICE BOX 2 AND PACK TERMINAL BLOCK IS ESSENTIAL ALL AN ELECTRICIAN IF NECESSARY LECTRICAL WIRING IN YT UROPEAN MODEL PHASE ONNECT 0 BETWEEN 0 AND 0 ONNECT 0 BETWEEN 0 AND 0 PHASE WITH SINGLE N...

Page 11: ...ECTION 0ART 6 CONVERSION IS AVAILABLE ON ORTH MERICAN IN YE MODELS ONLY HEAT WAV SPECIlCATION SUMMARY s 3UPPORTS 6 OR 6 s 0ROTECTED BY EXTERNAL BREAKER NOT FUSED s NCOLOY HEATER ELEMENT s PTIONAL K7 0...

Page 12: ...TCHES YOUR BREAKER B Note Every OEM has its own WYLZL JVU N YH PVUZ TgS IMPORTANT TO SPECIFY THE CURRENT RATING OF THE USED TO ENSURE SAFE AND EFlCIENT CURRENT MANAGEMENT AND REDUCE NUISANCE TRIPPINGS...

Page 13: ...CK LINE 0 0 7HITE COMMON 0 0 4HIS TABLE SHOWS TYPICAL CONNECTIONS S MAY HAVE A DIFFERENT CONNECTION SCHEME 6aVUH VY HUK JPYJ W TW JHU IL JVTIPULK VU OL ZHTL V W PH OL VW PVUHS ZWSP LY 77 IGH VOLTAGE A...

Page 14: ...of the 30 minute delay When the system resumes its normal operation the display shows On for 3 seconds A filter cycle consists of starting all the pumps and blower in high speed for 1 minute purge ste...

Page 15: ...resumes its normal operation the display shows On for 3 seconds A filter cycle consists of starting all the pumps and blower in high speed for 1 minute purge step then the pump associated with the fil...

Page 16: ...revent water from freezing in pipes The SWM indicator lights up when freezing is detected and flashes when the purge is active Setting economy mode This mode allows you to lower the temperature set po...

Page 17: ...tor lights up when the Smart Winter Mode is on Troubleshooting Hr An internal hardware error has been detected in in xe Contact dealer or service supplier HL The system has shut the heater down becaus...

Page 18: ...ULATION PROBE LOCATED ABOVE THE HEATER IS PROPERLY CONNECTED 3TEP BY 3TEP 2EGULATION PROBE s 2EPLACE HEATER IF PROBLEM PERSISTS s 2EPLACE SPA PACK IF PROBLEM PERSISTS 2ESTART THE SPA PACK AND START ST...

Page 19: ...EM F ERROR MESSAGE PERSISTS REPLACE SPA PACK YES 7AIT UNTIL SPA COOLS DOWN ADD COLD WATER IF NEEDED 2ESET SYSTEM NO NO YES F PROBLEM PERSISTS REPLACE HEATER F PROBLEM PERSISTS REPLACE SPA PACK YES NO...

Page 20: ...OT READ 6 PUMP MAY BE OVERHEATING WATER DURING lLTER CYCLE 3HORTEN lLTER CYCLE DURATION F HOT WEATHER IS NOT A FACTOR OWER 3ET 0OINT BELOW CURRENT WATER TEMPERATURE 4HE EATER INDICATOR SHOULD DISAPPEA...

Page 21: ...RIFY IF IN mO CABLE IS PROPERLY CONNECTED F PROBLEM PERSISTS REPLACE HEATER F PROBLEM PERSISTS REPLACE SPA PACK 0RIMARY PUMP IS ACTIVATED BUT THE SYSTEM DOESNgT DETECT ANY WATER mOW s AKE SURE WATER V...

Page 22: ...ITH TEMP ON THE DISPLAY F TEMP READING IS DIFFERENT REPLACE HEATER s 2EMOVE SPA COVER AND LET SPA COOL DOWN s DD COLD WATER AND LOWER lLTER CYCLES s F PROBLEM PERSISTS REPLACE SPA PACK 2EMOVE SPA COVE...

Page 23: ...2EPLACE 0UMP IF NEEDED 2EPLACE SPA PACK YES F 0UMP IS NOT WORKING FOLLOW THIS TROUBLESHOOTING mOW CHART 0UMP DOES NOT WORK s HECK FOR AN ERROR MESSAGE ON KEYPAD DISPLAY F THERE IS ONE REFER TO THE SPE...

Page 24: ...LINK CONNECTOR 0UMP HIGH AND LOW SPEED ARE ON THE VERSION s 4URN 0UMP TO HIGH SPEED AND TAKE VOLTAGE READING BETWEEN 0IN 0IN 9OUR READING SHOULD BE 6 FOR A 6 PUMP 6 FOR A 6 PUMP 0UMP HIGH SPEED FUSE...

Page 25: ...WER IS NOT WORKING FOLLOW THIS TROUBLESHOOTING mOW CHART 0UMP OR BLOWER DOESNgT WORK mOW CHART STEP BY STEP 0UMP OR BLOWER IS NOT WORKING s HECK FOR AN ERROR MESSAGE ON KEYPAD DISPLAY F THERE IS ONE R...

Page 26: ...GE READING ON THE CORRESPONDING 0 CONNECTOR s 4URN 0UMP TO HIGH SPEED AND TAKE VOLTAGE READING BETWEEN 0IN 0IN 9OUR READING SHOULD BE 6 FOR A 6 PUMP 6 FOR A 6 PUMP 0UMP FUSE s 4URN 0UMP TO LOW SPEED A...

Page 27: ...RIFY LOW LEVEL PROGRAMMING CONlGURATION s 3TART CIRCULATION PUMP BY SETTING TEMPERATURE SET POINT HIGHER THAN ACTUAL WATER TEMPERATURE s F YOU DONgT GET A VOLTAGE READING REPLACE THE ACCESSORY FUSE s...

Page 28: ...S NOT WORKING s HECK IF ILTER YCLE INDICATOR APPEARS STEADY ON KEYPAD s F THE lLTER INDICATOR IS BLINKING IT INDICATES THAT THE lLTER CYCLE HAS BEEN INTERRUPTED N THAT CASE RESET THE BREAKER BY TURNIN...

Page 29: ...LL NOTHING ON KEYPAD DISPLAY LOW CHART OR ORTH MERICAN SYSTEMS 3TEP BY 3TEP FOR ORTH MERICAN VERSION OTHING SEEMS TO WORK s 6ERIFY THAT ALL SCREWS ARE PROPERLY TIGHTENED ON THE TERMINAL BLOCK 4URN POW...

Page 30: ...OOTING mOW CHART OTHING SEEMS TO WORK UROPEAN VERSION mOW CHART OR 6 SYSTEM PHASE O YOU READ 6 BETWEEN PHASES O YOU READ 6 BETWEEN AND PHASES O YOU READ 6 BETWEEN AND PHASES ELTA O YOU READ 6 BETWEEN...

Page 31: ...OU DO NOT GET GOOD READINGS THIS INDICATES AN ELECTRICAL WIRING PROBLEM ALL AN ELECTRICIAN OR PHASE ELTA SYSTEM s EASURE VOLTAGE BETWEEN LINE AND LINE BETWEEN LINE AND LINE AND BETWEEN LINE AND LINE s...

Page 32: ...VERIFY IF HEATER TERMINALS ARE PROPERLY CONNECTED s F IT IS REPLACE SPA PACK s N THE CASE OF THE UROPEAN MODEL IN YT CE ONLY REPLACE ACCESSORY FUSE s F PROBLEM PERSISTS REPLACE SPA PACK IVE ROUND 2ET...

Page 33: ...ERROR TROUBLESHOOTING CHART IN THE 4ROUBLESHOOTING SECTION s F NO ERROR OCCURS RE INSTALL THE JUMPER F THE TRIPS AGAIN REPLACE THE PACK F THE IS STILL TRIPPING THE ERROR DOESN T COME FROM THE TRIPPER...

Page 34: ...a owner You will have to add chemicals to maintain proper levels of Total Alka linity TA Calcium Hardness CH and pH Proper water balance and pH control will minimize scale buildup and corrosion of met...

Page 35: ...se Don t inhale fumes or allow chemicals to come in contact with your eyes nose or mouth Wash your hands immediately after use Follow the emergency advice on the product label in case of accidental co...

Page 36: ...ause corrosion or scaling of the spa components Low TA can be corrected by adding Arctic PureTM Perfect Balance 4 If the Total Alkalinity is too high the pH level will tend to be high and may be diffi...

Page 37: ...3 Any natural corrosiveness in the water can be combatted by maintaining a slightly higher Total Alkalinity Level Sanitize the Spa Sanitizer is extremely important for killing algae bacteria and viru...

Page 38: ...stem Note If you are planning to use your new spa right away Peak Boost must be added first Follow directions for adding Peak Boost from this page 1 Fill floating dispenser with pucks and open to sett...

Page 39: ...EUTRAL AX OR IN YE ONLY 6 NOMINAL ONLY SINGLE LINE WITH NEUTRAL AX Z NOMINAL Z EAT WAV RATING 6OLTAGE OR 6 Z 7ATTAGE K7 AT 6 K7 AT 6 LSO AVAILABLE K7 AT 6 LOW RATE INIMUM OF 0 0 IS REQUIRED 5 3IXTH D...

Page 40: ...NOT EXCEED 4OTAL OF 0 0 AND I MUST NOT EXCEED 4OTAL OF 0 AND MUST NOT EXCEED 4OTAL OF 0 AND MUST NOT EXCEED ORTH MERICAN ODELS EVICE 6OLTAGE AXIMUM CURRENT YE YE YT YT 0UMP SPD OR 6 2 INRUSH s s s s 0...

Page 41: ...ects in workmanship and materials for a period of 3 years to the original purchaser from the original date of delivery Includes only parts necessary to repair not labour Shell Surface 3 years Arctic S...

Page 42: ...water absorption Any damage resulting from the mishandling of the spa cover in any way is not covered under warranty Any damage caused by moving of the spa or improper installation including insuffici...

Page 43: ...42...

Page 44: ...engineered for the world s harshest climates wherever you happen to live 17908...

Reviews: