22
Operating instructions.
Before using the appliance for the first time, wash the parts as specified in section
“Cleaning and maintenance”.
Insert the plug into the power outlet.
Select the refrigeration temperature using the knob located inside the appliance on the
right. Rotate it clockwise in 5 possible positions.
Consider that with high room temperatures (during summer, for example) the thermostat
should be set on position 5 (the coldest).
Vice versa, with low room temperatures, the thermostat should be set on position MIN
(the least cold).
If you set the thermostat on position MAX , it’s important to know that under these
conditions the compressor works continuously to keep the internal temperature low and
as a consequence layers of ice may form on the walls.
If this should occur, set the thermostat in a lower position so that the compressor turns on
and off allowing automatic defrosting.
Consider that the internal temperature depends not only on the setting of the thermostat
but also on the room temperature and other conditions such as the quantity of food in the
compartments or the number of times the refrigerator is opened.
Use of the fresh food compartment.
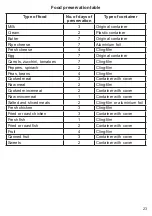
Position the food so as to guarantee an adequate circulation of air inside the appliance,
allowing optimization of the refrigeration process.
The food should be placed in containers or wrapped in appropriate preservation film so
that it maintains its fragrance and freshness longer.
Do not place hot food in the refrigerator, but let it cool to room temperature first in order to
prevent the formation of frost inside the compartment.
The height of the shelves can be adjusted using the appropriate guides on the side walls
of the refrigerator.
Use of the ice compartment.
The ice compartment is ideal for storing small quantities of food and for making ice cubes.
Summary of Contents for AR5I47
Page 5: ...5 Schema elettrico AR5I47 AR5I78 Montaggio maniglia e distanziatori ...
Page 7: ...Reversibilità porte AR5I47 AR5I78 ...
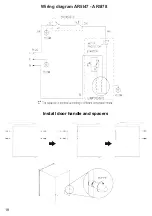
Page 18: ...18 Wiring diagram AR5I47 AR5I78 Install door handle and spacers ...
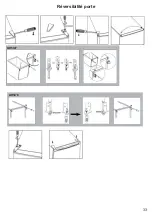
Page 20: ...20 Door reversibility AR5I47 AR5I78 ...
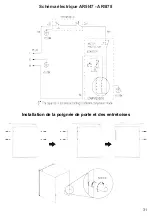
Page 31: ...31 Schéma électrique AR5I47 AR5I78 Installation de la poignée de porte et des entretoises ...
Page 33: ...33 Réversibilité porte AR5I47 AR5I78 ...
Page 44: ...44 Schaltplan AR5I47 AR5I78 Türgriff und Abstandhalter Installation ...
Page 46: ...46 Umkehrbarkeit der Tür AR5I47 AR5I78 ...
Page 57: ...57 Esquema eléctrico AR5I47 AR5I78 Instalación de la manilla de puerta y de espaciadores ...
Page 59: ...59 Reversibilidad de la puerta AR5I47 AR5I78 ...


