background image

Space Requirements

1.  Choose a place for the appliance out of direct sunlight.

2.  Choose a place that provides ample space for unobstructed opening of the door.

3.  Choose a place with a flat or almost flat surface.

4.  Provide ample space for installing the appliance on a flat surface.

5.  When installing, provide free space at the left, right, behind and above the appliance. 

The gaps between the appliance and adjacent items must be 50 mm or more. The free 

space above the refrigerator should not be less than 100 mm. This will reduce energy 

consumption. If possible, the back side of the appliance should be turned to the wall, 

in order to prevent contact with the heated components (compressor, condensing 

unit) and burns.

6.  After the installation of the appliance, it is necessary to make sure that the plug is 

available.

7.  The appliance should not be located near heating equipment or stoves.

Important! 

During installation, it is necessary to provide sufficient space for full opening of 

the door.

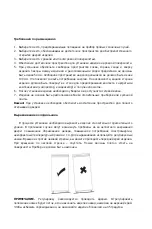
Refrigerator Alignment

During installation, it is necessary to align the refrigerator with respect to the horizontal 

level. Otherwise, you may experience problems caused by loosely closed door: excessive 

icing, increased power consumption, incorrect temperature, etc. Use adjusting legs for 

alignment. By rotating them counterclockwise, you can lift the front side of the appliance.

By rotating them clockwise, you can lower it. The legs should stand firmly on the surface. 

The appliance should not be tilted.

Note.

 It is recommended to carry out the adjustment in tandem. It will be easier to adjust 

the position of the legs if you tilt the appliance back by pushing its upper part.

To avoid tilting over, do not tilt the appliance by more than 45 degrees.

Summary of Contents for DDF-273W

Page 1: ...REFRIGERATOR User manual DDF 273X DDF 273W DDF 312W DDF 312X...

Page 2: ...8 1 2 3 4 5 6 7 8 9 10...

Page 3: ...11 12 13 14 15 16 17 18 19 20 21 22 23 24 R600a 25 26 27 28 29 30...

Page 4: ...31 32 33 34 35 36 37 38 39 40 41 42 43...

Page 5: ...1 1 V I 1 1 g g g 1 1 1 1 1 1 1 1 1 1 1 1 1 1 1 1...

Page 6: ...1 2 3 4 5 50 100 6 7 45...

Page 7: ...1 4 2 3...

Page 8: ...4 5 6 7...

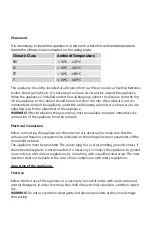
Page 9: ...SN 10 C 32 N 16 C 32 ST 16 C 38 T 16 C 43 100...

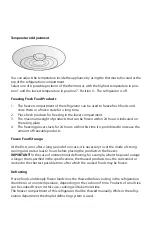
Page 10: ...8 1 7 0 1 2 3 24 4 24 2...

Page 11: ...1 24 2 3 4 5 6 7 8 9 1 2 3 1 2...

Page 12: ...1 2 3 4 5...

Page 13: ...24...

Page 14: ...8 1 2 3 4 5 6 7 8 9 10...

Page 15: ...11 12 13 14 15 16 17 18 19 20 21 22 23 24 R600a 25 26 27 28 29 30...

Page 16: ...31 32 33 34 35 36 37 38 39 40 41 42 43...

Page 17: ...w 1 1 V I 1 1 g g g 1 1 1 1 1 1 1 1 1 1 r 1 1 1 1 1 1...

Page 18: ...1 2 3 4 5 50 100 6 7 45...

Page 19: ...1 4 2 3...

Page 20: ...4 5 6 7...

Page 21: ...100...

Page 22: ...8 1 7 0 1 2 3 24 4 24 2...

Page 23: ...1 24 2 3 4 5 6 7 8 9 1 2 3 1 2...

Page 24: ...1 2 3 4 5 6...

Page 25: ...24...

Page 26: ...l be connected to the bipolar ground ing type receptacle Check carefully and ensure that your receptacle is properly and securely grounded 3 Do not splice the power cord or use extenders when the appl...

Page 27: ...products in the freezer with wet damp hands as this may cause skin damage or freezing injury 24 Refrigerant isobutane R600a circulating in the refrigerant circuit of the appliance is a flammable natur...

Page 28: ...oducts may not be frozen again 37 Keep packed refrigerated or frozen food products in accordance with the recommen dations of the product manufacturer 38 Do not place bottled drinks in the freezing ch...

Page 29: ...ption Lighting lamp and thermostat Glass shelves Container lid Container for fruits and vegetables 1 1 V I 1 Compartmens for frozen foods 1 g g g 1 1 1 1 1 1 1 1 1 1 Adjusting legs 1 1 1 1 1 1 Doors s...

Page 30: ...ssary to make sure that the plug is available 7 The appliance should not be located near heating equipment or stoves Important During installation it is necessary to provide sufficient space for full...

Page 31: ...rewdriver and remove the top cover Unscrew and remove the upper hinge and the upper door 2 Unscrew the screws and remove the central hinge Remove the bottom door Move the hole plugs from the left to t...

Page 32: ...the bottom hinge under the refrigerator as shown below screw in the adjusting legs 6 Install the bottom door turn over and fasten the central hinge on the housing 7 Install the upper door and then fas...

Page 33: ...ug must be available to ensure immediate dis connection of the appliance from the network Electrical Connection Before connecting the appliance to the network it is necessary to make sure that the vol...

Page 34: ...me it is prohibited to increase the amount of freezable products Frozen Food Storage At the first run or after a long period of non use it is necessary to set the mode of strong cooling and wait at le...

Page 35: ...fatty products salt reduces the shelf life of products 7 Ice covered products when used directly from the freezer can cause freezing injury 8 It is recommended to specify the product type on the packa...

Page 36: ...etwork during cleaning There is a risk of electric shock Turn off the appliance and disconnect the plug from the receptacle or unplug the switch or remove the fuse Remove all foods from the refrigerat...

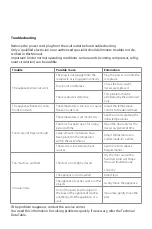
Page 37: ...d mark Foods are not frozen enough The temperature is set incorrectly See the section Setting the initial temperature The door has been open for a long period of time Open the door only for the necess...

Page 38: ...ntation they can be carried out both by the user and by specialists having the necessary qualification sent by USC or selling companies on a paid basis In this case the person the institution installi...

Page 39: ...ARDESTO ERC 18 04073 0 800 300 345 44 230 34 84 390 55 12 www erc ua service 1 2 7 3 4 5 6 7 12...

Page 40: ...3 2 1...

Reviews: