background image

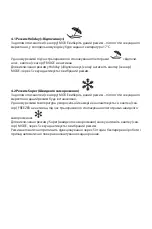
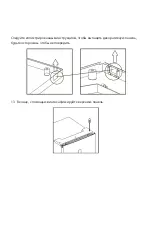
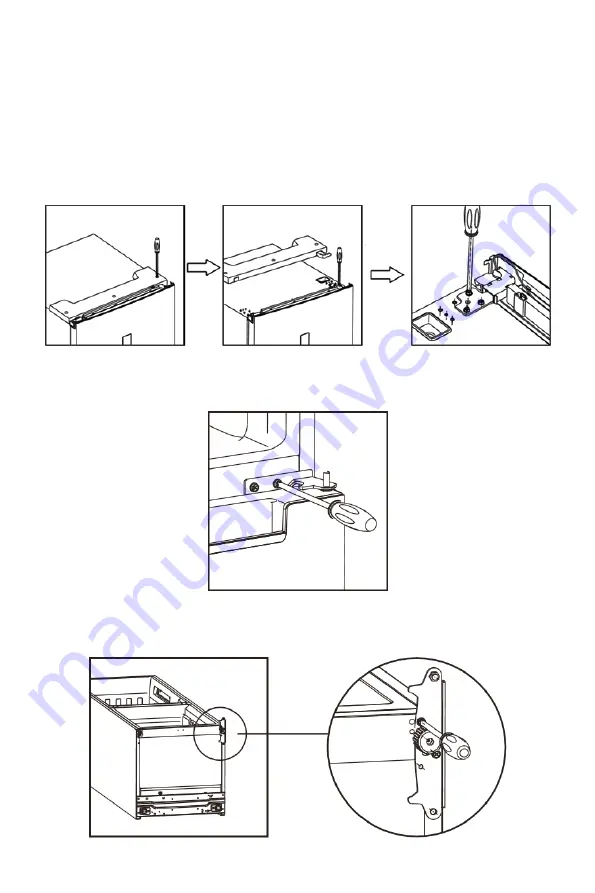
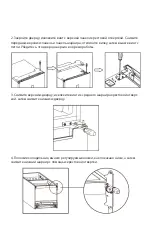
2. Закройте дверцу; извлеките винт с верхней панели крестовой отверткой. Снимите 

переднюю верхнюю панель и панель шарнира, отключите вилку, затем выньте винт с 

петли. Убедитесь, что дверца закрыта во время работы.

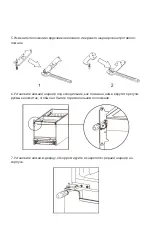
3. Снимите верхнюю дверцу; извлеките винт из среднего шарнира крестовой отверт-

кой, затем снимите нижнюю дверцу.

4. Положив холодильник, выньте регулируемые ножки, как показано ниже, а затем 

снимите нижний шарнир с помощью крестовой отвертки.

Summary of Contents for DNF-338X

Page 1: ...REFRIGERATOR User manual DNF 338X...

Page 2: ...8 1 2 3 4 5 6 7 8 9 10...

Page 3: ...11 12 13 14 15 16 17 18 19 20 21 22 23 24 R600a 25 26 27 28 29 30...

Page 4: ...31 32 33 34 35 36 37 38 39 40 41 42 43...

Page 5: ......

Page 6: ......

Page 7: ...1...

Page 8: ...2 3 4...

Page 9: ...5 6 7...

Page 10: ...8 9...

Page 11: ...10 11 12...

Page 12: ...13...

Page 13: ...1 1 A FRIDGE B FREEZER C MODE 1 2 LED 1 2 3 ECO 4 Holiday 5 Super 6 2 0 3 25 30 2 1 2 1 1 2 2 1 2 2 2 1 3...

Page 14: ...3 0 3 1 FRIDGE Super FRIDGE 2 3 4 5 6 7 8 OFF temperature control of fridge compartment FRIDGE OFF 3 2 FREEZER Holiday FREEZER 16 22 3 3 MODE ECO Holiday Super 3 MODE 3 MODE...

Page 15: ...3 4 3 5 25 4 0 MODE 5 18 FREEZER FRIDGE MODE 5...

Page 16: ...4 1 Holiday MODE 17 C FRIDGE Holiday MODE 5 4 2 Super MODE FREEZER Super MODE 5 50...

Page 17: ...1 2 3 4 5 50 100 6 7...

Page 18: ...45 SN 10 C 32 N 16 C 32 ST 16 C 38 T 16 C 43...

Page 19: ...100...

Page 20: ...1 2 3 24 4 24 2...

Page 21: ...1 24 2 3 4 5 6 7 8 9 1 2 3 1 2...

Page 22: ...1 2 3 4 5...

Page 23: ...24...

Page 24: ...8 1 2 3 4 5 6 7 8 9 10...

Page 25: ...11 12 13 14 15 16 17 18 19 20 21 22 23 24 R600a 25 26 27 28 29 30...

Page 26: ...31 32 33 34 35 36 37 38 39 40 41 42 43...

Page 27: ......

Page 28: ......

Page 29: ...1...

Page 30: ...2 3 4...

Page 31: ...5 6 7...

Page 32: ...8 9...

Page 33: ...10 11 12...

Page 34: ...13...

Page 35: ...1 1 A FRIDGE B FREEZER C MODE 1 2 LED 1 2 3 ECO 4 Holiday 5 Super 6 2 0 3 25 30 2 1 2 1 1 2 2 1 2 2 2 1 3...

Page 36: ...0 3 1 FRIDGE Super FRIDGE 2 C 3 C 4 C 5 C 6 C 7 C 8 C OFF temperature control of fridge compartment FRIDGE OFF 3 2 FREEZER Holiday FREEZER 16 C 22 C 3 3 MODE ECO Holiday Super 3 MODE 3 MODE 3 4 3 5 2...

Page 37: ...4 0 MODE 5 18 FREEZER FRIDGE MODE 5 4 1 Holiday MODE 17 C FRIDGE Holiday MODE 5 4 2 Super MODE FREEZER Super MODE 5 50...

Page 38: ...1 2 3 4 5 50 100 6 7 45...

Page 39: ...100...

Page 40: ...8 1 7 0 1 2 3 24 4 24 2...

Page 41: ...1 24 2 3 4 5 6 7 8 9 1 2 3 1 2...

Page 42: ...1 2 3 4 5 6...

Page 43: ...24...

Page 44: ...l be connected to the bipolar ground ing type receptacle Check carefully and ensure that your receptacle is properly and securely grounded 3 Do not splice the power cord or use extenders when the appl...

Page 45: ...products in the freezer with wet damp hands as this may cause skin damage or freezing injury 24 Refrigerant isobutane R600a circulating in the refrigerant circuit of the appliance is a flammable natur...

Page 46: ...oducts may not be frozen again 37 Keep packed refrigerated or frozen food products in accordance with the recommen dations of the product manufacturer 38 Do not place bottled drinks in the freezing ch...

Page 47: ...not be treated as household waste Instead it should be taken to the appropriate collection point for the recycling of electrical and electronic equipment By ensuring this product is disposed of correc...

Page 48: ...Description Note Above picture is for reference only Real appliance probably is different...

Page 49: ...ls and material straight screwdriver cross screwdriver spanner and the components included in the poly bag Decorative Cover of Right Door Left Door Hinge Cover 1 Please upwarp and take off plastic cov...

Page 50: ...terminal then take out the screw from the hinge Make sure door are closed when operation 3 Take off the upper door take out the screw from the middle hinge by cross screwdriver then take off the lower...

Page 51: ...r hinge and upper hinge to opposite position 6 Install the lower hinge under to the refrigerator like below screwing in the adjusting feet make sure the position in horizon 7 Install the lower door ad...

Page 52: ...Cover of Right Door from poly bag to cover the insert and take out the other side one accordingly In the meanwhile change the wire to another side 9 Install the upper door and then fix the upper door...

Page 53: ...the plastic cover and Left Door Hinge Cover from poly bag onto the product settle the wire see diagram 11 Fix the plastic cover and connect the terminal 12 Change the Decorative Cover from one to ano...

Page 54: ...Follow the instruction to take out of the decorative cover be careful not to ruin the cover 13 Lastly using the screw to fix the top cover...

Page 55: ...The panel will be lit up for 2 minutes once the door of fridge compartment or freezer compartment is opened one door signal is sensed at a time 2 1 2 The panel will be lit up by any key operation whe...

Page 56: ...er which a 5 second flashing means the selection of temperature is settled 3 3 Mode Locking Unlocking By touching this key consecutively the operation mode of the refrigerator will change in a circle...

Page 57: ...ng holiday mode Temperature fix 17 in fridge compartment fridge button in vain while holiday icon will flash three times in alarm Exit holiday mode choose mode exit holiday mode after 5 sec entering t...

Page 58: ...ssary to make sure that the plug is available 7 The appliance should not be located near heating equipment or stoves Important During installation it is necessary to provide sufficient space for full...

Page 59: ...ug must be available to ensure immediate dis connection of the appliance from the network Electrical Connection Before connecting the appliance to the network it is necessary to make sure that the vol...

Page 60: ...mode of strong cooling and wait at least 2 hours before placing the products in the freezer IMPORTANT In the case of unintentional defrosting for example when the power outage is longer than specifie...

Page 61: ...fatty products salt reduces the shelf life of products 7 Ice covered products when used directly from the freezer can cause freezing injury 8 It is recommended to specify the product type on the packa...

Page 62: ...etwork during cleaning There is a risk of electric shock Turn off the appliance and disconnect the plug from the receptacle or unplug the switch or remove the fuse Remove all foods from the refrigerat...

Page 63: ...d mark Foods are not frozen enough The temperature is set incorrectly See the section Setting the initial temperature The door has been open for a long period of time Open the door only for the necess...

Page 64: ...ntation they can be carried out both by the user and by specialists having the necessary qualification sent by USC or selling companies on a paid basis In this case the person the institution installi...

Page 65: ...ARDESTO ERC 18 04073 0 800 300 345 44 230 34 84 390 55 12 www erc ua service 1 2 7 3 4 5 6 7 12...

Page 66: ...3 2 1...
Reviews: