Space Requirements
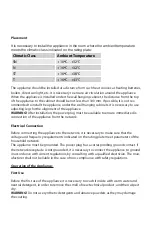
1. Choose a place for the appliance out of direct sunlight.
2. Choose a place that provides ample space for unobstructed opening of the door.
3. Choose a place with a flat or almost flat surface.
4. Provide ample space for installing the appliance on a flat surface.
5. When installing, provide free space at the left, right, behind and above the appliance.
The gaps between the appliance and adjacent items must be 50 mm or more. The free
space above the refrigerator should not be less than 100 mm. This will reduce energy
consumption. If possible, the back side of the appliance should be turned to the wall,
in order to prevent contact with the heated components (compressor, condensing
unit) and burns.
6. After the installation of the appliance, it is necessary to make sure that the plug is
available.
7. The appliance should not be located near heating equipment or stoves.
Important!
During installation, it is necessary to provide sufficient space for full opening of
the door.
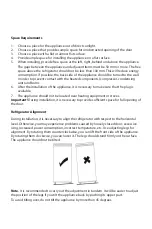
Refrigerator Alignment
During installation, it is necessary to align the refrigerator with respect to the horizontal
level. Otherwise, you may experience problems caused by loosely closed door: excessive
icing, increased power consumption, incorrect temperature, etc. Use adjusting legs for
alignment. By rotating them counterclockwise, you can lift the front side of the appliance.
By rotating them clockwise, you can lower it. The legs should stand firmly on the surface.
The appliance should not be tilted.
Note.
It is recommended to carry out the adjustment in tandem. It will be easier to adjust
the position of the legs if you tilt the appliance back by pushing its upper part.
To avoid tilting over, do not tilt the appliance by more than 45 degrees.
Summary of Contents for DNF-338X
Page 1: ...REFRIGERATOR User manual DNF 338X...
Page 2: ...8 1 2 3 4 5 6 7 8 9 10...
Page 3: ...11 12 13 14 15 16 17 18 19 20 21 22 23 24 R600a 25 26 27 28 29 30...
Page 4: ...31 32 33 34 35 36 37 38 39 40 41 42 43...
Page 5: ......
Page 6: ......
Page 7: ...1...
Page 8: ...2 3 4...
Page 9: ...5 6 7...
Page 10: ...8 9...
Page 11: ...10 11 12...
Page 12: ...13...
Page 15: ...3 4 3 5 25 4 0 MODE 5 18 FREEZER FRIDGE MODE 5...
Page 16: ...4 1 Holiday MODE 17 C FRIDGE Holiday MODE 5 4 2 Super MODE FREEZER Super MODE 5 50...
Page 17: ...1 2 3 4 5 50 100 6 7...
Page 18: ...45 SN 10 C 32 N 16 C 32 ST 16 C 38 T 16 C 43...
Page 19: ...100...
Page 20: ...1 2 3 24 4 24 2...
Page 21: ...1 24 2 3 4 5 6 7 8 9 1 2 3 1 2...
Page 22: ...1 2 3 4 5...
Page 23: ...24...
Page 24: ...8 1 2 3 4 5 6 7 8 9 10...
Page 25: ...11 12 13 14 15 16 17 18 19 20 21 22 23 24 R600a 25 26 27 28 29 30...
Page 26: ...31 32 33 34 35 36 37 38 39 40 41 42 43...
Page 27: ......
Page 28: ......
Page 29: ...1...
Page 30: ...2 3 4...
Page 31: ...5 6 7...
Page 32: ...8 9...
Page 33: ...10 11 12...
Page 34: ...13...
Page 38: ...1 2 3 4 5 50 100 6 7 45...
Page 39: ...100...
Page 40: ...8 1 7 0 1 2 3 24 4 24 2...
Page 41: ...1 24 2 3 4 5 6 7 8 9 1 2 3 1 2...
Page 42: ...1 2 3 4 5 6...
Page 43: ...24...
Page 48: ...Description Note Above picture is for reference only Real appliance probably is different...
Page 66: ...3 2 1...


