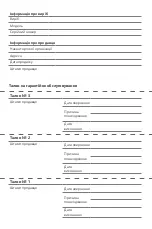
Умови гарантії:
Завод гарантує нормальну роботу
виробу протягом 12 місяців з моменту
його продажу за умови дотримання
споживачем правил експлуатації і до-
гляду, передбачених цією інструкцією.
Термін служби виробу 5 років.
Щоб уникнути непорозумінь,
переконливо просимо Вас уважно
вивчити Інструкцію з експлуатації,
умови гарантійних зобов’язань,
перевірити правильність заповнення
гарантійного талона. Гарантійний талон
дійсний тільки за наявності правильно
та чітко зазначених: моделі, серійного
номера виробу, дати продажу, чітких
відбитків печаток фірми-продавця,
підпису покупця. Модель та серійний
номер виробу повинні відповідати
зазначеним у гарантійному талоні.
При порушенні цих умов, а також
у випадку, коли дані, зазначені в
гарантійному талоні змінені, стерті
або переписані, гарантійний талон
визнається недійсним.
Налаштування та установка (монтаж,
підключення тощо) виробу, описані
в документації, що додається до
нього, можуть бути виконані як самим
користувачем, так і фахівцями УСЦ
відповідного профілю і фірм-продавців
(на платній основі). При цьому особа
(організація), що встановила виріб,
несе відповідальність за правильність і
якість установки (налаштування). Про-
симо Вас звернути увагу на важливість
правильної установки виробу як для
його надійної роботи, так і для отри-
мання гарантійного та безкоштовного
сервісного обслуговування. Вимагайте
від спеціаліста з налаштування внести
всі необхідні відомості про установку до
гарантійного талона.
У разі виходу виробу з ладу протягом
гарантійного терміну експлуатації з
вини виробника, власник має право на
безкоштовний гарантійний ремонт при
пред’явленні правильно заповне-
ного гарантійного талона, виробу в
заводській комплектації та упаковці
до гарантійної майстерні або до місця
придбання. Задоволення претензій
споживача через провину виробника
провадиться відповідно до закону
України «Про захист прав споживачів».
При гарантійному ремонті термін
гарантії подовжується на час ремонту
та пересилання.
Условия гарантии:
Завод гарантирует нормальную работу
изделия в течение 12-ти месяцев с
момента ее продажи при условии
соблюдения потребителем правил
эксплуатации и ухода, предусмотренных
настоящим руководством.
Срок службы изделия 5 лет.
Во избежание недоразумений убеди-
тельно просим Вас внимательно изучить
Руководство по эксплуатации, условия
гарантийных обязательств, проверить
правильность заполнения гарантийного
талона. Гарантийный талон действителен
только при наличии правильно и четко
указанных: модели, серийного номера
изделия, даты продажи, четких печатей
фирмы-продавца, подписи покупателя.
Модель и серийный номер изделия
должны соответствовать указанным в
гарантийном талоне.
При нарушении этих условий, а также
в случае, когда данные, указанные в
гарантийном талоне изменены, стерты
или переписаны, гарантийный талон
признается недействительным
Настройка и установка (сборка, под-
ключение и т.п.) изделия, описанными
в документации, прилагаемой к нему,
могут быть выполнены как самим
пользователям, так и специалистом
сервисного центра соответствую-
щего профиля и фирм-продавцов
(на платной основе). При этом лицо
(организация), установившее изделие,
несет ответственность за правильность и
качество установки (настройки). Просим
Вас обратить внимание на значимость
правильной установки изделия, как
для его надежной работы, так и для
получения гарантийного и бесплатного
сервисного обслуживания. Требуйте от
специалиста по установке внести все
необходимые сведения об установке в
гарантийный талон.
В случае выхода изделия из строя в те-
чение гарантийного срока эксплуатации
по вине изготовителя, владелец имеет
право на бесплатный гарантийный
ремонт при предъявлении верно запо-
лненного гарантийного талона, изделия
в заводской комплектации и упаковке в
гарантийной мастерской. Удовлетворе-
ние претензий потребителя из-за вины
производителя производится в соответ-
ствии с законом Украины «О защите прав
потребителя». При гарантийном ремонте
срок гарантии продлевается на время
ремонта и пересылки.
Warranty conditions:
The plant guarantees normal operation
of the product within 12 months from
the date of the sale, provided that the
consumer complies with the rules of
operation and care provided by this
Manual.
Service life of the product is 5 years.
In order to avoid any misunderstanding
we kindly ask you to carefully study the
Owner’s Manual, the terms of warranty,
and check the correctness of filling the
Warranty Card. The Warranty Card is
valid only if the following information is
correctly and clearly stated: model, serial
number of the product, date of sale, clear
seals of the company-seller, signature of
the buyer. The model and serial number
of the product must correspond to those
specified in the Warranty Card.
If these terms are violated, and if the
information specified in the Warranty
Card is changed, erased or rewritten, the
Warranty Card is considered invalid.
Setup and installation (assembly,
connection, etc.) of the appliance are
described in the attached documentation;
they can be carried out both by the user,
and by specialists having the necessary
qualification sent by USC or selling
companies (on a paid basis). In this case,
the person (the institution) installing
the appliance shall be responsible for the
correctness and quality of installation
(setup). Please pay attention to the
importance of the correct installation
of the appliance, both for its reliable
operation, and for obtaining warranty
and free service. Require the installation
specialist to enter all the necessary
information about the installation in the
Warranty Card.
In case of failure of the appliance during
the warranty period by the fault of the
manufacturer, the owner is entitled to
free warranty repair upon presentation
of the correctly filled Warranty Card
together with the appliance in the factory
configuration packed in the original
packaging to the warranty workshop or
the place of its purchase. Satisfaction of
the customer’s claim due to the fault of the
manufacturer shall be made in accordance
with the law of the Ukraine «On Protection
of Consumers’ Rights». In the case of
warranty repair the warranty period shall
be extended for the period of repair and
shipment.
Summary of Contents for DNF-338X
Page 1: ...REFRIGERATOR User manual DNF 338X...
Page 2: ...8 1 2 3 4 5 6 7 8 9 10...
Page 3: ...11 12 13 14 15 16 17 18 19 20 21 22 23 24 R600a 25 26 27 28 29 30...
Page 4: ...31 32 33 34 35 36 37 38 39 40 41 42 43...
Page 5: ......
Page 6: ......
Page 7: ...1...
Page 8: ...2 3 4...
Page 9: ...5 6 7...
Page 10: ...8 9...
Page 11: ...10 11 12...
Page 12: ...13...
Page 15: ...3 4 3 5 25 4 0 MODE 5 18 FREEZER FRIDGE MODE 5...
Page 16: ...4 1 Holiday MODE 17 C FRIDGE Holiday MODE 5 4 2 Super MODE FREEZER Super MODE 5 50...
Page 17: ...1 2 3 4 5 50 100 6 7...
Page 18: ...45 SN 10 C 32 N 16 C 32 ST 16 C 38 T 16 C 43...
Page 19: ...100...
Page 20: ...1 2 3 24 4 24 2...
Page 21: ...1 24 2 3 4 5 6 7 8 9 1 2 3 1 2...
Page 22: ...1 2 3 4 5...
Page 23: ...24...
Page 24: ...8 1 2 3 4 5 6 7 8 9 10...
Page 25: ...11 12 13 14 15 16 17 18 19 20 21 22 23 24 R600a 25 26 27 28 29 30...
Page 26: ...31 32 33 34 35 36 37 38 39 40 41 42 43...
Page 27: ......
Page 28: ......
Page 29: ...1...
Page 30: ...2 3 4...
Page 31: ...5 6 7...
Page 32: ...8 9...
Page 33: ...10 11 12...
Page 34: ...13...
Page 38: ...1 2 3 4 5 50 100 6 7 45...
Page 39: ...100...
Page 40: ...8 1 7 0 1 2 3 24 4 24 2...
Page 41: ...1 24 2 3 4 5 6 7 8 9 1 2 3 1 2...
Page 42: ...1 2 3 4 5 6...
Page 43: ...24...
Page 48: ...Description Note Above picture is for reference only Real appliance probably is different...
Page 66: ...3 2 1...


