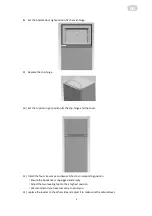
background image

EN


*The picture above is only for reference. The actual configuration will depend on  the physical 
product or statement by the distributor 


4.


OPERATION   

4.1


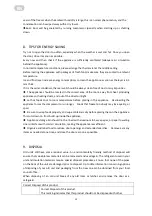
Switching On Your Unit 

Setting

Off

”:

UnitOff   

Setting

Min

”:

Less Cool Temperature   

Setting

Med

  or 

MID

Normal Operation(adequate for most situations)   

Setting

Max

”:

Coolest Temperature   

During high ambient temperatures e.g. on hot summer days. It may be necessary to set the   

thermostat to the Coolest setting(position“Max”).This may cause the compressor running   
continuously in order to maintain a low temperature in the cabinet.   

For the first time you install your refrigerator, set the thermostat knob at “Med”.   

Give your refrigerator time to cool down completely before adding food. It is the best to wait 
24 hours before adding food. The thermostat knob controls the temperature. When the 
thermostat control knob is set to OFF, the refrigerator will not be running. 

4.2


Noise Inside the Unit! 

10 


You may notice that your unit makes some unusual noises. Most of these are perfectly normal, 
but you should be aware of them! 
These noises are caused by the circulation of the refrigerant liquid in the cooling system. It has 
become more pronounced since the introduction of CFC free gases. This is not a fault and will not 
affect the performance of your  unit. This is the compressor motor working, as it pumps the 
refrigerant around the system. 

4.3


Tips for Keeping Food in the Unit 


Cooked meats/fishes should always be stored on a shelf above raw meats/fishes to avoid 
bacterial transfer. Keep raw meats/fishes in a container which is large enough to collect juices 
and cover it properly. Place the container on the lowest shelf. 


Leave space around your food, to allow air to circulate inside the unit. Ensure all parts of the 
unit are kept cool. 


To prevent transfer of favours and drying out, pack or cover the food separately. Fruit and 
vegetables do not need to be wrapped. 


Always let pre-cooked food cool down before you put in the unit. This will help to maintain 
the internal temperature of the unit. 


To prevent cold air escaping from the unit, try to limit the number of times you open the 
door. We recommend that you only open the door when you need to put food in or take food 
out. 

4.4


Change the Light Bulb 

Lamp replacement by professionals 
 

5.


CLEANING 

5.1


Defrosting


NOTE THIS UNIT DOES NOT HAVE AN AUTO DEFROST SYSTEM. 

5.2


Cleaning the Interior and the Exterior of the Unit 


Remove all the shelves and the salad bin. To remove the salad bin first remove the lower 
door shelf. 


Wipe the inside of the unit with a weak solution of bicarbonate soda and then rinse with 
warm water using a

wrung-out

  sponge or cloth. Wipe completely dry before replacing the 

shelves and salad bin. 


Use a damp cloth to clean the exterior, and then wipe with a standard furniture polish. Make 
sure that the door is closed to avoid the polish getting on the magnetic door seal or inside 
the unit. 


The grille of the condenser at the back of the unit and the adjacent components can be 
vacuumed using a soft brush attachment. 

5.3


Cleaning Tips 

Condensation may appear on the outside of the unit. This may be due to a change in room 
temperature. Wipe of any moisture residue. If the problem continues, please contact a qualified 
technician for assistance. 


Summary of Contents for DTF-M212W143

Page 1: ...ХОЛОДИЛЬНИК Інструкція з експлуатації REFRIGERATOR Instruction manual DTF M212W143 DTF M212X143 ...

Page 2: ...ІЯ З БЕЗПЕКИ 3 2 ПІДГОТОВКА ДО РОБОТИ 5 3 ОГЛЯД ПРОДУКТУ 14 4 ВИКОРИСТАННЯ 14 5 ОЧИЩЕННЯ 16 6 ОБСЛУГОВУВАННЯ ПРИЛАДУ 17 7 УСУНЕННЯ НЕПОЛАДОК 17 8 ПОРАДИ З ЕКОНОМІЇ ЕНЕРГІЇ 19 9 УТИЛІЗАЦІЯ 20 ПРАВИЛЬНА УТИЛІЗАЦІЯ ПРИЛАДУ 20 ...

Page 3: ...ажні щоб не пошкодити деталі контуру охолодження 4 УВАГА Не використовуйте електричні прилади всередині вашого холо дильника якщо виробник не дозволяє такого використання 5 Відключайте прилад від мережі електроживлення після використання та перед тим як проводити його обслуговування 6 Цей прилад може бути використаний дітьми у віці від 8 років та особами зі зниженими фізичними сенсорними або розум...

Page 4: ...нтами готелів мотелів та і житлового типу готельні приміщення задля тимчасового розміщення харчування та аналогічні некомерційні призначення 11 Не зберігайте всередині приладу вибухові речовини такі як аеро легкозаймистим газом САМОСТІЙНИЙ СЕРВІСНИЙ РЕМОНТ АБО ЗАМІНА ЧАСТ НЕБЕЗПЕЧНИМИ ДЛЯ КОРИСТУВАЧА ЗВЕРНІТЬСЯ ДО В З ОБСЛУГОВУВАННЯ НЕАВТОРИЗОВАНИЙ ЗЙОМ КОЖУХУ ПРИЛАДУ МОЖЕ П УДАРУ ЕЛЕКТРИЧНИМ СТРУ...

Page 5: ...вколишнього середовища також можуть спричинити несправність приладу Цей прилад не призначений для використання в гаражі або розташування на вулиці Не накривайте прилад ніяким покриттям Під час встановлення слід забезпечити 10 см вільного простору з обох сторін 10 см ззаду і 30 см над приладом Це дасть змогу холодному повітрю вільно циркулювати та підвищить ефективність процесу охолодження 2 2 Змін...

Page 6: ...що закріплюють верхній шарнір хрестовою викруткою гвинти 3 Зніміть верхній шарнір і верхній обмежувач а також блок дверцят на іншу сторону А Зніміть гайку з муфтою Зніміть шайбу потім витягніть осі з іншої сторони та зафіксуйте ...

Page 7: ...ть інший обмежувач що прикріплений гвинтом до дверцят 4 Відверніть гвинти що закріплюють нижній шарнір хрестовою викруткою гвинти Примітка морозильна камера пристрою під нахилом менше 45 5 Зніміть нижню втулку підшипника і обмежувальний блок ...

Page 8: ...8 UA 6 Перенесіть нижній шарнір на іншу сторону потім закріпіть його гвинтами 7 Зніміть середній шарнір 8 Встановіть положення нижньої двері зафіксуйте шарнір посередині ...

Page 9: ...суйте верхній шарнір та кришку 11 Встановіть чотири гвинтові ковпачки та два ущільнювача у відповідне положення Переконайтеся що пристрій від єднаний від електромережі та порожній Відрегулюйте рівні ніжок до їх найвищого положення Ми радимо вам попросити когось допомогти вам ...

Page 10: ...орону та відрегулюйте його щоб ви рівняти корпус Встановлення ручки дверей опціонально Холодильник необхідно від єднати від джерела електроживлення перш ніж встановлювати аксесуари Крок 1 Витягніть два штифта з дверей сторона відкривання дверей ...

Page 11: ...11 UA Крок 2 Встановіть дверну ручку і закріпіть її гвинтами Крок 3 Закрийте отвори гвинтів захисними ковпачками ...

Page 12: ...а пере дній панелі приладу Якщо прилад не вирівня но дверцята і магнітні ущільнювачі не будуть правильно закриватися Перед використанням слід переконатися що ніжки надійно торкаються підлоги В залежності від рівня підлоги обертайте важіль за чи проти годинникової стрілки 2 5 Чищення перед використанням Всередині прилад слід промити слабким розчином харчової соди Після чого протерти губкою чи ганчі...

Page 13: ... ного рівня Не переповнюйте ваш прилад Перед підключенням Ваша розетка має бути сумісною із штепсельною вилкою яка постачаєть ся разом з приладом Перед першим включенням Не включайте ваш прилад протягом двох годин після його пересування 2 7 Внутрішні аксесуари Ваш прилад оснащений різними видами скляних чи пластикових полиць для зберігання різні моделі мають різні комбінації Одна полиця з загартов...

Page 14: ... з експлуатації призначені лише з метою ознайомлення будь ласка звіряйте з вашою моделлю приладу 4 ВИКОРИСТАННЯ 4 1 Увімкнення приладу Ручка термостата розташована на правій стінці всередині вашого холодильника Положення OFF прилад вимкнений Положення MIN мінімально низька температура Положення MED нормальний температурний режим підходить для збері гання більшості продуктів ...

Page 15: ...и стали більш вираженими Це не є дефектом і жодним чином не вплине на ефективність роботи вашого приладу Ці звуки видає двигун компресора оскільки він нагнітає холодоагент навколо системи 4 3 Поради зі зберігання продуктів харчування Приготоване м ясо риба повинні завжди зберігатися на іншій полиці ніж сире м ясо риба щоб уникнути зараження бактеріями Зберігайте сирі м ясо рибу в достатньо великом...

Page 16: ...і контейнер для фруктів та овочів перед тим як встанов лювати їх всередину приладу Протріть зовнішню частину приладу вологою ганчіркою після чого вико ристайте звичайний поліруючий засіб Переконайтесь що двері закриті щоб запобігти попаданню поліруючого засобу на герметичну ізоляцію дверцят чи всередину приладу Решітку конденсатора на задній панелі приладу та суміжні компоненти можна пилососити за...

Page 17: ... до травм чи серйозних пошкоджень Зв яжіться з авторизованим сервісним центром 6 4 Вимкнення на довгий період Якщо пристрій не використовується протягом тривалого періоду часу від ключіть його від мережі електроживлення вийміть всі продукти харчування та очистіть пристрій залишаючи дверцята відкритими щоб запобігти утво ренню неприємного запаху 7 Усунення неполадок Наступні прості неполадки можуть...

Page 18: ...ння продуктів Занадто багато розміщених продуктів всередині Прилад може бути нахилений Прилад видає незвичні звуки Перевірте чи рівно розміщені продукти харчування всередині чи відбалансований самий прилад Чи правильно розміщені деталі всередині приладу 7 1 Поради Корпус холодильника може виділяти тепло під час експлуатації осо бливо влітку це викликано активною роботою конденсатора і це є нормаль...

Page 19: ...ці далеко від пристроїв що виробляють тепло нагрівальних елементів а також поза прямими сонячними променями Перш ніж помістити всередину приладу продукти харчування переко найтеся що вони охолоджені до кімнатної температури Перевантаження приладу призводить до довшої роботи компресора Продукти харчу вання які замерзають занадто повільно можуть втратити свої якості або зіпсуватися Обов язково загор...

Page 20: ...ів належним чином переробляйте прилад для сприяння стійкому повторному використанню матеріальних ресурсів Щоб повернути використаний вами прилад будь ласка використовуйте системи повернення та збору або зв яжіться з агентом в якого ви придбали цей прилад Так буде можливим використання цього приладу для екологічно безпечної переробки Щоб отримати додаткову інформацію будь ласка зв яжіться з місцеви...

Page 21: ...IEW 8 4 OPERATION 9 4 1 Switching On Your Unit 9 4 2 Noise Inside the Unit 9 4 3 Tips for Keeping Food in the Unit 10 4 4 Change the Light Bulb 10 5 CLEANING 10 5 1 Defrosting 10 5 2 Cleaning the Interior and the Exterior of the Unit 10 5 3 Cleaning Tips 10 6 MAINTENANCE 11 6 1 Changing the Internal Light 11 6 2 Care When Handling Moving Your Unit 11 6 3 Servicing 11 6 4 Switching Of for Long Peri...

Page 22: ...STALLTION 1 SAFETY WARNINGS 1 WARNING Keep ventilation openings in the appliance enclosure or in the built in structure clear of obstruction 2 WARNING Do not use mechanical devices or other means to accelerate the defrosting process other than those recommended by the manufacturer 3 WARNING Do not damage the refrigerant circuit 4 WARNING Do not use electrical appliances inside the food storage com...

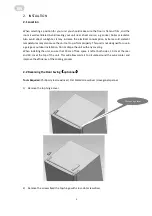
Page 23: ...signed for use in a garage or outdoor installation Do not drape the unit with any covering When installing the unit ensure that 10 cm of free space is left at both sides 10 cm at the rear and 30 cm at the top of the unit This will allow cold air to circulate around the wine cooler and improve the efficiency of the cooling process 2 2 Reversing the Door Swing optionnal Tools Required Phillips style...

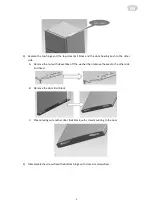
Page 24: ... other side A Remove the nut with sleeve Take off the washer then remove the axes to the other side and fixed B Remove the door limit block C Please taking out another door limit block with screw mounting to the door 4 Disassemble the screws fixed the bottom hinge with cross slot screwdriver ...

Page 25: ...4 Note the refrigerator freezer incline angle less 45 5 Replace the bottom door bearing bush and the limit block 6 Replace the bottom hinge to the other side then fix it with screws 7 Replace the mid hinge ...

Page 26: ...e top hinge and the cover 11 Install the four screw caps and two catches to corresponding position Ensure the Appliance is unplugged and empty Adjust the two leveling feet to their highest position We recommend you have someone to assist you 12 replace the leveler to the other side and adjust it to make sure the cabinet level ...

Page 27: ...ay differ slightly The refrigerator must be disconnected from the source of electrical supply before attempting the installation of accessory Step 1 take out two plug pins from the door Side of door open Step 2 Install the door handle to the door and fasten it with screws Step 3 Cover screw caps of the handle into screw holes The picture above is only for reference The actual configuration will de...

Page 28: ...section 2 7 Before Using Your Unit Do not damage the power cord under any condition so as to ensure safety use do not use when the power cord is damaged or the plug is worn Do not put flammable explosive volatile and highly corrosive items in the refrigerator to prevent damages to the product or fire accidents Do not place flammable items near the refrigerator to avoid fires This product is househ...

Page 29: ... slide one of the full size glass storage shelves into the lowest set of guides above the fruit and vegetable containers and keep it in this position To do this pull the storage shelf forward until it can be swivelled upwards or downwards and removed Please do the same in reverse to insert the shelf at a different height In order to make the most of the volume of the fresh food storage compartment...

Page 30: ...e g on hot summer days It may be necessary to set the thermostat to the Coolest setting position Max This may cause the compressor running continuously in order to maintain a low temperature in the cabinet For the first time you install your refrigerator set the thermostat knob at Med Give your refrigerator time to cool down completely before adding food It is the best to wait 24 hours before addi...

Page 31: ...tain the internal temperature of the unit To prevent cold air escaping from the unit try to limit the number of times you open the door We recommend that you only open the door when you need to put food in or take food out 4 4 Change the Light Bulb Lamp replacement by professionals 5 CLEANING 5 1 Defrosting NOTE THIS UNIT DOES NOT HAVE AN AUTO DEFROST SYSTEM 5 2 Cleaning the Interior and the Exter...

Page 32: ...ot settled Inoperation Whether the freezer is plugged and connected to power Low voltage Failure power or tripping circuit Odor Odorous foods should closely wrapped Whether foods are rotten Whether the interior shall be cleaned Long term operation of compressor It is normal that refrigerator operates for longer time in summer when the ambient temperature is higher Do not put too much food in the f...

Page 33: ...e Overloading the appliance forces the compressor to run longer Foods that freeze too slowly may lose quality or spoil Be sure to wrap foods properly and wipe containers dry before placing them in the appliance This cuts down on frost build up inside the appliance Appliance storage bin should not be lined with aluminum foil wax paper or paper toweling Liners interfere with cold air circulation mak...

Page 34: ...le reuse of material resources To return your used device please use the return and collection systems or contact the retailer where the product was purchased They can take this product for environmental safe recycling For more information please contact the local authority or your retailer where you purchased the product For more information please visit our website www midea com ...

Page 35: ...____ __________________________________________________ __________________________________________________ __________________________________________________ __________________________________________________ __________________________________________________ __________________________________________________ __________________________________________________ ______________________________________...

Page 36: ...____ __________________________________________________ __________________________________________________ __________________________________________________ __________________________________________________ __________________________________________________ __________________________________________________ __________________________________________________ ______________________________________...

Page 37: ...____ __________________________________________________ __________________________________________________ __________________________________________________ __________________________________________________ __________________________________________________ __________________________________________________ __________________________________________________ ______________________________________...

Page 38: ...ня Warranty conditions The plant guarantees normal operation of the product within 12 months fromthe date of the sale provided that the consumer complies with the rules ofoperation and care provided by this Manual Service life of the product is 5 years In order to avoid any misunderstanding we kindly ask you to carefully study theOwner s Manual the terms of warranty and check the correctness ofYll...

Page 39: ... 6 Виріб знімається з гарантійного обслуговування у випадках використання не за призначенням та не у споживчих цілях механічні пошкодження пошкодження що виникли у наслідок потрапляння всередину виробу сторонніх предметів речовин рідин комах пошкодження що викликані стихійними лихами дощем вітром блискавкою та ін пожежею побутовими факторами надмірна вологість запиленість агресивне середовище та і...

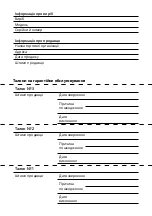
Page 40: ...зації Адреса Дата продажу Штамп продавця Талони на гарантійне обслуговування Талон 3 Штамп продавця Дата звернення Причина пошкодження Дата виконання Талон 2 Штамп продавця Дата звернення Причина пошкодження Дата виконання Талон 1 Штамп продавця Дата звернення Причина пошкодження Дата виконання ...

Reviews: