Примечание:
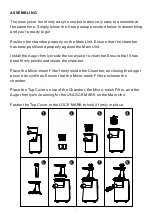
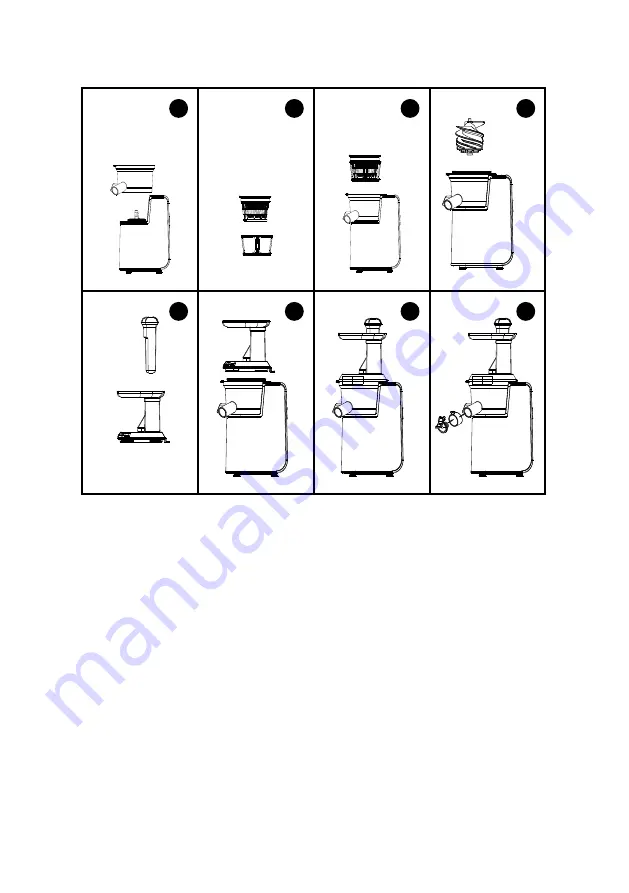
Осуществите сборку, как показано на рисунках ниже.
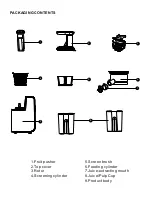
PACKAGING CONTENTS
1.Fruit pusher
2.Top cover
3.Rotor
4.Screening cylinder
5.Screen brush
6.Feeding cylinder
7.Juice-extracting mouth
8.Juice/Pulp Cup
9.Product body
1
4
9
2
5
8
7
3
6
3
ASSEMBLING
The slow juicer is not only easy to use but is also very easy to assemble at
the same time. Simply follow the 5-step setup provided below in assembling
and you’re ready to go!
Position the chamber properly on the Main Unit. Ensure that the chamber
has been positioned properly against the Main Unit.
Install the Auger firmly inside the slow juicer’s chamber.Ensure that it has
been firmly positioned inside the chamber.
Place the Micro-mesh Filter firmly inside the Chamber, enclosing the Auger
around its confines.Ensure that the Micro-mesh Filter encloses the
chamber.
Place the Top Cover on top of the Chamber, the Micro-mesh Filter, and the
Auger firmly while aiming for the UNLOCK MARK on the Main Unit.
Fasten the Top Cover to the LOCK MARK to hold it firmly in place.
1
2
3
4
5
6
7
8
4
1. Совместите прозрачный цилиндр с моторным блоком (Рисунок 1);
2. Поместите сито в очищающий ободок (Рисунок 2);
3. Вставьте сито с ободком в прозрачный цилиндр (Рисунок 3);
4. Наденьте шнек на вал мотора (Рисунок 4);
5. Вставьте толкатель в загрузочное отверстие (Рисунок 5);
6. Совместите отметку на крышке с треугольником на прозрачном
цилиндре (Рисунок 6);
7. Поверните по часовой стрелке, чтобы закрепить, и против часовой
стрелки, чтобы открыть (Рисунок 7);
8. Наденьте клапан на носик (не обязательно) (Рисунок 8).


