Mounting the tubes
The tubes are the last components on the board. They must be mounted carefully so that they sit neatly
over the top of the RGB LEDs, and so that they are upright and parallel.
The
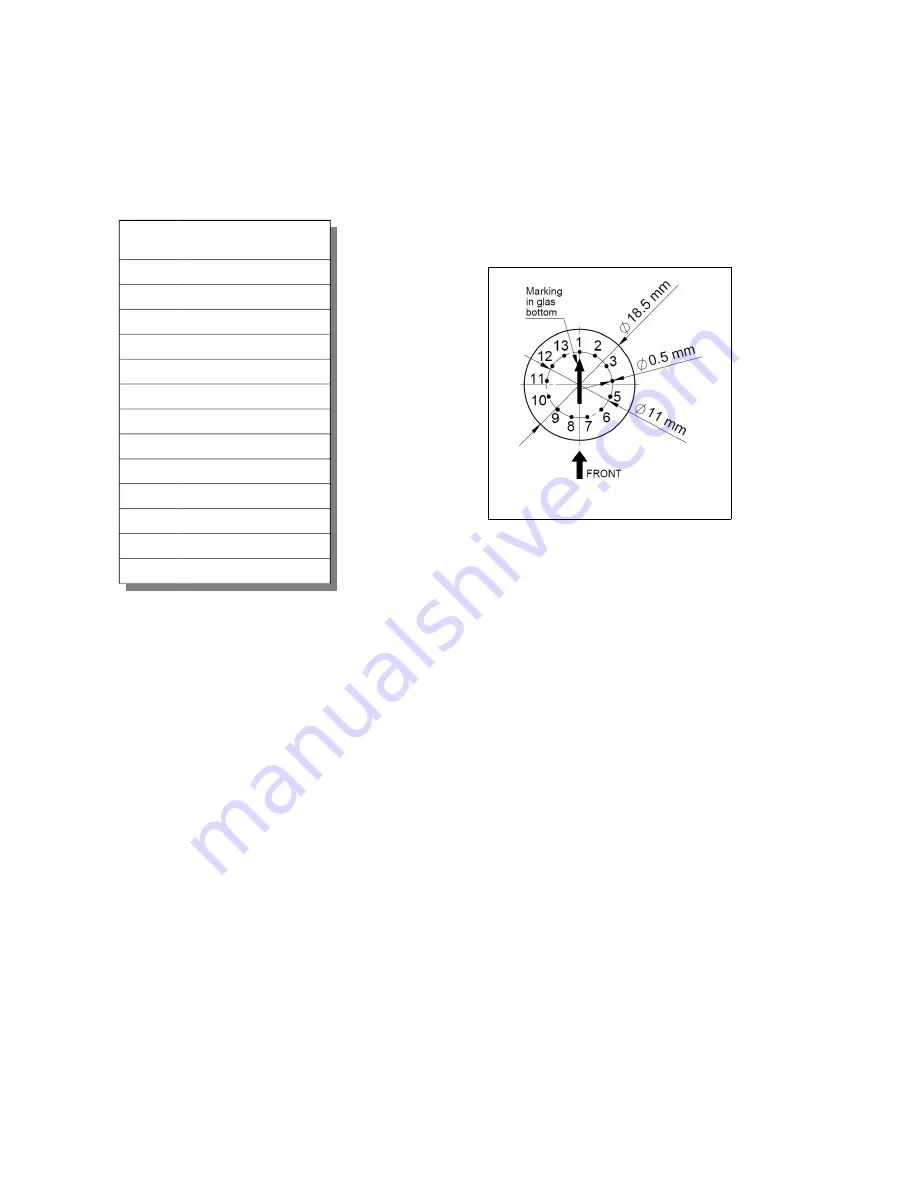
pin out diagram is viewed from the bottom of the tubes
. Pins 2 and 13 are decimal points, and are
often removed on the tubes. The other pins are given below.
Pin
Connection
1
Anode
2
Left decimal point
3
Digit 1
4
Digit 2
5
Digit 3
6
Digit 4
7
Digit 5
8
Digit 6
9
Digit 7
10
Digit 8
11
Digit 9
12
Digit 0
13
Right decimal point
•
It is best to carefully spread the legs of the tube out. If you have long enough leads, a trick is to
trim the leads to different lengths so they get shorter by 0.5mm as you go round the tube. This
means that pin 3 is shorter than pin 1 by 0.5mm. Pin 4 is shorter than pin3 by 0.5mm and so on.
Pin12 is shorter than pin 3 by 5mm at the end. This means that you can thread the leads into the
holes more easily.
•
You can remove the decimal point leads on each side of the anode (pins 2 and 13) if you want –
they are not used. Remember to leave an unpopulated hole on the board on each side of the
anode in this case. Be careful to trim the right leads if you want to remove them!
•
Place the tube base against the top of the LED, without leaving a gap.
•
To make the tube stand upright, solder just three leads at the beginning (e.g. pin 1, pin6 and pin
10). You can then easily align the tube so that it is perfectly upright by reheating only one of the
pins. Once the tubes are upright and aligned, you can solder the remaining pins.
•
For last resort, final, small adjustments, you can force the tube slightly so the leads give. It is best
to align the tubes without force. IN-14 tubes are robust, but they are made of glass and must be
treated with care.
•
Once the tubes are mounted, you can trim the colon LEDs to match the height of the tubes.


