background image

Arecont Vision HSG2 Installation Manual 

1  |  P a g e


HSG2 Installation Manual 

Inside the box: 

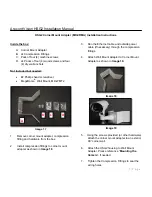
A.  Arecont Vision HSG2 Housing 
B. Flat 

washer 

C. Spring 

washer 

D. Machine 

screw 

E.  Two (2) rubber plugs 
F. RJ45 

Cable 

G. Two-sided 

hexagonal 

wrench 

Not included but needed: 


#1 Phillips head screwdriver 


Image 1 

 
Mounting the Camera: 
 

1. 

Remove HSG2 housing and hardware from 
the box. 


2. 

Open the HSG2 housing by using the 
provided wrench to loosen the two screws 
shown in


Image 2


NOTE: Do not remove screws from the 

housing.


Image 

3. 

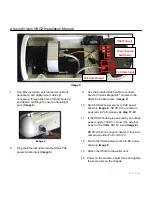
Remove the tray from the housing shown in 

Image 3

.  


Note: Please do not remove the heat sink 
from the HSG2 housing. 


Image 3 


4. 

Use the provided screw, flat washer and 
spring washer to attach Arecont Vision 
MegaVideo® cameras on the tray shown in 

Image 4-1 and Image 4-2

F


E

C


A


D


B


G


Tray

Heat


Sink


Summary of Contents for HGS2

Page 1: ...Arecont Vision HSG2 Installation Manual 0 P a g e...

Page 2: ...the Camera 1 Remove HSG2 housing and hardware from the box 2 Open the HSG2 housing by using the provided wrench to loosen the two screws shown in Image 2 NOTE Do not remove screws from the housing Ima...

Page 3: ...at sink shown in Image 5 Image 5 6 Remove the silicone cap from the housing cut the side part if necessary Image 6 to run the RJ45 cable external power and digital in out cables through the silicone c...

Page 4: ...ra to the HSG2 PoE data output Image 9 10 Switch HSG2 power source to PoE power shown in Image 9 NOTE If the camera is powered via PoE please skip step 11 12 11 If the HSG2 housing is powered by an ou...

Page 5: ...ed 2 Phillips head screwdriver Image 10 1 Remove wall mount and hardware from the box Image 11 2 Run the Ethernet cable and outside power cable if necessary through the wall mount 3 Install the HSG2 h...

Page 6: ...river HSG2 WMT HSG2 Wall Mount NPT Conduit if necessary Image 12 1 Remove the junction box and hardware from the box Image 13 2 Remove the conduit plug by first removing the socket set screw by using...

Page 7: ...d hardware from the box 2 Install compression fittings to pole mount adapter as shown in Image 15 3 Run the Ethernet cable and outside power cable if necessary through the compression fittings 4 Attac...

Page 8: ...ter compression fitting and hardware from the box 2 Install compression fittings to corner mount adapter as shown in Image 18 3 Run the Ethernet cable and outside power cable if necessary through the...

Page 9: ...Arecont Vision HSG2 Installation Manual 8 P a g e...

Reviews: