Junction Box Adapter (SV-JBA) Installation Instruction
(Sold Separately)
Caution:
SV-JBA should always be used in conjunction
with a wall mount, MD-WMT2, for outdoor
installation.
SV-JBA will only fit with the MD-WMT2 wall
mount. It does not fit the camera dome or older
wall mount MD-CMT!
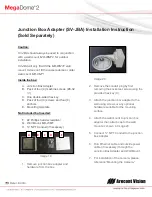
Inside the box:
A. Junction Box Adapter
B. Pack of four (4) machine screws (#8-32
½”)
C. One double-sided hex key
D. Pack of four (4) screws and four (4)
anchors
E. Mounting template
Not included but needed:
F. #2 Phillips head screwdriver
G. Wall Mount, MD-WMT
H.
¾” NPT Conduit (if necessary)
Image 19
1. Remove junction box adapter and
hardware from the box.
Image 20
2. Remove the conduit plug by first
removing the socket set screw using the
provided hex key (C).
3. Attach the junction box adapter to the
wall using screws or any optional
hardware suitable for the mounting
surface.
4. Attach the wall mount to junction box
adapter then attach cap to the wall
mount as shown in Image 20.
5.
Connect ¾” NPT Conduit to the junction
box adapter.
6. Run Ethernet cable and outside power
cable (if necessary) through the
Junction Box Adapter and Wall Mount.
7. For installation of the camera, please
reference “Mounting the Camera.”
B
C
A
D
E


