background image

Arecont Vision MegaDome

®

 2 Installation Manual (DN Models Only) 

0 | P a g e


Summary of Contents for MegaDome 2

Page 1: ...Arecont Vision MegaDome 2 Installation Manual DN Models Only 0 P a g e ...

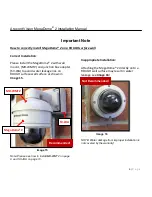
Page 2: ...J Magnetic core 1 Phillips head screwdriver Not included but needed 2 Phillips head screwdriver Image 1 Mounting the Camera 1 Remove the camera and hardware from the box 2 Using the mounting template prepare the mounting surface for camera installation NOTE the 19 5mm diameter hole on the Mounting template is where the Ethernet cable will be exiting the MegaDome 2 align accordingly If using the si...

Page 3: ...f the camera will be powered by an AC or DC power supply run the supplied power cable through the gasket and the hole on the bottom of the camera or run the cable through the side conduit and connect it to its respective connector inside the camera Image 3 NOTE Make sure that your installation of wires complies with Electrical Code of the local government where the camera is installed and that no ...

Page 4: ... the set screw as shown in Image 5 1 NOTE There are two set screws on opposite sides both need to be loosened CAUTION Do not remove the screw 14 Adjust the Z Axis as required and tighten the set screws 15 To adjust back focus loosen the three 3 set screws with the appropriate Allen key as shown Image 5 2 only one of two screw holes shown Adjust the silver back focus ring as needed and tighten down...

Page 5: ...ng software will automatically discover and change assign IP address to match PC subnet NOTE 2 Advanced Mode software will automatically discover but allow manual update of the IP address See AV100 Installation Manual found on the CD for details on Advanced Mode Image 10 22 Select Install Cameras on Arecont Vision Camera Installer as shown in Image 10 23 Confirm all cameras connected to the networ...

Page 6: ...on the CD for details on the web interface Image 11 25 When all cameras appear select Save Exit The AV100 application will appear 26 From the AV100 Application Manager menu select Run to view live images NOTE See the AV100 Installation Manual found on CD for details on camera configurations ...

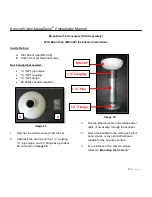
Page 7: ...SV JBA to avoid water leakage risk on ROUGH surface wall surface as shown in Image 15 Image 15 Note Please see how to install MD WMT2 on page 9 and SV JBA on page 10 Inappropriate Installation Attaching the MegaDome 2 directly onto a ROUGH wall surface may result in water leakage see Image 16 Image 16 NOTE Water damage from improper installation is not covered by the warranty MD WMT2 Not Recommend...

Page 8: ... wall anchors 2 Phillips head screwdriver Not included but needed Image 17 1 Remove the wall mount and hardware from the box Image 18 2 Using the mounting template prepare the mounting surface 3 Attach wall mount to the wall using drywall screws or any optional hardware suitable for the mounting surface 3 Install top shield on the wall mount as shown in image 18 4 Fasten the socket set screw using...

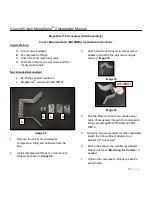
Page 9: ...template 2 Phillips head screwdriver Not included but needed Wall Mount MD WMT NPT Conduit if necessary Image 19 1 Remove junction box adapter and hardware from the box Image 20 2 Remove the conduit plug by first removing the socket set screw using the provided hex key C 3 Attach the junction box adapter to the wall using drywall screws or any optional hardware suitable for the mounting surface 4 ...

Page 10: ... and hardware from the box Image 22 Image 23 2 Using the mounting template prepare the mounting surface for camera installation 3 Place small gasket onto pendant mount shown in image 22 4 Attach the top shield to the pendant as shown in Image 23 using four machine screws E provided 5 Install the large round rubber gasket onto the pendant as shown in image 23 Be sure to align the holes appropriatel...

Page 11: ...ips head screwdriver Image 24 1 Remove the wall mount cap from the box 2 Assemble the wall mount cap 1 coupling 1 pipe nipple and 1 flange as a pendant Mount shown in image 25 Image 25 3 Run the Ethernet cable and outside power cable if necessary through the pendant 4 Attach the pendant to the ceiling using four wood screws or any optional hardware suitable for the mounting surface 5 For installat...

Page 12: ...om the box 2 Attach the dome to the flush mount adapter as shown in Image 27 Please reference Mounting the Camera if needed 3 Using the mounting template cut a hole in surface for mounting 4 Insert the flush mount adapter into the hole 5 Tighten the lever screws until the flush mount adapter is snuggly installed as shown in Image 27 The Support Arm will ride down the screw to compress the mounting...

Page 13: ... four 4 machine screws Image 29 2 Phillips head screwdriver Not included but needed Common electrical box such as single gang box double gang box or square electrical boxes shown in Image 30 1 4 1 Remove the electrical box adapter and hardware from the box 2 Attach the wall mount bracket SV WMT2 to the electrical box adapter 3 Attach electrical box adapter to electrical box Image 30 1 Single gang ...

Page 14: ...d hardware from the box 2 Install the compression fittings to pole mount adapter as shown in Image 32 3 Attach MegaDome 4 Run the Ethernet cable and outside power cable if necessary through the compression fittings and MegaDome wall mount MD WMT2 to pole mount adapter as shown in Image 33 5 Use the supplied two steel straps to attach the Pole Mount Adapter to the pole and tighten the compression s...

Page 15: ...sion fitting and hardware from the box 2 Install compression fittings to corner mount adapter as shown in Image 35 3 Attach wall mount adapter to corner mount adapter and attach the wall mount cap as shown in Image 36 Image 35 Image 36 4 Run the Ethernet cable and outside power cable if necessary through the compression fittings and MegaDome 5 Using the screws provided or other hardware attach the...

Page 16: ... the heater cable to the connector on PCB as shown in Image 39 Red is positive cable NOTE 1 MegaDome 2 Heater MD2 HK uses 2 28 watts which is different from the MegaDome NOTE 2 Unlike the MegaDome Heater MD 1HK is 10 watts Heater MD 1HK MegaDome 3 With the heater element facing away from the main board in the camera align the two 2 holes on the heater board with the two holes on gimbal base shown ...

Page 17: ... flat head screw driver to push it in is recommended Min Max Input voltage V ON 2 9 6 3 measured between and terminals OFF 0 1 3 Output current mA ON 50 measured between and terminals Applied Voltage Rage 0 80V OFF 0 1 Table 1 Image 41 NOTE Both the input and the output are electrically isolated from the rest of the camera s electrical circuitry via general purpose photo couplers The input is addi...

Page 18: ...Arecont Vision MegaDome 2 Installation Manual 17 P a g e ...

Reviews: