background image

Specifications

Wingspan: ............... 65.25 in (1657mm)
Wing Area: ............. 752 sq in (48.5 sq dm)
Length: .................... 51.5 in (1308mm)
Weight: .................... 7.5–.8.5 lb (3.4 kg–3.85 kg)

ASSEMBLY MANUAL

F4U Corsair .60 ARF

WE GET PEOPLE FLYING

TM

®

Recommended Engines: 

  .61–.75 2-stroke 
.91–1.0 4-stroke

Radio: ...................... 5-channel w/6 servos

Summary of Contents for F4U Corsair .60

Page 1: ...in 1657mm Wing Area 752 sq in 48 5 sq dm Length 51 5 in 1308mm Weight 7 5 8 5 lb 3 4 kg 3 85 kg ASSEMBLY MANUAL F4U Corsair 60 ARF WE GET PEOPLE FLYING TM Recommended Engines 61 75 2 stroke 91 1 0 4 stroke Radio 5 channel w 6 servos ...

Page 2: ... the Ailerons 16 Section 6 Installing the Elevators 17 Section 7 Installing the Rudder 19 Section 8 Retract Linkage Installation 22 Section 9 Engine Installation 25 Section 10 Throttle Pushrod Installation 26 Section 11 Fuel Tank Assembly 28 Section 12 Fuel Tank Installation 31 Section 13 Radio Installation 32 Section 14 Linkage Installation 38 Section 15 Cowling Installation 44 Section 16 Canopy ...

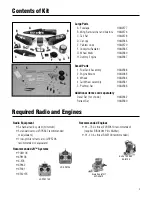
Page 3: ...ofile retract servo JRPS703 recommended or equivalent Recommended JR Systems PCM10X XP8103 X 378 XP662 XF631 XF421EX Recommended Engines 61 75 2 stroke EVOE0610 recommended requires BIS04061 Pitts Muffler 91 1 0 4 stroke SAIE100 recommended Small Parts 1 Fuel Tank Assembly HAN2588 2 Engine Mount HAN2033 3 Wheels HAN2584 4 Tail Wheel Assembly HAN2581 5 Pushrod Set HAN2583 Additional items sold sepa...

Page 4: ...0 File Fuel Tubing AER1003 Measuring device e g ruler tape measure Mixing Sticks for Epoxy DUB346 Paper towels Petroleum jelly Rubbing alcohol Sanding bar Sandpaper medium String T Pins DUB252 Wax paper An RC aircraft is not a toy If misused it can cause serious bodily harm and damage to property Fly only in open areas preferably at AMA Academy of Model Aeronautics approved flying sites following ...

Page 5: ... date of purchase This warranty does not cover any parts damage by use or modification In no case shall Horizon Hobby s liability exceed the original cost of the purchased kit Further Horizon Hobby reserves the right to change or modify this warranty without notice In that Horizon Hobby has no control over the final assembly or material used for the final assembly no liability shall be assumed nor...

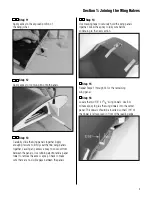
Page 6: ...end the retract Make a slight bend in the linkage towards the bottom of the wing This will make the alignment of the wire to the retract servo much easier later Step 2 Remove the tape from the string located in the outer wing panel Tape the string to the retract linkage so it can be accessed later Note Do not remove the string from the wing panel Step 3 Draw a centerline on the wing joiner as show...

Page 7: ...ightly sand the joiner as necessary to achieve a proper fit Note The joiner will be angled towards the bottom of the wing Step 6 Use a hobby knife to remove the covering from the opening in the center panel for the retract servo Step 7 Without using any glue test fit the wing panel and center panel together using the wing joiner Guide the retract linkage into the center panel so it is visible in t...

Page 8: ... the wing joiner cavity of the outer wing panel Step 9 Completely coat the short half of the wing joiner with epoxy Be sure to apply epoxy to the top and bottom of the joiner also Insert the epoxy coated side of the joiner into the outer wing joiner cavity up to the mark on the joiner If you have used enough epoxy it will ooze out of the cavity as the joiner is installed Remove any excess epoxy us...

Page 9: ...bbing alcohol and a paper towel to remove the excess epoxy Check to make sure there are no visible gaps between the panels Step 14 Use masking tape to securely hold the wing panels together Allow the epoxy to fully cure before continuing to the next section Step 15 Repeat Steps 1 through 14 for the remaining wing panel Step 16 Locate the two 1 4 x 11 4 wing dowels Use 30 minute epoxy to glue the w...

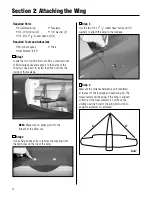
Page 10: ...e inside of the fuselage Note Make sure no epoxy gets into the threads of the blind nut Step 2 Use a sharp hobby knife to remove the covering from the bolt holes on the top of the wing Step 3 Use the two 1 4 x 11 2 socket head bolts and 1 4 washers to attach the wing to the fuselage Step 4 Measure the distance between a point centered at the rear of the fuselage and each wing tip The measurement w...

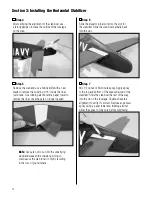
Page 11: ...ar forward as possible Center the stab in the opening by measuring the distance from the fuselage to each tip The stab is aligned when both measurements are identical Step 2 Check the distance from each stab tip to each wing tip These measurements must be equal for the stab to be aligned Step 3 Check to make sure the wing and stabilizer are parallel If they are not lightly sand the opening in the ...

Page 12: ...cut into the underlying wood and weaken the structure Doing so could cause the stab to fail in flight resulting in the loss of your airplane Step 6 Slide the elevator joiner wire into the slot for the stabilizer Slide the stabilizer partially back into the slot Step 7 Mix 1 2 ounce of 30 minute epoxy Apply epoxy to the top and bottom of the exposed wood of the stabilizer Slide the stabilizer the r...

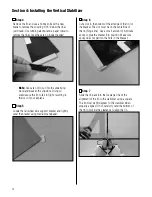
Page 13: ... Ruler Step 1 Remove the covering from the top of the fuselage for the vertical fin and from the bottom of the fuselage for the tail wheel wire Step 2 Locate the tail wheel wire Slide the steering control arm onto the wire as shown Step 3 Test fit the fin to the fuselage Slide the fin as far forward in the slot as possible to provide clearance for the tail wheel wire Trace the outline of the fusel...

Page 14: ... 5 Locate the tail wheel wire support bracket and lightly sand the bracket using medium sandpaper Step 6 Cut a slot in the bottom of the aft edge of the fin for the bracket The slot must be on the centerline of the fin hinge line Use a small amount of 6 minute epoxy to glue the bracket into position Make sure epoxy does not get into the hole in the bracket Step 7 Slide the fin back into the fusela...

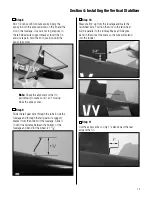
Page 15: ...it isn t moving while the epoxy cures Step 9 Slide the tail gear wire through the tube inside the fuselage and through the tail gear wire support bracket from the bottom of the fuselage Slide it in until the distance between the bottom of the fuselage and bend for the wheel is 17 8 Step 10 Measure 3 4 up from the fuselage and mark the tail wheel wire Position the wire so the tail wheel will be par...

Page 16: ... be a maximum of approximately 1 64 Check to make sure the gap at both ends of the aileron are equal and that the aileron can move without rubbing on the wing Note Do not use CA accelerator during the hinging process The CA must be allowed to soak into the hinge to provide the best bond Using accelerator will not provide enough time for this process Step 4 Remove the T Pins and move the aileron to...

Page 17: ...ck for proper movement Step 7 Repeat Steps 1 through 6 for the remaining aileron Section 6 Installing the Elevators Required Parts Fuselage assembly Elevator joiner wire CA hinge 6 Elevator left and right Required Tools and Adhesives Thin CA T pins 30 minute epoxy Medium sandpaper Drill Drill Bit 9 64 Step 1 Locate one of the elevator halves Remove the covering from the slot in the elevator Measur...

Page 18: ...bbing alcohol and a paper towel Note You can combine the previous step with the following step if you like This will hold the elevator in position while the epoxy cures Step 5 Check to make sure the elevator moves freely It should not rub against the stabilizer at the tip Check to make sure the hinge gap between the elevator and stabilizer is roughly 1 64 Apply thin CA to both sides of the hinge M...

Page 19: ...d in the previous step using a 9 64 drill bit Step 9 Repeat Steps 2 through 6 to install the remaining elevator half Section 7 Installing the Rudder Required Parts Fuselage assembly Rudder CA hinge 3 Required Tools and Adhesives Thin CA T pins 30 minute epoxy Medium sandpaper Drill Drill Bit 1 8 Step 1 Hold the rudder in position against the fin Mark the location of the tail wheel wire onto the ru...

Page 20: ...fit the rudder to the fin and tail wheel wire The gap between the rudder and fin should be a maximum of approximately 1 64 Step 7 Check the movement of the rudder to make sure it clears the fin Step 8 Remove the rudder from the fin Mix 1 2 ounce of 30 minute epoxy and apply it to the groove and hole in the rudder Insert the rudder control rod Remove any excess epoxy using rubbing alcohol and a pap...

Page 21: ... the rudder a few times to break in the hinges Step 11 Align the rudder with the fin Position the rudder lower trim piece onto the fuselage directly below the rudder Trace the outline of the trim piece onto the fuselage Step 12 Remove the covering from the fuselage and the bottom of the trim piece Step 13 Use medium CA to glue the trim piece onto the fuselage ...

Page 22: ...remove the covering for the aileron servo extensions will Pass the strings for the aileron servos through the holes and tape them to the top of the wing Step 2 Use 6 minute epoxy to glue the two retract servo tray mounts into the wing as shown Step 3 Locate the retract servo tray Use 6 minute epoxy to glue the servo tray into position Step 4 Install a low profile retract servo in the servo tray us...
Page 23: ...retract servo Step 9 With the retract servo in the retracted position push the retract linkage to manually retract the landing gear Install 3mm set screws into the quick connectors and tighten them to secure the retract linkage Step 10 It is important to check the actuation of the retracts Make sure they lock in both the up and down positions by pulling or pushing on the retract The linkage will n...

Page 24: ... rough surfaces Step 12 Install a wheel and two wheel collars on the main landing gear The order of items is 5 32 wheel collar wheel and then another wheel collar Secure the collars using the 3mm set screws Step 13 Physically check to make sure the retract does not move fore or aft by moving the strut as shown in Step 10 Tighten the adjustment screw in the front of the retract to eliminate any pla...

Page 25: ... bolts loose enough not to draw the blind nuts into the wood inside the fuselage Hint You can also install the blind nuts backwards to prevent them from pulling into the wood on the backside of the firewall Just remember to move them to their correct positioning before moving to the next section Note A pitts muffler will be required when installing a 2 stoke engine Step 3 Position the engine on th...

Page 26: ...uts go into the backside of the firewall Section 10 Throttle Pushrod Installation Required Parts 2 56 x 18 pushrod Plastic pushrod sleeve 12 Required Tools and Adhesives Drill Drill Bit 5 32 Felt tipped pen Medium CA Step 1 Determine the proper location for the throttle pushrod Mark the location with a felt tipped pen Remove the engine and drill the firewall for the pushrod tube using a drill and ...

Page 27: ...mer 2 and into the fuselage Once satisfied with the fit roughen the tube using medium sandpaper Slide the tube back into position and use medium CA to glue it to the firewall Step 4 Position the throttle servo tray so the opening for the servo is on the same side of the fuselage as the throttle pushrod tube Use Medium CA to glue the tray into position Step 5 Trim the throttle pushrod tube at the f...

Page 28: ...l tank Rubber stopper M3x20 screw Metal tubes short and long Required Tools and Adhesives Phillips screwdriver small Hobby knife Note The stopper provided with the Corsair has three holes that are not bored completely through the stopper The holes are for the fuel pickup fill and vent lines For these instructions only two holes will be used one for the fuel pickup and one for the fuel vent Only op...

Page 29: ...r the tube on the smaller end of the rubber stopper This end will be inserted into the fuel tank The larger cap is placed on the side of the rubber stopper that makes the cap Loosely install the M3 x 20 screw through the center of the stopper Step 4 Bend the longer fuel tube carefully to a 45 degree angle using your fingers This will be the fuel tank vent tube Use care not to kink the tube while b...

Page 30: ... properly Also it may be necessary to shorten the length of the fuel pickup tubing to make sure the clunk does not rub against the back of the fuel tank You should be able to turn the tank to any attitude and the clunk will fall to the lowest point All directions except for having the stopper facing down Note The fuel tank is taller than it is wide Step 8 Tighten the M3 x 20 screw carefully do not...

Page 31: ...ld cause the fuel to foam In turn you will not get the optimum performance from your engine Step 1 Wrap the fuel tank in 1 4 foam as shown Step 2 Connect the two 8 pieces of fuel tubing to the fuel tanks pickup and vent tubes Step 3 Install the fuel tank into the fuselage Make any necessary supports to keep the tank from moving during flight Note Make sure that any support braces installed will no...

Page 32: ...tions for the servo screws using a felt tipped pen Required Parts Fuselage assembly Wing assembly Servo w hardware 5 2 x 3 8 screws 8 3 8 x 5 8 x 5 8 servo mounting block 4 Required Tools and Adhesives Drill Drill Bit 1 16 6 minute epoxy Thin CA Felt tipped pen Hobby knife Phillips screwdriver small Ruler 9 Servo Extension JRPA097 2 12 Servo Extension JRPA098 2 Step 1 Install the recommended servo...

Page 33: ...ng the screws provided with the servo Step 5 Remove the covering from the opening on the bottom of the fuselage for the rudder servo Step 6 Connect a 9 Servo Extension JRPA097 to the servo lead Secure the connectors by tying them in a knot using dental floss as shown or by using a commercially available connector clamp to prevent the servo leads from becoming disconnected Note It is always a good ...

Page 34: ... using the screws provided with the servo Step 8 Repeat Steps 5 through 7 for the elevator servo Step 9 Mount the radio switch to the side of the fuselage Step 10 Wrap the receiver and receiver battery in protective foam to prevent damage that may be caused by engine vibration Step 11 Connect any necessary extensions and Y harnesses necessary to connect the retract and aileron servos Connect the e...

Page 35: ...leron hatch from the wing Remove the covering from the slot for the aileron horn Note The aileron servo is mounted directly to the hatch Step 15 Install the recommended servo hardware grommets and eyelets supplied with the servo Temporarily install a long half servo arm JRPA212 onto the servo and position the servo onto the hatch so the servo arm is centered in the notch Once satisfied mark the lo...

Page 36: ...e holes for the servo mounting screws marked in the previous step Use the screws supplied with the servo to mount it to the servo mounting blocks Step 19 Connect a 12 Servo Lead extension JRPA098 to the servo lead Secure the connectors by tying them in a knot using dental floss as shown or by using a commercially available connector clamp to prevent the servo leads from becoming disconnected Note ...

Page 37: ...servo hatch and the underlying hatch mounts Use caution not to accidentally drill through the top of the wing Step 22 Remove the servo hatch cover and re drill the holes using a 5 64 drill bit Use 2 3 drops of thin CA to harden the underlying wood This will prevent the screws from crushing the wood when they are tightened Secure the hatch using four 2 x 3 8 screws Step 23 Repeat Steps 14 through 2...

Page 38: ...ves Drill Phillips screwdriver small Drill Bit 1 16 5 64 3 32 Step 1 Thread a clevis onto a 6 wire a minimum of 10 turns Step 2 Remove the back plate from a control horn using side cutters or a sharp hobby knife Step 3 Position the control horn on the elevator so the horn aligns with the hinge line of the elevator Mark the position for the mounting holes using a felt tipped pen Step 4 Drill three ...

Page 39: ... 1 2 screws and the control back plate Step 7 Center the elevator servo electronically using the radio system Install a servo arm onto the elevator servo Attach the pushrod with clevis to the control horn Physically place the elevator control surface in neutral Mark the pushrod where it crosses the holes in the servo arm Step 8 Bend the wire 90 degrees at the mark made in the previous step ...

Page 40: ...levis to keep it from opening during flight Step 11 Thread a clevis onto a 7 wire a minimum of 10 turns Step 12 Center the rudder servo electronically using the radio system Install a servo arm onto the rudder servo Attach the pushrod with clevis to the steering control horn Physically place the steering control horn parallel to the rudder servo arm Mark the pushrod where it crosses the holes in t...

Page 41: ...t screw Note It is important to file a small flat spot on the tail gear wire and use threadlock on the set screw Failure to do so may result in the set screw loosening during flight Step 16 Remove the back plate from a control horn using side cutters or a sharp hobby knife Step 17 Position the control horn on the aileron so the horn aligns with the aileron servo horn and the aileron hinge line Mar...

Page 42: ...n control surface in neutral Mark the pushrod where it crosses the holes in the servo arm Step 22 Bend the wire 90 degrees at the mark made in the previous step Cut the wire 3 8 above the bend Step 23 Slide the wire through the outer hole in the aileron servo arm Secure the wire using a nylon wire keeper Step 24 Repeat Steps 16 through 23 for the other aileron servo Step 25 Use a 5 64 drill bit to...

Page 43: ...on the carburetor to the closed position Use a 3mm set screw to secure the throttle pushrod wire Step 29 Check the movement of the throttle to verify there is no binding at either low or high throttle If there is make the necessary adjustment to eliminate any binding Install the throttle servo arm screw when complete Step 30 Use scrap wood to make a brace for the throttle pushrod tube near the ser...

Page 44: ... engine Use a sharp hobby knife to trim the material between the cylinders as shown Leave the material above the cylinders in tact for strength Remove the center area for the engine drive washer Hint The dummy radial engine can also be painted at this time Just remember to test the paint on the pieces removed to make sure the paint won t attack the plastic Step 2 Use 6 minute epoxy to glue the dum...

Page 45: ...xtends 1 4 from the outside edge of the fuselage Glue the cowl mounting blocks to the firewall using 6 minute epoxy Step 6 Use a piece of cardstock to indicate the location of the engine head needle valve and cowl mounting blocks Hint Remove the muffler at this time and fit the cowl to it later Step 7 Remove the engine Position the cowl onto the fuselage so it is 51 2 from the firewall Transfer th...

Page 46: ...ng onto the fuselage Position the cowl so the engine drive washer is 1 8 in front of the dummy engine Step 10 Use the cardstock from Step 1 to locate the positions for the cowling screws The goal is to drill into the cowl mounting blocks for the four screws that hold the cowling Drill the locations using a 1 16 drill bit Step 11 Enlarge the holes drilled in the cowling using a 1 8 drill bit Step 1...

Page 47: ...ing Use epoxy or Zap A Dap A Goo to secure the pilot Step 2 Use Lexan scissors to trim the backrest Use Zap A Dap A Goo to glue the backrest into position Step 3 Use Lexan scissors to trim the canopy Step 2 Position the canopy onto the fuselage Trace around the canopy and onto the fuselage using a felt tipped pen Step 3 Lightly sand the inside edge of the canopy and slightly inside the line drawn ...

Page 48: ...ors Use Zap A Dap A Goo to glue the radiators into position on the wing Adjusting the Engine Step 1 Completely read the instructions included with your engine and follow the recommended break in procedure Step 2 At the field adjust the engine to a slightly rich setting at full throttle and adjust the idle and low speed needle so that a consistent idle is achieved Step 3 Before you fly be sure that...

Page 49: ...6 up 1 2 11 down 11 16 15 down Elevator 9 16 11 up 7 8 17 up 9 16 11 down 13 16 16 down Rudder 1 1 2 20 left 2 27 left 1 1 2 20 right 2 27 right Note Control throws are measured at the widest part of the elevator rudder and aileron unless otherwise noted Preflight at the Field Charge both the transmitter and receiver pack for your airplane Use the recommended charger supplied with your particular ...

Page 50: ...itromethane or hydrazine 7 I will not operate models with pyrotechnics any device that explodes burns or propels a projectile of any kind including but not limited to rockets explosive bombs dropped from models smoke bombs all explosive gases such as hydrogen filled balloons ground mounted devices launching a projectile The only exceptions permitted are rockets flown in accordance with the Nationa...

Page 51: ...e exception of events flown under AMA Competition rules after launch except for pilots or helpers being used no powered model may be flown closer than 25 feet to any person 9 Under no circumstances may a pilot or other person touch a powered model in flight Organized RC Racing Event 10 An RC racing event whether or not an AMA Rule Book event is one in which model aircraft compete in flight over a ...

Page 52: ...6111 2003 Horizon Hobby Inc 4105 Fieldstone Road Champaign Illinois 61822 877 504 0233 www horizonhobby com WE GET PEOPLE FLYING TM ...

Reviews: