background image

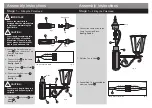
1.  Switch off the mains power supply.

2. Before replacing the bulb, allow it

to cool down for at least 10
minutes.

3. Never touch the bulb with your

fingers directly, cover it with a cloth.

4. Loosen the bulb and remove it from

the lamp.

5. Replace a new bulb with same

voltage and wattage.

Assembly Instructions

Assembly Instructions

Stage 5 – 

Bulb Replacement

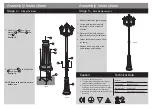
Stage 4 – 

Fitting the Base

1.  Switch off the mains power supply.

2. Let the bulb cool down before

replacing it - allow at least 10
minutes.

3. Never touch the bulb with your

fingers directly, cover it with a cloth.

4. Loosen the bulb and remove it from

the lamp.

5. Replace with a new bulb of the

same voltage and wattage.

Technical Data

Caution

Model No.

Input Voltage

Max. Wattage

Bulb

432/5217

220-240V~, 50Hz

3 x Max.60W

Max. 60W E27 230V-240V~

1.  Connect to 230V/240V~, 50Hz.

2. If in doubt about fitting this product. Please

consult a suitably qualified electrician.

3. The temperature of the spot lamp rises very

quickly. Do not touch the metal parts or glass
of the spot lamp after the light is turned on.

4. Never allow the light beam to point directly onto

the ceiling.

D

E

C

D

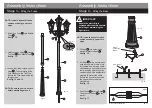
NOTE: Ensure the unit is secure

before use.

fig. 18

fig. 19

fig. 20

4. Use Big Nuts 

D

 and Spring

Washers 

B

 to fix Base  D  onto

Pegs 

A

 .

See fig. 18.

5. Use Screws 

C

 to fix Middle Tube

C  onto Base  D .

See fig. 19.

A

D

B

C

Summary of Contents for Elega 432/5217

Page 1: ...ate them into their groups 4 Ensure you have enough space to lay out all the parts before assembly Three Head Street Lamp Components Fittings 5 To avoid scratching it is recommended that you assemble the unit on a soft level surface 11 08 A 1 x Head 1 x Top Tube B 1 x Middle Tube C 1 x Base D F 3 x Lamp Head G 1 x Wires H 3 x Lamp Top Fitted to Lamp Head A 3 x Peg B 3 x Spring C 3 x Screw D 3 x Bi...

Page 2: ...ires from Lamp E through Head A See fig 4 3 Remove Screws J from Head A See fig 4 5 Use Screws J to fix Lamp E onto Head A See fig 4 6 Connect the Lamp wires to the Lamp Connection Block See fig 5 and 6 7 Refit the Top to Head A 8 Repeat Step 1 9 to assemble the other two Lamps E CAUTION We strongly recommend this light is fitted by a Qualified Electrician If you are in any doubt please ask the re...

Page 3: ...H Plastic Washer G and Lamp Top H from Lamp Head F See fig 8 3 Use Screw H and Plastic Washer G to fix Lamp Top H onto Lamp Head F See fig 9 4 Use Screws E and Small Nuts F to fix Lamp Head F onto the unit See fig 10 5 Repeat Steps 1 4 to assemble the other two Lamp Heads See fig 11 E27 Max 60W H G H G IMPORTANT Ensure the electricity is switched off at the mains before installing or maintaining t...

Page 4: ...n Pole Head A Then carefully fit the Pole Head onto the Top Tube Secure the Pole Head using the fixing screws See fig 13 and 14 1 Fit Pegs A into holes in the triangular plate in Base D See fig 15 2 Set Pegs A into a secure base such as concrete where it is to be located Run a mains cable connected to a light switch to the lamp bringing it up though the centre of pegs Use appropriate sleeving to p...

Page 5: ... Loosen the bulb and remove it from the lamp 5 Replace with a new bulb of the same voltage and wattage Technical Data Caution Model No Input Voltage Max Wattage Bulb 432 5217 220 240V 50Hz 3 x Max 60W Max 60W E27 230V 240V 1 Connect to 230V 240V 50Hz 2 If in doubt about fitting this product Please consult a suitably qualified electrician 3 The temperature of the spot lamp rises very quickly Do not...

Reviews: