background image

Assembly Instructions

4

4 x screw 

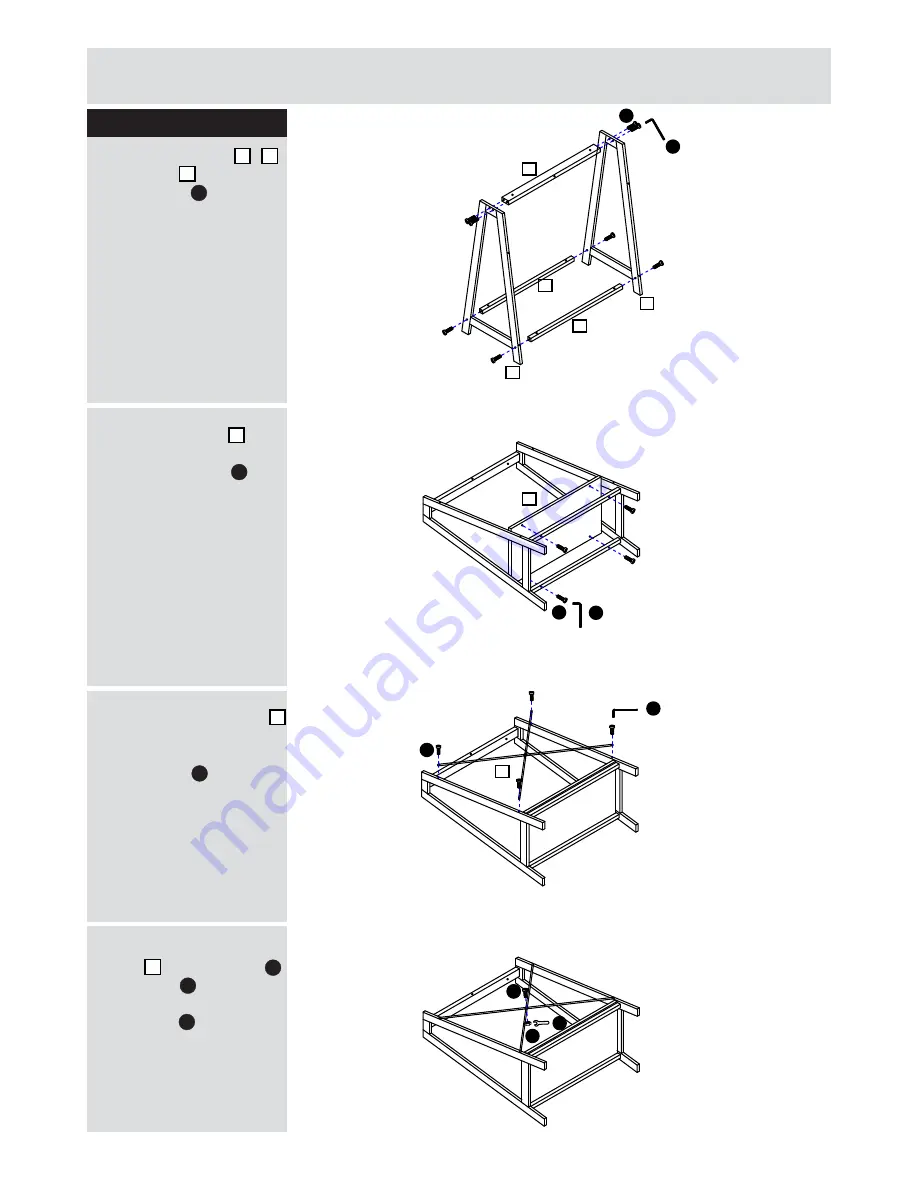
Attach supporting bar 7

to the assembled

section by using

A

 .

Step 1

a:

Attach cross bar 4 & 5

Please do not tighten

all the screws until

step b is completed.

to frame 3 by using

screw 

4 x

C

 for each.

b:

c:

d:

a:

b:

c:

d:

3

3

4

5

5

C

G

2

B

G

G

A

7

E

F

Attach the shelf 2 to the

assembled section by

B

 .

using 4 x screw 

Repeat the above for

the other one.

Repeat the above for

the other one.

Secure the supporting

bar 7 by using screw 

A

and Nut 

. Tighten

with supplied

spanner 

.

Assembly Instructions

x 2

x 2

x 2

x 2

A

A

Summary of Contents for HOME LARGE TRESTLE TABLE DESK

Page 1: ...ight 75cm Issue3 20 07 201 6 Important Please read these instructions fully before starting assembly Assembly Instructions Pleasekeep for future reference 616 9639 If you need help or have damaged or missing parts call the Argos Aftersales Helpline 0345 640 0800 ...

Page 2: ...an be cut out and used as reference throughout the assembly Keep this page with these instructions for future reference To reduce the likelihood of damaging your product please ensure that your power drill is set on a low torque setting ...

Page 3: ...Table top 140 X 60 CM 1 Bottom board x 2 54 5 X 29 5 CM 2 Cross bar x 2 55 X 2 CM 4 Supporting bar x 4 74 X Ø0 6 CM 7 Cross bar x 4 55 X 1 8 CM 5 Frame x 4 33 X 73 5 CM 3 Cross bar 102 X 2 CM 6 ...

Page 4: ...A E B C Spanner x 1 Bolt Ø6mm x 12 mm x 10 Bolt Ø6mm x 60 mm x 2 Bolt Ø6mm x 28 mm x 8 Bolt Ø6mm x 32 mm x 21 Nut x 2 G Allen key 68 x 25mm x 1 F D ...

Page 5: ...step b is completed to frame 3 by using screw 4 x C for each b c d a b c d 3 3 4 5 5 C G 2 B G G A 7 E F Attach the shelf 2 to the assembled section by B using 4 x screw Repeat the above for the other one Repeat the above for the other one Secure the supporting bar 7 by using screw A and Nut E Tighten with supplied spanner F Assembly Instructions x 2 x 2 x 2 x 2 A A ...

Page 6: ...structions Step 2 Step 3 Assembly Instructions 6 G D C G 1 Attach crossbar 6 to the assembled section by Attached table top 1 to the assembled section C Assembly is complete 5 using 2 x screw D by using 5 x screw ...

Reviews: