LOG
M
D
H
M D
3.2 Registering Key Fobs
Logging in Key Fob: Press the PROG key on the Keypad, a series of - - - will appear on
the LCD. Enter the PIN code or Press the Disarm key on a current registered Key Fob and the
word 'Sensor' will appear on the LCD.Using the key fob you wish to register,press the disarm
key on the Key Fob, the panel will receive the Key Fob code and the LCD will show the word
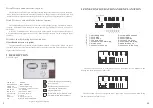
'CODE' (refer to below figure 8). Press 0 key on the Keypad to identify you are registering a
Key Fob. The LCD will now display the Key Fob number that it has allocated to that Key Fob.
Press the PROG Key to complete and save the information. The Key Fob is now registered
and recognised by the control panel.
If no further actions take place the panel will automatically return to normal state after
approximately 30 seconds. Otherwise at the end, press Esc on the keypad or the Dis-Arm key
on a registered Key Fob to return the panel to normal state.
Note: whenever a PIN code is necessary ,if you enter a wrong PIN code for 3 times ,the Panel
will alarm automatically. refer to figure 24
LOG
M
D
H
M D
SET
Figure 8
4.2 24 Hours Arming
24 hours arming is used for the detectors ( i.e. smoke detector and gas detector etc ),
These zones are armed 24 hours whether the system is armed or disarmed. They can at no
time be omitted or disarmed.
4.3 Selectable Zone Arming
This facility allows only a particular selected zone or only a particular selection of
zones to be armed. This is of great use when requiring temporary protection in a selected
area while the premises is occupied.
How to action Selectable Zone Arming: Using the numeric Keypad on the panel, press
the number of the Zone you wish to arm (refer to 1 to 8 zone), then press the ARM key to
arm. When both the Armed and Disarmed lights illuminate arming is completed. The
armed zones will be displayed on the LCD alongside with the 24 hour zones.
4.4 Selectable Detector Alarming Local only or Local and C.S.
This facility allows particular detectors in each Zone to be local alarm only or local
alarm and transmit alarm information to the C.S,each detector can be configured differently
e.g. local Alarm only or local Alarm and C.S. function, door bell function or in the case of
Key Fob, Request Assistance with / without sounder.
How to set the function: press 'Sensor ’ key and - - appears on the LCD. Press registered
Key Fob or entering the preprogrammed PIN code, LCD will display 'DEL Sensor' Use Key
pad to select Zone(s) 1 to 8. Use Key pad to select detector(s) 1 to 9. Program each of the 3
fields of the detector with 0 or 1 to suit. Press Key Fob or ESC to save and exit.
3.3 Registering Sensors
Logging in Sensors: Press the PROG Key on the Keypad, a series of - - - will appear on
the LCD. Enter the PIN code or Press the Disarm key on a current registered Key Fob and the
word 'Sensor' will appear on the LCD. Trigger the detector you wish to register, the Panel
will receive the detectors code and the word 'CODE' will appear on the LCD ( refer to figure
8). Pressing a numeric key 1 to 8 on the Keypad will select the Zone you wish to allocate the
detector. e.g. Pressing No 3 on the Keypad will allocate the detector to Zone 3. The control
panel will then automatically allocate the detector with the next available detector number in
that Zone. So, if there are no detectors allocated in Zone 3 the control panel will allocate it as
detector No 1 and the next detector to be registered in Zone 3 will be allocated detector No 2
etc. To complete and save the information press PROG key.
If no further actions take place the panel will automatically return to normal state after
approximately 30 seconds. Otherwise at the end, press ESC on keypad or the Dis-Arm key on
a registered Key Fob to return the panel to normal state.
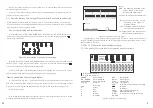
1 2 3 4
1 1= local alarm only, when disarmed;
0=Normal detector
2 1= detector will be door bell, when disarmed;
0=not door bell
3 1= key fob request assistance with sounder;
0=key fob request assistance no sounder
4 1= display detector low voltage on LCD;
0=Cancel detector low voltage display
Note: field 1,2,4 are for detector; field 3 is for Key fob
Figure 22: Detector features setting
7
20
Summary of Contents for ZDAS-300
Page 2: ......

