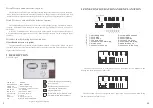
System config
Auto disarmed time
H
M
SET
CONFIG
TIMED
The first auto disarmed Auto disarmed
The first auto disarmed
:
press * or # to select the 1--6
Figure12: The first auto disarmed time is at 17:35.
3.10 The Phone Numbers Setting
How To Set Phone Number: Press the PROG key on the Keypad, a series of - - - will
appear on the LCD. Press the Disarm key on any current registered Key Fob or entering the
preprogrammed PIN code, and the word 'Sensor' will appear on the LCD. Pressing the * key
on the Keypad, the LCD will show the words 'Zone type'. Pressing the # key on the Keypad,
the LCD will show the words 'SYS phone'. Press No 1 on the numeric Keypad. Enter the full
phone number of the Central Station Comms.and press PROG to store this number. Pressing
* then # scroll back down to 'SYS phone' Press No2 on the numeric Keypad. Enter the full
phone number of the Central Station secondary number for comms using the numeric keypad
on the panel, then Press PROG to store this number. The No 1 and 2 are for C.S. Phone
numbers, No 3 to 6 are for personal numbers. If not networking, No 1 and 2 can also be set
with personal numbers.
If no further actions take place the panel will automatically return to normal state after
approximately 30 seconds. Otherwise at the end, press the Dis-Arm key on a registered Key
Fob to return the panel to normal state.
Press disarming key on any current registered key fob or entering the preprogrammed
PIN code, and the word 'Sensor' will appear on the LCD. Pressing the * key on the Keypad,
the LCD will show the words 'Zone type'. Pressing the # key on the Keypad, the LCD will
show the words 'SYS phone'. Press No 7 key on the keypad, the Panel will access the
location of the C.S. account code. Enter the account code using the numeric keypad on the
panel, this is normally a 4 Digit Code called site code. Press 'Prog' key to store the
programmed number.
If no further actions take place the panel will automatically return to normal state after
approximately 30 seconds. Otherwise at the end, press the Dis-Arm key on a registered Key
Fob to return the panel to normal state.
3.12 Deleting Zones
How To Delete a Zone: There are two ways to delete a zone
A: Delete all the detectors within the zone.
Press the DELETE key on the keypad, , a series of - - - will appear on the LCD. Press
the Disarm key on any current registered Key Fob or entering the preprogrammed PIN code
and the word 'DEL Sensor' will appear on the LCD. Pressing the 0 then 1 key on the Keypad
to select the Zone number of the detector or Key fob that needs to be deleted. e.g. select 3 on
Keypad, the LCD will display 'Zone 3'. Using the numeric Keypad select the number of the
detector requiring to be deleted. e.g. Detector No 4 in Zone 3. The LCD will now display
‘Zone 3 4'. Press DELETE and the detector will be deleted from memory.
B: Enter the location of zone type setting, set the No 7 field to 0, refer to 3.8 figure 10.
3.13 Viewing The Recording Event Log
Events refer to occurrences taking place within your s ystem, such as, which key Fob
Armed or Dis-Armed the system and when. If an alarm occurred which detector in which
Zone activated the alarm and when.
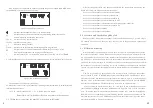
How To View the event record: press the * key on the keypad, the panel LCD will show
the latest event, using the * and # keys to look over previous events, times and information.
Note: the top line always shows the latest event information.
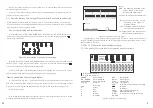
Figure13: The LCD display when there is a panic alarm from the keypad
3.11 The C.S. Account Code Setting
LOG
RMOT
M
D
H
M
D
ALM
How To Set C. S. Code: Press the PROG key on the numeric Keypad, a series of - - - will
appear on the LCD.
RMOT
ALM : remote panic alarm
13
14
Summary of Contents for ZDAS-300
Page 2: ......


