E T V I S I O N M A N U A L
46
8.2
Appendix B -- Calibration function details
Since the geometry of the eye structures and the position of the optics with respect to the face vary
somewhat from person to person, gaze computation accuracy can be improved by incorporating data
from calibration points (points at which the person wearing the optics is known to be fixating a
particular point on the scene camera image).
Section 6.5 provides a simple description of a recommended procedure for subject calibration. This
appendix provides a more detailed description of the calibration function and flexible features.
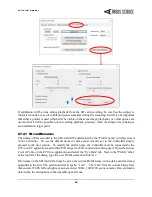
The Subject Calibration tab dialog, on the System Control table, can be used to set the “Calibration
Type” and the maximum number of calibration points (“Total Calibration Points”).
The “Calibration Type” can be either “Click on Scene Image Points” or “Use Pre-determined Points
on Scene Image”. The default choice is “Click on Scene Image Points” and it is suggested that this be
used for most applications. The description in this manual assumes that the “Click on Scene Image
Points” method is being used.
The alternate “pre-determined Points" method is intended for use only under special circumstances
when the subject display is fixed with respect to the scene camera. Please consult Argus Science for
use of the “pre-determined Points" method.
The subject calibration function allows any number of calibration points to be used in any order, up to
a maximum (“Total Calibration Points”) that is set on the
System Control Table
, “Subject Calibration”
tab dialog. The highest “Total Calibration Points” number that can be set is 20 and the lowest that
can be set is 1. The suggested setting for “Total Calibration Points” is 9. Note that this setting does
not mean that all 9 different points must be used, but rather that any number between 1 and 9 can be
used. Once 9 points have been entered during a calibration procedure, the program will assume that
any additional points entered are intended to replace one of the 9 points.
Clicking the subject calibration icon
on the
ETVision
menu bar, or clicking the “Start” button on
the “Subject Calibration” dialog, opens Subject Calibration mode. When calibration mode is open the
calibration icon symbol will appear red
rather than black. Clicking the menu bar icon again, or
clicking the “Finish” button on the “Subject Calibration” dialog, will close calibration mode and
change the icon symbol back to black.
It is not required that the “Subject Calibration” dialog be displayed during calibration; but if it is, it
will show calibration status. The box labeled “Calibrating”, at the upper left of the “Calibration
Status” group box, shows the calibration point number expected to be entered next. The box labeled
“Calibrated”, at the upper right of the “Calibration Status” group box, shows the number of calibration
points already entered.
With “Calibration Type” set to “Click on Scene Image Points”, the “Enter Data for Current Point
”
button and the “Skip Current Point” buttons on the dialog will both be inactive.

