E T V I S I O N M A N U A L
33
6.7.1.4
Record external data (XDAT) and control
ETVision recording from external
devices
ETVision
keeps track of a 16 bit integer data value labeled “XDAT” (short for “external data”) which
is displayed on the
Data Display
window, recorded along with gaze data, and which can be controlled
by an external device via a LAN connection. It is most often used for marking events. For example
the XDAT channel might be used by an external device to mark the onset of a particular stimulus, etc.
ETVision
will also accept commands from the external device to open data files and to start and stop
recording via the same LAN connection. Section 6.8 has instructions for setting up a LAN connection
and communicating with an Argus Science application called
ETRemote
. The protocols for sending
and receiving data with a user application are specified in a separate manual, titled
ETVision
Real-
Time Communication with External Devices
.
6.7.2
Record video/audio data on micro SD card
Video data and audio data from the wearable optics cameras and microphone can also be recorded
directly onto a micro SD card by the
ETVision
Controller for later playback to the
ETVision
PC
application. This allows data recording to take place when the Controller is beyond WiFi range of the
ETV PC. Data cannot, however, be simultaneously monitored or recorded by the
ETVision
PC
application even if it is in-range. While SD card recording is in progress, the ETVision application
will not display or record live data even if connected with a LAN cable or within WiFi range.
Before recording to an SD card, first position the optics on the subject and determine that there is
proper feature recognition as described in section 6.4. This must be done while the Controller is in
WiFi range or is connected to the ETV PC with a LAN cable.
Subject calibration can be done using the
ETVision
application before SD card recording begins, or
later on, during playback of SD card data to the
ETVision
app. If calibration is done before SD card
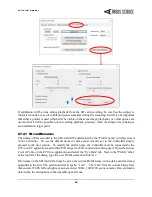
recording begins, be sure to save the configuration so that the calibration parameters are saved. To
save system configuration (including calibration parameters) open the
System Control Table
window
(click
System Control Table
icon
on the menu bar), select the “Configuration” tab, and click the
“Advanced Configuration” button. At the lower right of the
Advanced Configuration
dialog, under
“Configuration Settings”, click “Save” to bring up a standard browser dialog. Navigate to the desired
directory and type in a file name. The file will automatically be given a “.xml” extension. To re-load
this configuration at a later time, click “Load” on the same
Advanced Configuration
dialog, and select
the previously saved file.

