background image

EN - 10

Use of any gasoline other than those 
approved above will void the engine 
warranty. If the pumps are not marked 
for the content of alcohol or ethers, 
check ethanol and MTBE levels with 
the fuel supplier.

Do not modify the fuel system to use 
different fuels.

Never mix oil and gasoline.

NOTE: 

All gasoline is not the same. If the 

engine experiences starting or performance 
problems after using a new gasoline, switch to 
a different fuel provider or fuel brand.

IMPORTANT: 

Excessively oxygenated or 

reformulated fuels (fuels blended with alcohols 
or ethers) can damage the fuel system or 
cause performance problems. If any 
undesirable operating problems occur, use a 
gasoline with a lower percentage of alcohol or 
ether.

Fuel Stabilizer

Gasoline left in the fuel system for extended 
periods without a stabilizer will deteriorate, 
resulting in gum deposits in the system. These 
deposits can damage the carburetor and the 
fuel hoses, filter and tank. Prevent deposits 
from forming in the fuel system during storage 
by adding a quality fuel stabilizer to the fuel. 
Follow the recommended mix ratio found on 
the fuel stabilizer container.

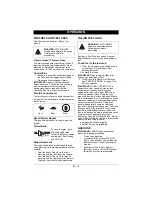
TO STOP IN AN EMERGENCY

To stop in an emergency, release control bail. 
When all moving parts have stopped, push 
throttle control lever to stop.

TO START AND SHUT OFF 
ENGINE

Pre-Start

1. Check engine oil level. See Engine 

Manual.

2. Check fuel level. 

Starting the Engine

1. Push primer bulb 2 or 3 times for a cold 

engine. 

2. Set throttle control to Fast.
3. Grasp starter handle and pull rope out 

slowly until it pulls harder. This is the 
compression stroke. Let rope rewind 
slowly. Then pull rope with rapid 
continuous full arm stroke to start engine. 
Allow rope to rewind slowly.

IMPORTANT: 

DO NOT let starter handle snap 

against handlebar.

4. Repeat until engine starts. (If engine does 

not start, refer to 

Troubleshooting

.)

Stopping the Engine

1. Release control bail so that trimmer head 

stops rotation. Wait until rotating parts 
stop completely before leaving operator’s 
position.

2. Push throttle control lever to Stop.
3. If leaving unit unattended, disconnect 

spark plug wire to prevent start-up.

TO OPERATE THE TRIMMER

1. Start the engine.
2. Set throttle control to Fast.
3. Hold the control bail against the 

handlebar to engage the trimmer head.

4. When trimmer head is rotating at full 

speed, move unit forward to trim.

TO TRAVEL TO ANOTHER WORK 
AREA

When crossing driveways or bare areas, 
release the control bail to stop trimmer head 
rotation and push down slightly on the 
handlebar to lift the trimmer head off the 
ground. This prevents premature wear of the 
trimmer head.

TRIMMING TIPS

• Operating the trimmer in Fast throttle 

provides the best trimming performance.

• In heavy growth, walk slower.
• Do not push the trimmer into heavy 

growth too fast.

• Do not trim on extremely steep slopes. Do 

not trim on slopes when the ground is wet 
or slippery. If you do not feel comfortable 
on a slope, do not trim it.

• Keep the trimmer clear of dirt and grass 

build-up.

• Install a new trimmer line when line is 

worn to less than 4” (10.2 cm). See 

Service and Adjustments

.

TO TRANSPORT UNIT

ALWAYS turn engine off when transporting on 
truck or trailer. Tie unit down securely. Do not 
tie down by linkages, guards, cables or other 
parts that may be damaged.

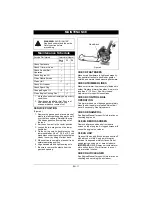
CAUTION: 

Before every use, 

clean grass and debris from 
foam debris screen and around 
muffler.

Summary of Contents for 946152

Page 1: ...tring Trimmer String Trimmer 04241700A 10 12 Printed in USA ENGLISH FRANÇAIS E10 The use of any gasoline exceeding 10 ethanol E10 or 10 MTBE will void the product warranty L utilisation d une essence contenant plus de 10 d éthanol E10 ou de 10 de MTBE annulent la garantie ...

Page 2: ...isponibles pour votre équipement Les manuels imprimés dans des langues différentes de l anglais sont également disponibles en téléchargement gratuit sur notre site Web http www ariens com THE MANUAL Before operation of unit carefully and completely read your manuals The contents will provide you with an understanding of safety instructions and controls during normal operation and maintenance All r...

Page 3: ...tailer it is your responsibility to Read and understand all assembly instructions in this manual If you do not understand or have difficulty following the instructions contact your nearest Ariens Dealer for assistance To locate your nearest Ariens Dealer go to www ariens com on the internet Do not operate the unit unless all controls function as described in this manual Before attempting to operat...

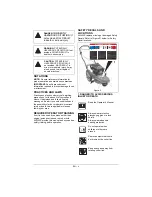
Page 4: ... safety training before operation SAFETY DECALS AND LOCATIONS ALWAYS replace missing or damaged Safety Decals Refer to Figure 2 below for Safety Decal locations 1 DANGER TO AVOID SERIOUS INJURY OR DEATH DANGER IMMINENTLY HAZARDOUS SITUATION If not avoided WILL RESULT in death or serious injury WARNING POTENTIALLY HAZARDOUS SITUATION If not avoided COULD RESULT in death or serious injury CAUTION PO...

Page 5: ...rotect eyes face and body with adequate safety gear and protective clothes Wear sturdy footwear gloves and safety goggles or safety glasses with side shields while operating mower NEVER operate trimmer barefoot or when wearing open sandals or canvas shoes NEVER wear loose clothes long hair or jewelry that may get caught in rotating parts Protect eyes face and head from objects that may be thrown f...

Page 6: ...practical remove gas powered equipment from the truck or trailer and refuel it on the ground If this is not possible then refuel such equipment on a trailer with a portable container rather than from a gasoline dispenser nozzle Keep the nozzle in contact with the rim of the fuel tank or container opening at all times until fueling is complete Do not use a nozzle lock open device Check fuel supply ...

Page 7: ...se Oil Fill engine crankcase with proper amount and viscosity of oil Refer to Engine Manual for specific information CHECKLIST Please complete the following checklist before proceeding All assembly instructions have been completed No remaining loose parts in carton Handlebar is adjusted comfortably and tightened securely While learning how to use your unit pay extra attention to the following impo...

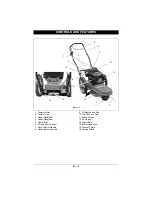
Page 8: ...6 Throttle Control Lever 7 Recoil Starter Handle 8 Handlebar Wing Knob 9 Oil Dipstick and Cap 10 Fuel Tank and Cap 11 Debris Screen 12 Air Cleaner 13 Primer Bulb 14 Swivel Head Lock 15 Trimmer Shield 16 Trailing Shield CONTROLS AND FEATURES 1 2 3 4 5 6 7 8 9 10 11 12 13 14 15 16 Figure 3 ...

Page 9: ...k 1 Clean fuel caps and surrounding area to prevent dust dirt and debris from entering fuel tanks 2 Remove fuel caps IMPORTANT Refer to Engine Manual for correct type and grade of fuel 3 Fill fuel tank to the bottom of filler neck See SPECIFICATIONS on page 17 for fuel tank capacity IMPORTANT DO NOT OVERFILL This equipment and or its engine may include evaporative emissions control system componen...

Page 10: ...sion stroke Let rope rewind slowly Then pull rope with rapid continuous full arm stroke to start engine Allow rope to rewind slowly IMPORTANT DO NOT let starter handle snap against handlebar 4 Repeat until engine starts If engine does not start refer to Troubleshooting Stopping the Engine 1 Release control bail so that trimmer head stops rotation Wait until rotating parts stop completely before le...

Page 11: ...y when the bail handle is released Adjust bail travel if necessary See Adjustments CHECK ENGINE OIL See Engine Manual for specific information on checking engine oil CLEAN DEBRIS SCREEN Remove all grass and debris from debris screen on top of engine A clogged screen will cause the engine to overheat CLEAN UNIT Clean unit thoroughly Brush dirt and debris off with a brush or cloth Apply paint or spr...

Page 12: ... For best results use only genuine Ariens replacement trimmer line 1 Stop the engine and wait for all moving parts to stop Disconnect the spark plug wire and place it securely away from the spark plug 2 Remove the worn trimmer line from the cutter disk 3 Thread the two ends of the trimmer line up from the bottom through the two holes in the cutter disk 4 Cross the line and thread the ends of the l...

Page 13: ...emove cutter disk and any of the remaining spacers required to achieve the desired cutting height 5 Reinstall the cutter disk 6 Reinstall the spacers required to achieve the desired cutting height 7 Reinstall height guide on the hex shaft NOTE Be sure the hex shaft and the hex hole in the height guide are correctly aligned 8 Reinstall washer lock washer and capscrew Tighten securely NOTE The minim...

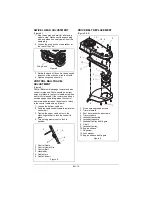
Page 14: ...tely when the control bail is released increase the amount of slack in the control cable wire as follows 1 Loosen the bottom cable nut 2 Push the cable conduit upward toward the control bail 3 Tighten the upper cable nut onto the mounting bracket to lock the conduit in place 4 Turn nuts against mount to lock in position DRIVE BELT REPLACEMENT Figure 9 9 Wing Knob Figure 8 1 Control Cable 2 Control...

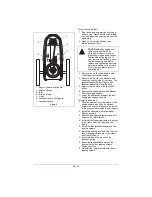
Page 15: ...sher Tighten securely 3 Slide the belt between the idler and belt finger on the idler bracket 4 Install the four tapping screws in the holes in the frame from the top side of the frame 5 Install the four jackshaft spacers on the tapping screws 6 Install the belt finger Make sure the bent tabs are facing up and are to the sides and front of the unit 7 Install the belt in the groove of the jackshaft...

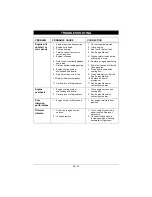
Page 16: ...es before attempting to start 6 Replace or regap spark plug 7 Drain fuel tank and refill with fresh gasoline 8 Clean debris screen and cooling fins 9 Clean carburetor or fuel line See Engine Manual 10 Replace air filter or precleaner 11 See Engine Manual or contact your dealer Engine overheats 1 Engine cooling system overloaded with debris 2 Carburetor out of adjustment 1 Clean engine screen and c...

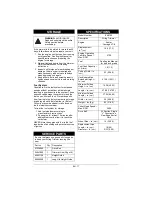
Page 17: ...er according to manufacturer s instructions 2 Run engine for at least 10 minutes after adding stabilizer to allow it to reach the carburetor NEVER store the engine with fuel in the fuel tank inside of a building with potential sources of ignition STORAGE WARNING AVOID INJURY Read and understand the entire Safety section before proceeding SERVICE PARTS Be sure to always use genuine Ariens parts to ...

Page 18: ...product registration card in the literature package and return it to the Ariens Company or register the unit online at www ariens com www gravely com www countax com To obtain warranty service the original purchaser must Perform the maintenance and adjustments explained in the owner s manual Warranty Code Product Group Warranty Period Consumer Use Warranty Period Commercial Use HA Zoom ZT Zero Tur...

Page 19: ...ny to incorporate such design changes into previously manufactured products nor shall such changes be construed as an admission that previous designs were defective LIMITATION OF REMEDY AND DAMAGES Ariens Company s liability under this warranty and under any implied warranty that may exist is limited to repair of any defect in workmanship and repair or replacement of any defective part Ariens Comp...

Page 20: ...riod defined in subsection b 2 A statement in such written instructions to the effect of repair or replace as necessary will not reduce the period of warranty coverage Any such part repaired or replaced under warranty must be warranted for a time not less than the remainingwarrantyperiod 3 Any warranted part that is scheduled for replacement as required maintenance in the written instructions must...

Page 21: ......

Page 22: ...om this product contains chemicals known to the State of California to cause cancer birth defects or other reproductive harm WARNING Ariens 655 West Ryan Street Brillion WI 54110 920 756 4688 Fax 920 756 2407 www ariens com ...

Reviews: