ARIESAUTOMOTIVE.COM
•
NEED ASSISTANCE?
•
877.287.8634
•
4524-INS-RA
•
PAGE 3
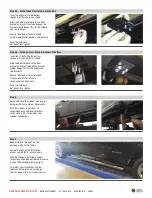
Step 5A - For Polished Stainless Steel Side Bars
Insert a bolt plate into the bottom
channels of the side bar as shown.
Slide the bolt plate forward to the front
bracket and insert the studs through the
bracket cradle. Repeat this for the middle
and rear brackets.
Secure the side bar to the brackets
using twelve M6 flat washers and hex nuts.
Snug the hardware,
but do not fully tighten.
Step 7
Repeat steps 5 through 7 on the
passenger side of the vehicle.
Congratulations on the installation
of your new ARIES 6" oval side bars.
With the side bars installed, periodic
inspections should be performed to ensure
all mounting hardware remains tight.
To protect your investment, see the
'Notes and Maintenance' section on
the first page of this instruction manual.
Step 5B - For Semi-Gloss Black, Aluminum Side Bars
Insert four T-bolts into the bottom
channels of the side bar as shown.
Slide the bolts forward to the front
bracket and insert through the bracket
cradle. Repeat this for the middle and
rear brackets.
Secure the side bar to the brackets
using twelve M8 flat washers,
lock washers and hex nuts.
Snug the hardware,
but do not fully tighten.
Step 6
Adjust and level the side bar, centering it
between the front and rear wheel wells.
With the side bar in position, it is
recommended to tighten all brackets
to the vehicle first, followed by the
side bar connections.


