


EN
- 14 -
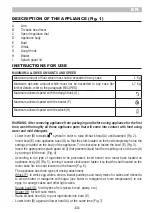
- Connect plug to mains outlet and turn appliance on by turning dial (C) and setting on speed “1”.
Increase speed according to need or according to recipe.
- For smoother results, switch appliance off , disconnect plug from mains outlet and raise head (A)
as described above. Using a spatula, mix ingredients off the sides of the bowl and towards the
centre of the bowl (E).
- At the end of processing, or to change the type of whisk, switch off the appliance by turning the
dial (C) to “O” and unplugging it from the power socket; lift the arm (A) as described above and
remove the whisk by pulling it out with care, after first releasing it by turning it clockwise.
- To remove bowl (E) turn counter-clockwise.
WARNING:
Before using appliance, ensure that all accessories have been assembled properly.
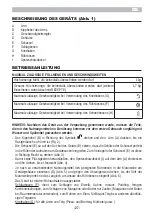
When using the dough hook (G) and the beater (H), do not operate the appliance for more than
5 consecutive minutes; subsequently, allow to cool down for at least 20 minutes.
When using the whisk (F), do not operate the appliance for more than 10 consecutive minutes;
subsequently, allow to cool down for at least 20 minutes.
The failure to comply with these rules may damage the product not covered by the warranty.
If more ingredients have to be added to bowl (E) during use, first turn dial (C) to position “0”
to switch appliance off and then pour ingredients into bowl.
To avoid injury and damage to appliance, always keep hands and kitchen utensils out of reach
of moving parts.
Do not remove food from bowl sides (E) while the appliance is operating. Switch the appliance
off and then unplug it.
USEFUL TIPS
- For the best results, always whisk eggs at room temperature.
- Before whisking egg whites, make sure that there is no grease or egg yolk on the whisk attachment
or in the bowl.
- Always use cold ingredients for short crust pastry, unless otherwise specified in the recipe.
- If appliance seems to be over-working, switch off, disconnect plug from mains outlet and reduce
quantity of ingredients to process.
- For optimum mixing, always add liquids first.
CLEANING AND MAINTENANCE
- Remove all of the attachments used, working in the opposite order to the way they were fitted.
- The bowl (E), the lid (I), and the whisk (F) are machine washable; the beater (H) and the dough
hook (G) must be washed by hand in hot water with mild detergent.
- To clean the appliance body (D) use a slightly damp cloth.
WARNING:
After cleaning, dry all parts thoroughly and refit them.
Summary of Contents for 1164415
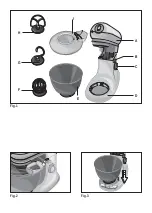
Page 2: ...Fig 1 Fig 2 Fig 3 H A B C D E F G I...
Page 3: ...1 Fig 4 Fig 5 Fig 6 Fig 7...
Page 52: ...EL 52 1 2 3 4 5 6 7 8 9 10 11 12 13 ULHWH ULHWH 14...
Page 53: ...EL 53 15 16 17 18 19 20 21 22 23 24 25 26 27...
Page 54: ...EL 54 1 Kg 1 7 Kg...
Page 55: ...EL 55 2...
Page 56: ...EL 56 PO...
Page 57: ...EL 57 PO JU PO 7257 3 5 62 JU...
Page 58: ...EL 58...
Page 59: ...RU 59 1 2 3 4 5 6 7 8 9 10 11 12 13 ULHWH ULHWH 14...
Page 60: ...RU 60 15 16 17 18 19 20 21 22 23 24 25 26 27...
Page 61: ...RU 61 V...
Page 62: ...RU 62 2...
Page 63: ...RU 63...
Page 64: ...RU 64 3 5 62...
Page 65: ...RU 65...
Page 67: ...UA 67 1 2 3 4 5 6 7 8 9 10 11 12 13 ULHWH ULHWH 14...
Page 68: ...UA 68 15 16 17 18 19 20 21 22 23 24 25 26 27...
Page 69: ...UA 69...
Page 70: ...UA 70 2...
Page 71: ...UA 71...
Page 72: ...UA 72 3 5 62...
Page 73: ...UA 73...
Page 74: ...AR 74 Ariete...
Page 75: ...AR 75 EC CE A B C D E F G H I...
Page 76: ...AR 76 G F H A B D E E A I D F G H A E A B C E A...
Page 77: ...AR 77 C A O E H G F E C E...
Page 78: ...AR 78 F I E G H D...
Page 79: ...AR 79 G...
Page 80: ...AR 80...
Page 88: ......