background image

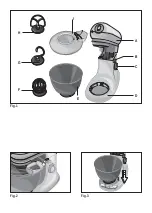
Fig. 1

Fig. 2

Fig. 3

H

A

B

C

D

E

F

G

I

Summary of Contents for 1164415

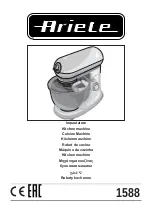
Page 1: ...1588 Impastatore Kitchen machine Cuisine Machine K chenmaschine Robot de cocina M quina da cozinha Kitchen machine Roboty kuchenne...

Page 2: ...Fig 1 Fig 2 Fig 3 H A B C D E F G I...

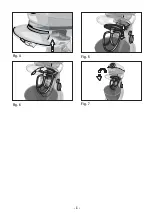
Page 3: ...1 Fig 4 Fig 5 Fig 6 Fig 7...

Page 4: ...ricoli presenti durante l uso dell apparecchio 8 Questo apparecchio non deve essere utilizzato dai bambini 9 Non immergere mai il corpo del prodotto la spina ed il cavo elettrico in acqua o altri liqu...

Page 5: ...da di renderlo inoperante tagliandone il cavo di alimentazione Si raccomanda inoltre di rendere innocue quelle parti dell apparecchio suscettibili di costituire un pericolo specialmente per i bambini...

Page 6: ...rpo dell apparecchio D in modo che le fessure presenti sulla ciotola si applichino perfettamente sulle tacche ricavate nell apposito alloggiamento sul corpo dell apparecchio Ruotare in senso orario pe...

Page 7: ...consecutivamente poi lasciare raffreddare per almeno 20 minuti Se si usa la frusta per montare F non far funzionare l apparecchio per pi di 10 minuti con secutivamente poi lasciare raffreddare per alm...

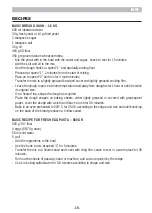
Page 8: ...il sale e l olio Usando il gancio impastare a velocit 1 aggiungendo gradualmente le farine Proseguire a velocit 1 sino a 2 minuti dall inizio Passare a velocit 2 ed impastare ancora per 4 minuti Tras...

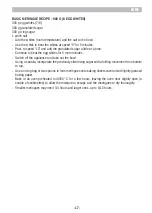
Page 9: ...ORTA PARADISO 1 6 KG 350 g di burro a temperatura ambiente 350 g di zucchero 4 uova da 65 70 gr 10 tuorli circa 200 gr 250 g di farina 0 150 g di fecola di patate 1 bustina di lievito in polvere per d...

Page 10: ...a ciotola Con una spatola e con movimenti dall alto verso il basso incorporare lo zucchero a velo fatto passare per un setaccio Con l aiuto di una sacca da pasticceria o con due cucchiai formate le me...

Page 11: ...d by children 9 Never place the appliance body plug or power cord in water or other liquids always wipe clean with a damp cloth 10 Always unplug the power cord from the electricity mains before fittin...

Page 12: ...parts that could be dangerous be rendered harmless especially for children who may play with the appliance or its parts 21 Packaging must never be left within the reach of children since it is potenti...

Page 13: ...owl E onto appliance base D so that the slots located on the bowl completely fit into the settings provided on the body of the appliance Turn clockwise to fasten the bowl E Fig 3 Insert the appropriat...

Page 14: ...lure to comply with these rules may damage the product not covered by the warranty If more ingredients have to be added to bowl E during use first turn dial C to position 0 to switch appliance off and...

Page 15: ...our or until it is twice its original size On a floured top shape the dough as required Place the dough shapes on baking sheets either lightly greased or covered with greaseproof paper cover the dough...

Page 16: ...6 KG 350 g butter at room temperature 350 g sugar 4 eggs 65 70 g each 10 yolks approx 200 g 250 g 0 flour 150 g potato starch 1 sachet powdered raising agent for cakes 1 pinch salt Flavourings vanilla...

Page 17: ...for 5 more minutes Switch off the appliance and take out the bowl Using a spatula incorporate the previously sifted icing sugar with a folding movement from bottom to top Use an icing bag or two spoo...

Page 18: ...tions et compris les dangers li s l utilisation de l appareil 8 Cet appareil ne doit pas tre utilis pas les enfants 9 Ne pas plonger le corps du produit la fiche ni le cable electrique dans l eau ou a...

Page 19: ...mand de le rendre inutilisable en liminant le c ble d alimentation lectrique Nous conseillons en outre d exclure toute partie de l appareil pouvant constituer une source de danger en particulier pour...

Page 20: ...r la tasse E sur la base du corps de l appareil D de fa on ce que les fissures de la tasse co ncident parfaitement avec les crans du logement situ sur le corps de l appareil Tourner vers la droite pou...

Page 21: ...pareil pendant plus de 5 minutes cons cutives faire ensuite refroidir pendant au moins 20 minutes Si on utilise le fouet monter en neige F il ne faut pas faire fonctionner l appareil pendant plus de 1...

Page 22: ...au liquide le sel et l huile En utilisant le crochet p trir la vitesse 1 en ajoutant graduellement les farines Poursuivre la vitesse 1 pendant 2 minutes Passer ensuite la vitesse 2 et p trir encore pe...

Page 23: ...ff 170 180 C entre 15 et 25 minutes selon la recette RECETTE BASE POUR CAKE TARTE PARADIS 1 6 KG 350 g de beurre temp rature ambiante 350 g de sucre 4 ufs de 65 70 gr 10 jaunes d uf environ 200 gr 250...

Page 24: ...le sucre Eteindre l appareil et extraire la tasse Avec une spatule et travers des mouvements verticaux du haut vers le bas incorporer le sucre voile apr s l avoir pass au tamis A l aide d une poche p...

Page 25: ...as Geh use den Stecker und das Stromkabel des Ger ts keinesfalls in Wasser oder sonstige Fl ssigkeiten tauchen Verwenden Sie zur Reinigung ein feuchtes Tuch 10 Auch wenn das Ger t nicht in Betrieb ist...

Page 26: ...ber hinaus sind all die Ger teteile unsch dlich zu machen die vor allem f r Kinder die das Ger t als Spielzeug verwenden k nnten eine Gefahr darstellen 21 Die Verpackungsteile nicht in Reichweite von...

Page 27: ...s drehen und den Arm A dr cken bis ein Rastger usch zu h ren ist Fig 2 Die Sch ssel E so auf den Sockel des Ger ts D setzen dass die Schlitze der Sch ssel perfekt in die Rillen der Aufnahme am Ger tes...

Page 28: ...etzt wird sicherstellen dass alle Zubeh rteile richtig ange bracht wurden Wenn der Knethaken G und der R hrbesen H verwendet werden darf das Ger t nicht l n ger als 5 Minuten ununterbrochen betrieben...

Page 29: ...eitere 4 Minuten kneten Den Teig in eine leicht gefettete Sch ssel geben und mit ebenfalls gefetteter Klarsichtfolie bede cken Bei Umgebungstemperatur fern von Zugluft etwa 1 Stunde gehen lassen bis d...

Page 30: ...Butter 350 g Zucker 4 Eier Klasse 65 70 g 10 Eigelb circa 200 g 250 g Mehl 0 150 g St rkemehl 1 P ckchen Backpulver 1 Prise Salz Aromen Vanille oder Mandelessenz Zitronen oder Orangenschale usw Butte...

Page 31: ...noch weitere 5 Minuten r hren Das Ger t abschalten und die Sch ssel herausnehmen Mit einem Spatel von oben nach unten den gesiebten Staubzucker unterheben Mithilfe einer Spritzt te oder mit zwei L ffe...

Page 32: ...el agua o en otros l quidos usar un pa o h medo para limpiarlos 9 Incluso cuando el aparato no est en marcha hay que desconectar el enchufe de la toma de corriente el ctrica antes de acoplar o quitar...

Page 33: ...podr an utilizar el aparato para sus juegos 20 Los elementos del embalaje no se tienen que dejar al alcance de los ni os ya que constituyen fuentes potenciales de peligro 21 No tocar nunca las partes...

Page 34: ...Montar el recipiente E sobre la base del cuerpo del aparato D para que las ranuras presentes en el recipiente se acoplen perfectamente en las marcas realizadas en el correspondiente aloja miento en el...

Page 35: ...illas para amasar G y para mezclar H no hay que dejar el aparato en marcha por m s de 5 minutos seguidos despu s dejar enfriar por al menos 20 minutos Si se usa la varilla para montar F no hay que dej...

Page 36: ...sando el gancho amasar a 1 de velocidad a adiendo gradualmente las harinas Continuar con la velocidad 1 hasta 2 minutos desde el inicio Pasar a la velocidad 2 y amasar todav a durante 4 minutos Pasar...

Page 37: ...PARAISO 1 6 KG 350 g de mantequilla a temperatura ambiente 350 g de az car 4 huevos de 65 70 g 10 yemas aproximadamente 200 g 250 g de harina 0 150 g de f cula de patatas 1 sobrecito de levadura en po...

Page 38: ...adido Apagar el aparato y extraer el recipiente Con una esp tula y con movimientos de arriba hacia bajo incorporar el az car glas pasado con el colador Con un brazo de pastelero o con dos cucharas fo...

Page 39: ...mpreendido as instru es e os perigos presentes durante o uso do apa relho 8 Este aparelho n o deve ser utilizado por crian as 9 Nunca passe o corpo do aparelho a ficha e o cabo el ctrico por gua ou ou...

Page 40: ...cida a descartar como lixo este aparelho recomendamos que o deixe inoperante cortando o cabo de alimenta o Recomendamos tamb m que deixe in cuas as partes do aparelho que possam representar um perigo...

Page 41: ...aparelho D de modo que as fendas presentes na ta a se encaixem perfeitamente nas marcas presentes no corpo do aparelho Rode a ta a no sentido hor rio para bloque la E Fig 3 Inserir a tampa para salpi...

Page 42: ...e durante o funcionamento for necess rio adicionar mais ingredientes na ta a E desligue o aparelho pelo man pulo C colocando o na posi o 0 e verta os ingredientes na ta a Para evitar les es pessoais e...

Page 43: ...leo ou forrado com papel de forno cubra com um pano de cozinha e deixe levedar mais 30 minutos Asse no forno pr aquecido a 220 C durante 25 35 minutos dependendo do formato ouquando batendo a base do...

Page 44: ...o fermento e misture na velocidade 6 por 2 minutos Verta a massa em forma untada e enfarinhada Asse no forno pr aquecido a 170 C por 35 45 minutos Retire do forno e deixe repousar 5 minutos dentro da...

Page 45: ...ucties en gevaren bij het gebruik van het apparaat hebben begrepen 8 Dit apparaat mag niet door kinderen worden gebruikt 9 De basis van het apparaat de stekker het elektriciteitssnoer nooit onder wate...

Page 46: ...0 Wanneer men het apparaat als afval wil verwerken moet het onbruikbaar gemaakt worden door de voedingskabel er af te knippen Bovendien wordt het aanbevolen om alle gevaarlijke onderdelen van het appa...

Page 47: ...e arm A totdat een blokkeringsklik wordt gehoord Fig 2 Steek de kom E op de basis van het apparaat D zodat de gleuven op de kom perfect aansluiten op de streepjes op de plaats van de kom op de basis v...

Page 48: ...werken laat het vervolgens tenminste 20 minuten afkoelen Als de garde voor het opkloppen F wordt gebruikt laat het apparaat niet langer dan 10 minu ten doorgaand werken laat het vervolgens tenminste...

Page 49: ...nelheid 1 tot aan 2 minuten vanaf het begin Ga naar de snelheid 2 en blijf nog 4 minuten kneden Leg het deeg in een ingevette kom en bedek het met folie die ook ingevet moet worden Laat het deeg op ka...

Page 50: ...mperatuur 350 g suiker 4 eieren 65 70 gr 10 eidooier circa 200 gr 250 g meel 0 150 g aardappelzetmeel 1 zakje poedergist voor taarten 1 mespuntje zout Aroma s vanille citroenschil sinassappelschil enz...

Page 51: ...te dosis is toegevoegt Zet het apparaat uit en verwijder de kom Voeg de poedersuiker door een zeef toe met een spatel die van boven naar beneden bewogen moet worden Met een spuit of met twee lepels ma...

Page 52: ...EL 52 1 2 3 4 5 6 7 8 9 10 11 12 13 ULHWH ULHWH 14...

Page 53: ...EL 53 15 16 17 18 19 20 21 22 23 24 25 26 27...

Page 54: ...EL 54 1 Kg 1 7 Kg...

Page 55: ...EL 55 2...

Page 56: ...EL 56 PO...

Page 57: ...EL 57 PO JU PO 7257 3 5 62 JU...

Page 58: ...EL 58...

Page 59: ...RU 59 1 2 3 4 5 6 7 8 9 10 11 12 13 ULHWH ULHWH 14...

Page 60: ...RU 60 15 16 17 18 19 20 21 22 23 24 25 26 27...

Page 61: ...RU 61 V...

Page 62: ...RU 62 2...

Page 63: ...RU 63...

Page 64: ...RU 64 3 5 62...

Page 65: ...RU 65...

Page 66: ...RU 66 61 ZN UDEFGHIJ ZN U DEFGHIJ a 3 H RQJKL SSOLDQFHV 6UO KWWS ZZZ DULHWH QHW UX DVVLVWDQFH ULHWH...

Page 67: ...UA 67 1 2 3 4 5 6 7 8 9 10 11 12 13 ULHWH ULHWH 14...

Page 68: ...UA 68 15 16 17 18 19 20 21 22 23 24 25 26 27...

Page 69: ...UA 69...

Page 70: ...UA 70 2...

Page 71: ...UA 71...

Page 72: ...UA 72 3 5 62...

Page 73: ...UA 73...

Page 74: ...AR 74 Ariete...

Page 75: ...AR 75 EC CE A B C D E F G H I...

Page 76: ...AR 76 G F H A B D E E A I D F G H A E A B C E A...

Page 77: ...AR 77 C A O E H G F E C E...

Page 78: ...AR 78 F I E G H D...

Page 79: ...AR 79 G...

Page 80: ...AR 80...

Page 81: ...K IL F Q FK F XFLRZ FK OXE XP V RZ FK OXE WH QLHSRVLDGDM FH QLH E GQHJR GR ZLDGF HQLD OXE QDMRPR FL XU G HQLD FK ED H V RQH QDG RURZDQH SU H RVRE RGSRZLHG LDOQ D LFK EH SLHF H VWZR OXE RVWD SRXF RQH Z...

Page 82: ...DOQH QLH DWZLHUG RQH Z UD QLH SU H SURGXFHQWD PRG ILNDFMH PRJ VNXWNRZD PQLHMV HQLHP EH SLHF H VWZD X WNRZDQLD XU G HQLD RUD XWUDW gwarancji 20 SU SDGNX XW OL DFML SURGXNWX Z FKDUDNWHU H RGSDGX QDOH XQ...

Page 83: ...FL 2EQL G ZLJQL Z NLHUXQNX V PEROX DE SRGQLH UDPL D GR XV V HQLD G ZL NX blokowania rys 2 8VWDZL PLVN QD SRGVWDZLH NRUSXVX XU G HQLD Z WDNL VSRVyE DE RWZRU Z PLVFH ZSDVRZD VL GRN DGQLH Z NDUE QDMGXM F...

Page 84: ...JQ RVWUR QLH GR JyU GHPRQWRZD PLVN REUDFDM F M Z OHZR UWAGA 3U HG UR SRF FLHP X ZDQLD XU G HQLD VSUDZG L F DNFHVRULD RVWD SRSUDZQLH zamontowane SU SDGNX X ZDQLD NR FyZHN GR Z UDELDQLD L PLHV DQLD QLH...

Page 85: ...F HQLD RVXV GRN DGQLH ZV VWNLH F FL SU HG LFK SRQRZQ P zamontowaniem PRZEPISY PRZEPIS PODSTAWOWY NA CHLEB 1 6 KG 600 ml letniej wody J ZLH FK GUR G OXE J GUR G Z SURV NX HF NL FXNUX HF ND VROL 30 g o...

Page 86: ...GNR FL SU H PLQXW 3U H R FLDVWR QD EODW URERF L V ENR XIRUPRZD NXO 2ZLQ IROL R GR FK RG LDUNL QD FR QDMPQLHM PLQXW OXE GR OHNNLHJR VWZDUGQLHQLD 5R ZD NRZD FLDVWR QD GDQ ZLHONR QD EODFLH SRV SDQ P P N...

Page 87: ...L SU H PLQXW PLHQL SU GNR QD L GRGDZD VWRSQLRZR FXNLHU GUREQ RQW QXRZD XELMDQLH MHV F H SU H PLQXW SR GRGDQLX RVWDWQLHM SRUFML F XU G HQLH L Z M PLVN D SRPRF RSDWNL ZPLHV D UXFKDPL RG JyU GR GR X FXNL...

Page 88: ......

Page 89: ...Cod 6115105700 Rev 0 del 25 07 2017 De Longhi Appliances Srl Divisione Commerciale Ariete Via San Quirico 300 50013 Campi Bisenzio FI Italy E Mail info ariete net Internet www ariete net 827070...

Reviews: