background image

Training Manual FAST EVO X/FLUENDO PLUS LNX -FAST EVO R X/BRD LNX                            


Page. 35 di 64


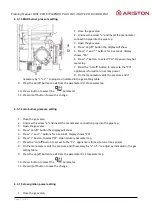
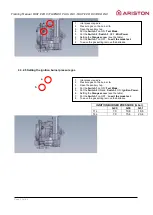
2.


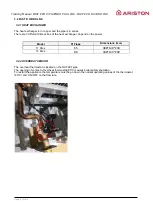
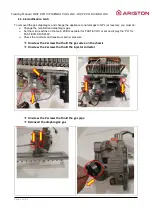
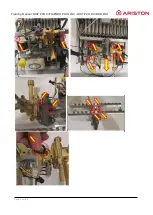
Unscrew the screw “a” and insert the manometer connection pipe into the pipe tap 

3.


Open the gas valve 

4.


Press “on/off” button the display will show  

5.


Press “+” and “-” buttons for 3 seconds, display shows ”PA” 

6.


Press “+” button, to select ”Pd”. Open sanitary hot water tap 

7.


Press the “on/off” button to access to the “Pd”, appliance is forced to run at max power 

8.


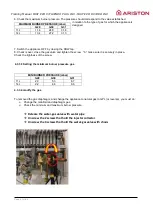
On the manometer verify the pressure and if necessary by “+” or”-” to adjust as indicated in the gas 
setting table 

9.


Press the on/off button to exit from the parameter Pd. Close water tap 

10.


Press + button to select the 

parameter 

11.


Press on/off button to save the change 


4.3.2 FAST EVO X/FLUENDO PLUS LNX 


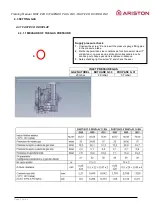
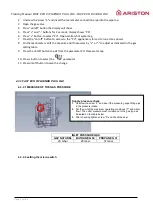
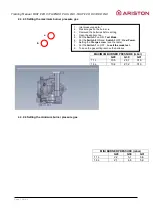
4.3.2.1 MEASURE OF THE GAS PRESSURE 


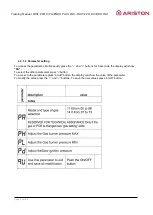
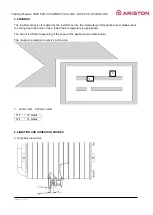
4.3.2.2 setting the micro-switch  


INLET PRESSURE GAS 

GAZ NATUREL 

BUTHANE G 30 

PROPANE G 31 

20 mbar 

29 mbar 

37 mbar 

 
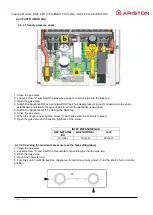
Supply pressure check 

1

.  

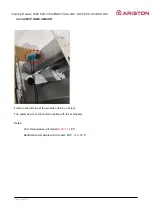
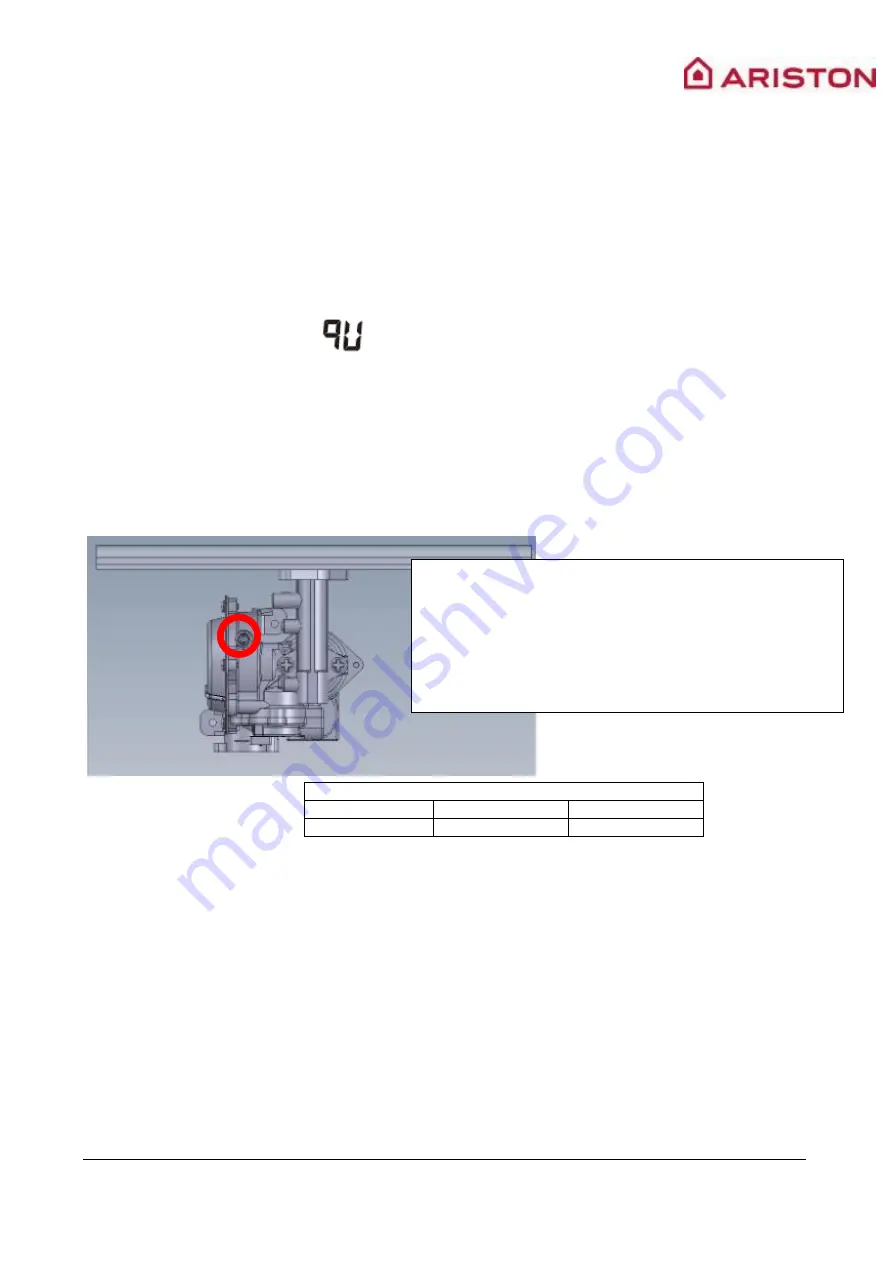
Unscrew the screw “b” and insert the pressure gauge fitting pipe 
in the pressure intake. 

2

.  Put the unit at the maximum operating conditions (T° and water 

flow). The outlet pressure must correspond to the gas type as 
indicated on the table below. 

3

.  After 

checking tighten screw “b” and check the seal. 

Summary of Contents for BRD LNX

Page 1: ...TRAINING MANUAL FAMILY Instantaneous Gas Water Heater BRAND ARISTON CHAFFOTEAUX MODEL FAST EVO X FLUENDO PLUS LNX FAST R X BRD LNX TYPE 11 14 low NOx version 1V1 17 12 2018 ...

Page 2: ...g Manual FAST EVO X FLUENDO PLUS LNX FAST EVO R X BRD LNX Page 2 di 64 Modification 1V1 17 12 2018 MY Fast Evo X Display version added 1V0 18 07 2018 MY Creation of the document VERSION DATE NAME MODIFICATION ...

Page 3: ...AST EVO X FLUENDO PLUS LNX 15 2 2 FAST R X BRD LNX 17 2 3 MANAGEMENT OF THE APPLIANCE 19 2 3 1 FAST EVO X FLUENDO PLUS LNX 19 2 3 2 FAST R X BRD LNX 20 2 4 SPECIAL FUNCTION 21 2 4 1 ANTIFREEZE FUNCTION 21 2 4 2 SOLAR FUNCTION 21 3 HYDRAULIC COMPONENTS 22 3 1 FAST EVO X FLUENDO PLUS LNX 22 3 1 1 HYRAULIC BLOCK Inlet 22 3 1 2 HYDRAULIc BLOCK outlet 23 3 1 3 HEAT EXCHANGER 24 3 1 4 INLET FILTER 24 3 ...

Page 4: ... correct 51 6 1 2 Flashing Temperature sensor out 51 6 1 3 Flashing No flame detected 52 6 1 4 Flashing Problem on the gas valve 53 6 1 5 flashing Fume temperature too high 54 6 2 TROUBLESHOOTING FAST R X BRD LNX 55 6 2 1 Flashing Low voltage 55 6 2 2 No ignition 55 6 2 3 Ignition but not successful 56 6 3 FAST EVO X DISPLAY 57 6 3 1 E2 Water temprerature sensor failure 57 6 3 2 E3 igniton failure...

Page 5: ... di 64 1 GENERAL INFORMATION 1 1 SIEZE DIMENSIONS 1 1 1 FAST EVO X FLUENDO PLUS LNX Model a b c d e f g h i j k l m 11 110 580 40 8 117 234 1 310 47 8 58 8 97 210 8 225 2 25 8 3 23 3 14 125 72 147 8 264 6 370 22 8 0 LEGEND A Hot water outlet B Gas inlet C Cold water inlet ...

Page 6: ...FAST EVO X FLUENDO PLUS LNX FAST EVO R X BRD LNX Page 6 di 64 1 1 2 FAST R X BRD LNX Model a b c d e f g h i j k l m 11 113 617 40 8 102 208 310 58 8 93 3 210 8 255 2 0 6 18 5 92 8 13 6 14 132 70 132 238 370 15 5 10 6 ...

Page 7: ...ining Manual FAST EVO X FLUENDO PLUS LNX FAST EVO R X BRD LNX Page 7 di 64 1 2 HMI OF THE APPLIANCE 1 2 1 FAST EVO X DISPLAY LEGEND 1 Reset 2 Temperature button 3 Temperature button 4 on off button 1 2 3 4 ...

Page 8: ...US LNX 1 2 3 FAST R X BRD LNX 1 2 4 Information with the LED If the LED is red fixed the power of the batteries is too low changed them If the LED Red blink 1 2 3 4 or 5 times is an error code see in the pragraphe Error Code If the LED is Orange setting mode LEGEND 1 Knob 2 Scale of temperature 3 Led 1 2 3 ...

Page 9: ...i 64 1 3 DETAILED DESCRIPTION 1 3 1 FAST EVO X FLUENDO PLUS LNX LEGEND 1 Fume thermostat 8 PCB box 2 Exhaust hood 9 Flow sensor 3 Heat exchanger 10 Ignition PCB 4 Burner 11 knob 5 manifold 12 HMI 6 Overheat thermostat 13 Ignition and detection electrode 7 Gas valve 14 frame ...

Page 10: ...LNX Page 10 di 64 1 3 2 FAST R X BRD LNX LEGEND 1 Exhaust hood 8 Water gas valve 2 Heat exchanger 9 Overheat thermostat 3 Burner 10 Gas connect pipe 4 Water connect pipe 11 Ignition ionization electrode 5 manifold 12 frame 6 PCB 13 fumes thermostat 7 Battery box ...

Page 11: ... line and to the left of the water line perpendicular Horizontally fix the plate to the wall using the fixings designed for this purpose after having drilled out holes B Engage the holes in the top of the chassis onto the lugs on the securing plate a b c d e f g h i j k l m o p q Fast EV O X 11L 58 0 446 2 15 2 19 0 9 5 31 0 114 2 79 1 23 3 3 8 25 8 2 9 21 0 9 6 47 8 57 4 Fast EV O X 14L 58 0 446 ...

Page 12: ...2 190 95 310 114 2 52 8 53 2 18 4 13 5 210 96 93 3 FAST R X 14L 617 4 485 8 370 115 52 3 53 7 15 5 10 6 Recommandations Position the water heater as close as possible to the flue exhaust Do not fit the water heater above cooker knobs an oven or any other appliance producing steam Provide a wall and fixings adequate to support the weight of the water heater ...

Page 13: ...tlet 13 Battery number 2 3 Burner 14 Hot water NTC sensor 4 Ignitor sensor 15 Knob for setting the temperature 5 Detection electrode 16 Fume safety sensor 6 Gas clapet in the valve gas 17 Cold water inlet 7 Principal gas clapet 18 Water filter 8 Adjutment gas 19 FLUX meter 9 Safety gas valve 20 Motor gas valve 10 Safety gas valve 21 Solenoid coil 11 Electronid PCB 22 Overheat sensor ...

Page 14: ... EVO R X BRD LNX Page 14 di 64 1 5 2 FAST R X BRD LNX LEGEND 1 Heat exchanger 7 Magnetic plug 2 Wet chamber 8 Water valve 3 Burner 9 Control unit 4 Ignition electrode 10 Over heat thermostate 5 Ionisation electrode 11 Safety exhaust fume 6 Gas valve ...

Page 15: ...alve 7 open to position of soft ignition After bidirectional valve 9 10 got power normally open valve 9 turn OFF normally closed valve 10 tun ON In the function of pressure diaphragm valve 6 is turned on by differential pressure After soft ignition light on ionization pole 5 can sense flame signal ignition 12 control discharge electrode 4 to stop ignite Base on deliver water NTC 14 and water flow ...

Page 16: ...LNX FAST EVO R X BRD LNX Page 16 di 64 Mesasure of the flow rate Ignition cycle Ignitor 12 Adjustement of the gas power Ionistation current 0 5 uA Detection 5 Gas valve 20 et 21 Safety gas valve 9 et 10 Flame on te burner 3 Water flow 2 l min ...

Page 17: ...he signal drive the ignition 0 5s after the solenoid valve 20 open Gas from the intake connection 21 goes to the solenoid valve 20 and then goes to the gas regulating shaft 19 goes to the linkage body 14 next goes to manifold and burner B start ignition Ignition is successful flame electrode C sensor provides flame signal to controller box and ignition pin C stop spark and machine continue to work...

Page 18: ...5 the machine stops working Machine only for RU market has this function Right knob 9 can adjust water flow rate filter 7 eliminater particles in water Left knob 17 can adjust gas flow rate 2pcs 1 5 V batteries are series connection Microswitch ON Ignition cycle after 0 5s Normal working Stop ignition Detect flame Open valve Turn off water or power Water pressure 0 2bar System self detection OK St...

Page 19: ...is verification of the current If the current is not sufficent there is safety gas valve shut down Modulation occurs between the value of the maximum power and the value of the minimum power The burner is on till the outlet limit temperature The temperature is checked by the outlet NTC During the flow rate variations and during the ignition the power is managed by the T and the flow rate measure t...

Page 20: ...ME CHECK After dection flame there is verification of the current If the current is not sufficent there is safety gas valve shut down Modulation occurs between the value of the maximum power and the value of the minimum power The burner is on till the outlet limit temperature The temperature is checked by the outlet thermostat During the flow rate variations and during the ignition the power is ma...

Page 21: ... where is possible that the temperature goes down 5 C we suggest to drain the water 2 4 2 SOLAR FUNCTION The opening temperature for the thermostatique is 48 C T 48 C T 48 C T maxi 90 C Maxi pressure 10 bars Hot water Cold water Inlet water in the appliance Hot water Cold water Inlet water in the appliance Hot water Cold water Inlet water in the appliance ...

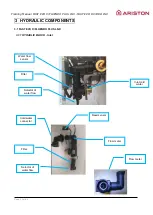
Page 22: ... X BRD LNX Page 22 di 64 3 HYDRAULIC COMPONENTS 3 1 FAST EVO X FLUENDO PLUS LNX 3 1 1 HYRAULIC BLOCK Inlet Cold water connector Flow meter Selector of water flow Selector of water flow Reed sensor Flow meter Inlet cold water Water flow sensor Filter Filter ...

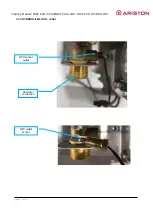
Page 23: ...Training Manual FAST EVO X FLUENDO PLUS LNX FAST EVO R X BRD LNX Page 23 di 64 3 1 2 HYDRAULIc BLOCK outlet Hot water connection NTC sensor outlet NTC outlet sensor ...

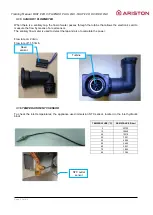
Page 24: ... copper and the pipe is in series There are 2 different dimensions of the heat exchanger depend on the power Model N Flaps Dimensions mm 11 litres 62 260 155 203 14 litres 77 310 155 203 3 1 4 INLET FILTER In the inlet hydraulic block there is the filter accessible from the bottom of the appliance Filter Connector and filter ...

Page 25: ...by means of a reed sensor The sanitary flow meter is used to detect the tap and also to calculate the power Flow rate on 2 l min Flow rate off 1 5 l min 3 1 6 TEMPERATURE NTC SENSOR To check the inlet temperatures the appliance used immersion NTC sensor located in the inlet hydraulic block TEMPERATURE C RESISTANCE Ohm 0 23730 10 15450 20 10310 30 7037 40 4905 50 3485 60 2521 70 1853 80 1384 NTC ou...

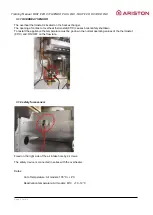
Page 26: ... C causes boiler safety shutdown To restart the appliance the temperature must be go down the normal operating values of the thermostat 80 C and ON OFF on the flow rate 3 1 8 safety fume sensor Fixed on the right side of the air intake hole by 2 screws The safety device is connected in series with the overheater Datas Cut of temperature All models 135 C 4 C Reactivation temperature All models 80 C...

Page 27: ... of the heat exchanger depend on the power Model N Flaps Dimensions mm 11 litres 65 388 140 230 14 litres 80 388 140 290 3 2 2 OVERHEAT SENSOR The overheat thermostat is located on the OUTLET pipe The opening of contact of overheat thermostat 85 C causes boiler safety shutdown To restart the appliance the temperature must be go down the normal operating values of the thermostat 80 C and ON OFF on ...

Page 28: ...BRD LNX Page 28 di 64 3 2 3 SAFETY FUME SENSOR Fixed on the left side of the air intake hole by 2 screw The safety device is connected in series with the overheater Datas Cut of temperature All models 145 C 4 C Reactivation temperature All models 80 C 10 12 C ...

Page 29: ...AS 4 1 FAST EVO X FLUENDO PLUS LNX The valve gas is equiped with safety gas valve and a motor for the coil of the regulation of the principal main valve Safety valve gas rep 9 et 10 LEGEND 1 Safety solenoid valve 2 Motor and coil 3 Membrane for principal valve 4 Gas valve 2 3 1 1 2 4 ...

Page 30: ...Training Manual FAST EVO X FLUENDO PLUS LNX FAST EVO R X BRD LNX Page 30 di 64 Solenoid Motor rep 20 and solenoid coil rep 21 Gas diaphragm rep 7 Motor rep 20 coil rep 21 ...

Page 31: ...Training Manual FAST EVO X FLUENDO PLUS LNX FAST EVO R X BRD LNX Page 31 di 64 4 2 FAST R X BRD LNX The valve is equiped with water valve gas valve interstage valve microswitch ...

Page 32: ...BUTHANE G 30 PROPANE G 31 20 mbar 29 mbar 37 mbar Supply pressure check 1 Unscrew the screw b and insert the pressure gauge fitting pipe in the pressure intake 2 Mettre l appareil dans les conditions de fonctionnement maxi T et débit eau La pression de sortie doit correspondre à celle donnée pour chaque gaz dans le tableau ci dessous 3 Après checking tighten screw b and check the seal b ...

Page 33: ... the paramters simultaneously press the and buttons for 3 seconds the display will show PA To select the other parameters press button To access to the parameters press on off button the display will show the valve of the parameter To modify the valve press the and buttons To save the new values press on off button ...

Page 34: ... parameter PH Close water tap 10 Press button to select the parameter 11 Press on off button to save the change 4 3 1 4 min burner pressure setting 1 Close the gas valve 2 Unscrew the screw a and insert the manometer connection pipe into the pipe tap 3 Open the gas valve 4 Press on off button the display will show 5 Press and buttons for 3 seconds display shows PA 6 Press button to select PL Open ...

Page 35: ...as indicated in the gas setting table 9 Press the on off button to exit from the parameter Pd Close water tap 10 Press button to select the parameter 11 Press on off button to save the change 4 3 2 FAST EVO X FLUENDO PLUS LNX 4 3 2 1 MEASURE OF THE GAS PRESSURE 4 3 2 2 setting the micro switch INLET PRESSURE GAS GAZ NATUREL BUTHANE G 30 PROPANE G 31 20 mbar 29 mbar 37 mbar Supply pressure check 1 ...

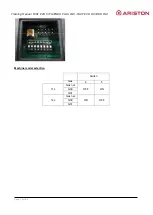
Page 36: ...Training Manual FAST EVO X FLUENDO PLUS LNX FAST EVO R X BRD LNX Page 36 di 64 Machine model selection Switch Gas 4 5 11L Gas nat OFF ON G30 G31 14L Gas nat ON OFF G30 G31 ...

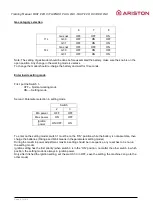
Page 37: ... ON Setting mode Second Parameter selection in setting mode Switch 2 3 Min power OFF OFF Max power ON OFF Ignition power ON OFF ON To enter on the setting model switch 1 must be on the ON position while the battery is not assemble then charge the batteries Orange Led blink means in the parameters setting model During the max min power adjustment max min setting should be in sequence any reset has ...

Page 38: ...3 14 L 13 4 27 2 31 3 MINI BURNER PRESSURE mbar G20 G30 G31 11 L 2 2 5 1 6 6 14 L 2 1 4 6 5 9 1 Inlet pressure gas b 2 Pressure gas on the burner a 3 Removed the batteries before setting 4 Open the sanitary tap 5 Put the Switch 1 on ON Test Mode 6 Put the Switch 2 ON and Switch 3 OFF Maxi Power 7 Setting the Orange screw see the table 8 Put the Switch 1 on OFF to exit the mode test 9 To save the g...

Page 39: ...ch 1 on ON Test Mode 5 Put the Switch 2 Switch 3 OFF Mini Power 6 Setting the Orange screw see the table 7 Put the Switch 1 on OFF to exit the mode test 8 To save the gas setting remove the batteries b a 1 Inlet pressure gas a 2 Pressure gas on the burner b 3 Open the sanitary tap 4 Put the Switch 1 on ON Test Mode 5 Put the Switch 2 ON and Switch 3 ON Ignition Power 6 Setting the Orange screw see...

Page 40: ... you must do Change the manifold and diaphragm gas Set the micro switchs on the main PCB see table for FAST EVO X or set on display the PA for FAST EVO X DISPLAY Check the minimum and maximum burner pressure Unscrew the 2 screws that hold the gas valve on the chassis Unscrew the 2 screws that hold the injector collector Unscrew the 2 screws that hold the gas pipe Removed the diaphragme gas ...

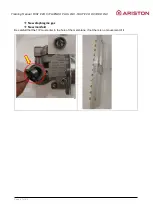
Page 41: ...ning Manual FAST EVO X FLUENDO PLUS LNX FAST EVO R X BRD LNX Page 41 di 64 New diaphragme gas New manifold Be carefull that the TIP must enter in the hole of the membrane if not there is no mouvement of it ...

Page 42: ...ance is designed 5 Switch the appliance OFF by closing the DHW tap 6 Close the gas valve 7 When the check is over tighten screw b and make sure it is securely in place 8 Open the gas valve and check the tightness of the screw 4 3 3 2 Checking the maximum pressure see the Gas setting table 1 Close the gas valve 2 Loosen screw b and insert the manometer connection pipe into the pipe tap 3 Open the g...

Page 43: ...e tightness of the screw 4 3 3 3 Setting the minimum burner pressure gas 4 3 3 4 modify the gas To removed the gas diaphragm and change the appliance to natural gas to GPL or reverse you must do Change the manifold and diaphragm gas Check the minimum and maximum burner pressure Release the water gas valve with water pipe Unscrew the 2 screws that hold the injector collector Unscrew the 4 screws th...

Page 44: ...Training Manual FAST EVO X FLUENDO PLUS LNX FAST EVO R X BRD LNX Page 44 di 64 ...

Page 45: ...er go through the burner blades result to cooling down the burner thus a lower flame temperature is approached The burner is different depending of the power of the appliance see table below The minimum ionization current is 3 micro Amp 1 Water inlet 2 Water outlet 11lt 12 plates 14lt 14 plates 4 5 IGNITION AND IONIZATION PROBES 2 pin ignition electrodes 1 2 ...

Page 46: ...Training Manual FAST EVO X FLUENDO PLUS LNX FAST EVO R X BRD LNX Page 46 di 64 Position of the probes on the burner 4 6 MANIFOLD ...

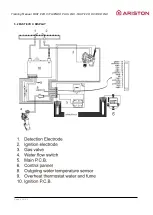
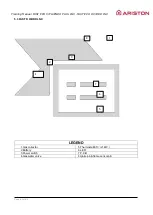
Page 47: ...Page 47 di 64 5 ELECTRIC CABLE 5 1 FAST EVO X FLUENDO PLUS LNX LEGEND 1 Ignition Electrode 5 Knob for the temperateur setting 2 Ionisation Electrode 6 Overheat temperature flue gas and water 3 Gas valve 7 NTC outlet sensor 4 Detection of water flow rate 1 2 3 4 5 6 7 ...

Page 48: ...Training Manual FAST EVO X FLUENDO PLUS LNX FAST EVO R X BRD LNX Page 48 di 64 5 2 FAST EVO X DISPLAY ...

Page 49: ...VO X FLUENDO PLUS LNX FAST EVO R X BRD LNX Page 49 di 64 5 3 FAST R X BRD LNX LEGEND 1 Gas collector 5 Thermostat 85 140 2 Battery 6 LED 3 Power switch 7 P C B 4 Gas water valve 8 Ignite pin flame sensor pin 1 2 3 4 5 8 6 7 ...

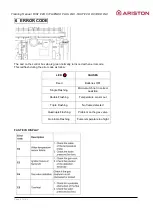
Page 50: ... turns red with an error code This led flash during the error code as follow LED CAUSES Fixed Batteries OFF Single Flashing Micro switch not in correct posistion Double Flashing Temperature sensor out Triple Flashing No flame detected Quadruple Flashing Problem on the gas valve Quintuple Flashing Fume temperature too hight FAST EVO DISPLAY ...

Page 51: ...e Flashing x2 T sensor out Check the position of the micro switch with the instruction booklet batteries OK Check the water pressure Pressure 0 1 b Increased the pressure P 0 1 b Pressure 0 1 b Check the curve ot the NTC sensor following the table Replace the NTC Not correct Check the wire of the probe Replace the probe Not correct Correct Replace the batteries Check the wire and replace the main ...

Page 52: ...ty valve Repalce the gas valve gaz Safety valve correct Gaz pressure correct Gaz pressure correct Check the static pressure gaz between 17 et 25 mb natural gas and 28 et 40 GPL Check the dunamic pressure gaz between 17 et 25 mb natural gas and 28 et 40 GPL Check the valve gas Check the position of the ignition ionisation electrode Replace the batteries Batteries OK Check the wire and replace the m...

Page 53: ...alve Problem on the gas valve Replace the gas valve gaz Gas valve correct Check the diaphragm gas Diaphragm not correct Put in place the one of the instruction booklet Diaphragm correct Doesn t open Replace the gas valve Gas valve OK Check the safety valve Replace the batteries Batteries OK Check the wire and replace the main board if necessary Check the batteries Batteries not OK ...

Page 54: ...rature too hight Check the dynamic pressure gaz between 17 et 25 mb natural gas and 28 et 40 GPL Gas pressure too hight Set the pressure reducer of the installation Check the maxi power of the appliance Bad setting Set the gas valve following the instruction booklet Correct setting Gas pressure correct Check the exhaust fume Clean it by a professional ...

Page 55: ...ignition Change batteries Check water flow Water pressure is low Increase water pressure Check switch status turn on or replace switch switch position off or not ok Check batteries Replace the batteries Batteries not OK Switch on Replace the thermostat thermos tat OK Check the wire and replace the main board if necessary thermostat Thermostat not OK batteries OK Water pressure normal ...

Page 56: ...Electrode ignition flame detection Overheating thermostat work valve Decrease gas inlet or incerase water inlet Overheating thermostat not work Fume safety sensor work Replace the batteries Batteries OK Check the wire and replace the main board if necessary Check the batter Batteries not OK Gas type and pressure correct Electrode ignition flame detection OK Check inlet gas type and pressure Electr...

Page 57: ...lure Check the water pressure Pressure 0 1 b Increased the pressure P 0 1 b Pressure 0 1 b Check the curve ot the NTC sensor following the table Replace the NTC Not correct Check the wire of the probe Replace the probe Not correct Correct Replace the batteries batteries OK Check the wire and replace the main board if necessary Check the batteries Batteries not OK Wire correct ...

Page 58: ...e installation Insufficient pressure gas Check the pressure reducer of the installation Problem on the safety valve Repalce the gas valve gaz Safety valve correct Ignition proble simple Electrode with 2 pin Check the position Gaz pressure correct Gaz pressure correct Check the static pressure gaz between 17 et 25 mb natural gas and 28 et 40 GPL Check the dunamic pressure gaz between 17 et 25 mb na...

Page 59: ...e gas valve Replace the gas valve gaz Gas valve correct Check the diaphragm gas Diaphragm not correct Put in place the one of the instruction booklet Diaphragm correct Doesn t open Replace the gas valve Gas valve OK Check the safety valve Replace the batteries Batteries OK Check the wire and replace the main board if necessary Check the batteries Batteries not OK ...

Page 60: ...amic pressure gaz between 17 et 25 mb natural gas and 28 et 40 GPL Gas pressure too hight Set the pressure reducer of the installation Check the maxi power of the appliance Bad setting Set the gas valve following the instruction booklet Correct setting Gas pressure correct Check the exhaust fume Clean it by a professional ...

Page 61: ...Training Manual FAST EVO X FLUENDO PLUS LNX FAST EVO R X BRD LNX Page 61 di 64 7 TECHNICAL SPECIFICATION ...

Page 62: ...Training Manual FAST EVO X FLUENDO PLUS LNX FAST EVO R X BRD LNX Page 62 di 64 ...

Page 63: ...Training Manual FAST EVO X FLUENDO PLUS LNX FAST EVO R X BRD LNX Page 63 di 64 ...

Page 64: ...Training Manual FAST EVO X FLUENDO PLUS LNX FAST EVO R X BRD LNX Page 64 di 64 ...

Reviews: