background image


OWNER’S

 MANUAL 

5 | 

P a g e


3. OPERATION INSTRUCTION: 


3.1


 STARTING UP: Drive in ideal conditions for optimal E-Bike performance. 

a.


Make all safety checks on battery level, both break levers, both right and left turn signals, horn, and 
headlight. Check and tighten any bolts and nuts. Adjust mirrors for proper visibility.


b.


Check air pressure in tires. Make sure air in tires are holding and there are no leaks.  

c.


Turn alarm off. If alarm is on when the ignition is turned on the E-Bike will turn on and then turn off. 
The bike will not move at this point when the key is in the ignition. Take the key out of the ignition 
and turn the alarm off. If the alarm does not turn off, open the seat and switch the breaker off to 
reset then turn it on. Then press the alarm off on the key fob.  


d.


Ensure pedals are attached tightly and safely.


e.


Retract main kickstand or side kickstand. 


f.


Ensure forward drive is switched on and not reverse drive. 


g.


Driver sits on seat, insert the key in ignition, turn key clockwise to ON position. The dash display will 
be visible but there will be no engine sound. 


h.


Place hands on both Rt and Lt brake leaver for safety when you are ready to drive. Turn the throttle 
towards you slowly to start accelerating.


3.2


 PARKING: Park in designated public areas using the alarm and a good heavy-duty lock.  


Turn off ignition by turning the key left counter clockwise before parking.


Use the front wheel lock by turning the handlebars fully to the left; turn the key in the ignition to left again 
counter clockwise.


It is recommended to use a heavy duty bike lock or chain looped through the wheel to secure the bike when 
parked. 


3.3


CHARGING: Let your batteries cool before charging. Charge frequently for best performance. 


Turn off ignition before using the charger. 


On  the  E-Bike,  plug  the  charger  to  the  output  socket  then  to  a  standard  wall  power  outlet. 
Disconnect the battery charger and unplug from E-Bike when not in use.


Completely empty batteries will take 6-8 hours to charge with a standard charger. Chargers will 
stop  charging  when the  battery  is  fully  charged. Do  not  charge  more than  8-10  hours  or  it  will 
damage the batteries. 


The red light on the charger indicates that the E-Bike is being charged and the fan inside the charger 

will be on. Once it’s fully charged 

the green light will turn on. Place the charger back inside the seat 

storage.


Charging should proceed in condition of good ventilation not in an environment with corrosive gas 
or flammable condition.


Avoid dropping the charger. The battery charger should be regularly examined for damage to the 
cord,  plug,  enclosure  and  other  parts.  In  the  event  of  such  damage,  if  any  is  found,  the  E-Bike 
should not be charged until the battery charger has been repaired or replaced.


Summary of Contents for Commander III 2020

Page 1: ...ELECTRIC BIKE OWNER S MANUAL E BIKE MODEL COLOR Armada Recon SERIAL NUMBER PURCHASE DATE Ltd ...

Page 2: ...riate Riding Gear 2 8 Electrical Care 2 9 Security 3 Operational Instruction 3 1 Start Up 3 2 Parking 3 3 Charging 3 4 Hazards Lights 4 Maintenance and Care 4 1 Battery type and care 4 2 Handling the battery 4 3 Distance and power 4 4 Effects of temperature 4 5 Breaker Switch 4 6 Battery Storage 4 7 Cleaning Care 4 6 Regular Maintenance Time Table 5 General Technical Info Tips Trouble shooting ...

Page 3: ...Oil Throttle Brake Oil Rt Brake lever Lt Brake lever LED Digital Display Light switch 3 speed switch Reverse Speed Horn High beam low beam Horn Lt Rt Turn Signal Key Ignition Under Seat Lock Charger Port Side Kickstand Middle Kickstand Pedal and crank shaft ...

Page 4: ...an inner tube in it either repair the tube with a patch kit or better yet replace it Most ARMADA ELECTRONIC VEHICLES have tubeless tires 2 6 CARRYING CAPACITY Typical carrying capacity for most E Bike is 330lbs Do not over load max carrying weight of the E Bike Doing so will affect performance and may cause damage to components on the E Bike Securely fix cargo on the vehicle to ensure safe drive a...

Page 5: ... the alarm and a good heavy duty lock Turn off ignition by turning the key left counter clockwise before parking Use the front wheel lock by turning the handlebars fully to the left turn the key in the ignition to left again counter clockwise It is recommended to use a heavy duty bike lock or chain looped through the wheel to secure the bike when parked 3 3 CHARGING Let your batteries cool before ...

Page 6: ...w battery Replace battery with an identical or similar battery When replacing your battery dispose of it at a proper battery recycling facility or return to an ARMADA Scooter Shop 4 2 HANDLING THE BATTERY The battery contains large amounts of electrical power You must use caution and respect when handling it Not following these instructions can result in serious injury DO NOT place your lead acid ...

Page 7: ...splay screen check to see if the breaker switched off The breaker switch can be turned off when you want to store the bike for a long period of time Storing it with the breaker switch off keeps the battery from drain but will also shut off the E bike s alarm 4 6 BATTERY STORAGE IMPORTANT WARNING STORING YOUR E BIKE FOR A LONG TIME WITHOUT CHARGING WILL DEPLETE THE BATTERY If you do not charge the ...

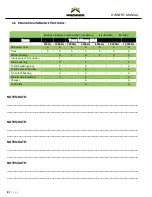
Page 8: ..._______________________ _______________________________________________________________________________ NOTES DATE _______________________________________________________________________________ _______________________________________________________________________________ Items Travel Mileage KM 200km 1000km 3000km 5000km 8000km 10 000km 12 000km All bolts nuts A A A A A A A Tires A A A A A A A ...

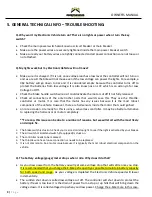
Page 9: ...ehicle However there are hall sensors inside the motor that could go bad on rare occasion A remedy for this is using a sensor less controller It may be a better alternative to replacing the hall sensor or motor completely To recap this issue can be due to a number of reasons but we will start with the most likely and simple fix 1 The brake switch is stuck on Check your rear red tail stop light to ...

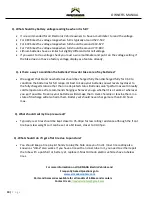
Page 10: ...n in a depleted status Batteries won t perform as well in really cold temperatures We recommend charging wherever you go whether it is at work or wherever you go if possible Freezing your batteries will damage them Over charging or leaving them in a state of discharge will also harm them Battery set should never charge more than 8 10 hours max Q What should I set my tire pressure at Typically rear...

Reviews: