5
wire around the clamp if possible. Like a transformer, the more
wraps, the more power.
Please note, the clamp must be placed between grounding points
on each end of the cable and the cable must be grounded on both
ends for the clamp to work. The clamp induces current onto the
cable and the current will not flow if the cable isn’t grounded on
both ends.
Tracing Wire
- After the Pro871C transmitter has been properly
connected and verified to have a good ground and power, turn on
the Pro871C receiver by turning the volume knob on the front of
the receiver clockwise. Place the receiver near the operating
Pro871C transmitter. A beeping sound should be heard indicating
that the receiver is working properly. A high pitched tone could
indicate that you are too close to the receiver or your batteries are
low. A fading signal indicates low battery. If you suspect low
battery, consult the Lo Battery LED on the receiver and
transmitter.
The black control knob on the front of the receiver regulates the
volume of the receiver, both headphones and external speaker.
Additionally, the analog meter on the front of the receiver will
indicate the reception power level visually. After connecting and
turning on the transmitter and turning on the receiver, point the
receiver toward the ground and listen for the beeping signal. The
closer you are to the cable, the louder the signal should be except
for directly over the cable in the NULL mode (discussed next).
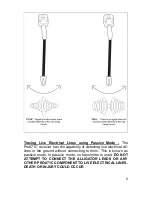
When connected directly to the wire using the red and black
alligator clips, the Pro871C has the option of NULL or PEAK
tracing. Simply put, NULL means that the signal nulls or stops
when the receiver is directly over the cable. PEAK means the
signal is loudest directly over the cable. See illustration on page 6.
The user should become familiar with this difference and select
the response that best suits their preference. When using either of
the inductive modes (broadcast or clamp), the receiver
automatically defaults to PEAK reception as the only option.


