2
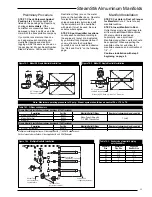
These instructions cover the
installation of the models listed below:
Air Operated (AM):
90 - 94 Sizes (Cast Iron)
1200 - 1400 Sizes (Stainless Steel)
Electric Motor Operated (HEM):
90 - 94 Sizes (Cast Iron)
1200 - 1400 Sizes (Stainless Steel)
Electric “On-Off” (DSA):
90 - 93 Sizes (Cast Iron)
Preliminary Procedure
STEP 1: Check Shipment Against
Packing List.
All components are
listed on the packing slip. Report any
shortages
immediately
. If the
humidifier or accessories have been
damaged in transit, notify us and file
claim with the transportation company.
If your order covers more than one
unit, separate each complete unit.
Humidifier tagging and manifold
tagging will be the same as shown on
the packing list. Model, Serial Number,
Steam Pressure, Orifice and Orifice
Restriction (if any) are on the metal
plate on the humidifier body. Operator
for electric motor operated unit is
shipped separately but marked with
the serial number of the humidifier
with which it must be used. Be sure
serial numbers agree.
STEP 2: Spot Humidifier Locations.
Locate each humidifier according to
the engineer’s layout or as indicated
by your Armstrong Representative. If
you must locate the humidifiers
yourself, be sure to read and observe
the “Do’s and Don’ts” on the following
page.
Manifold Installation
STEP 3: Cut Hole in Duct or Plenum
for Manifold.
Use manifold
dimensions “X” and “Y” from Table 2-
2, below, and add approximately
1
¼
4
"
for manifold clearance. If multiple
manifolds are used, read page 9 first.
STEP 4: Insert Manifold in Duct.
Outlet holes must point upstream into
air flow,
except on insulated
manifolds point discharge holes
downstream.
Where manifold is
positioned horizontally, use a spirit
level. Manifolds longer than one foot
should be supported. Put the two
piece manifold escutcheon plate in
position. When supporting the
manifold on the far end allow for
manifold expansion and contraction of
1/2" - 1”.
Instructions continued on page 8
Preliminary Procedure and Manifold Installation
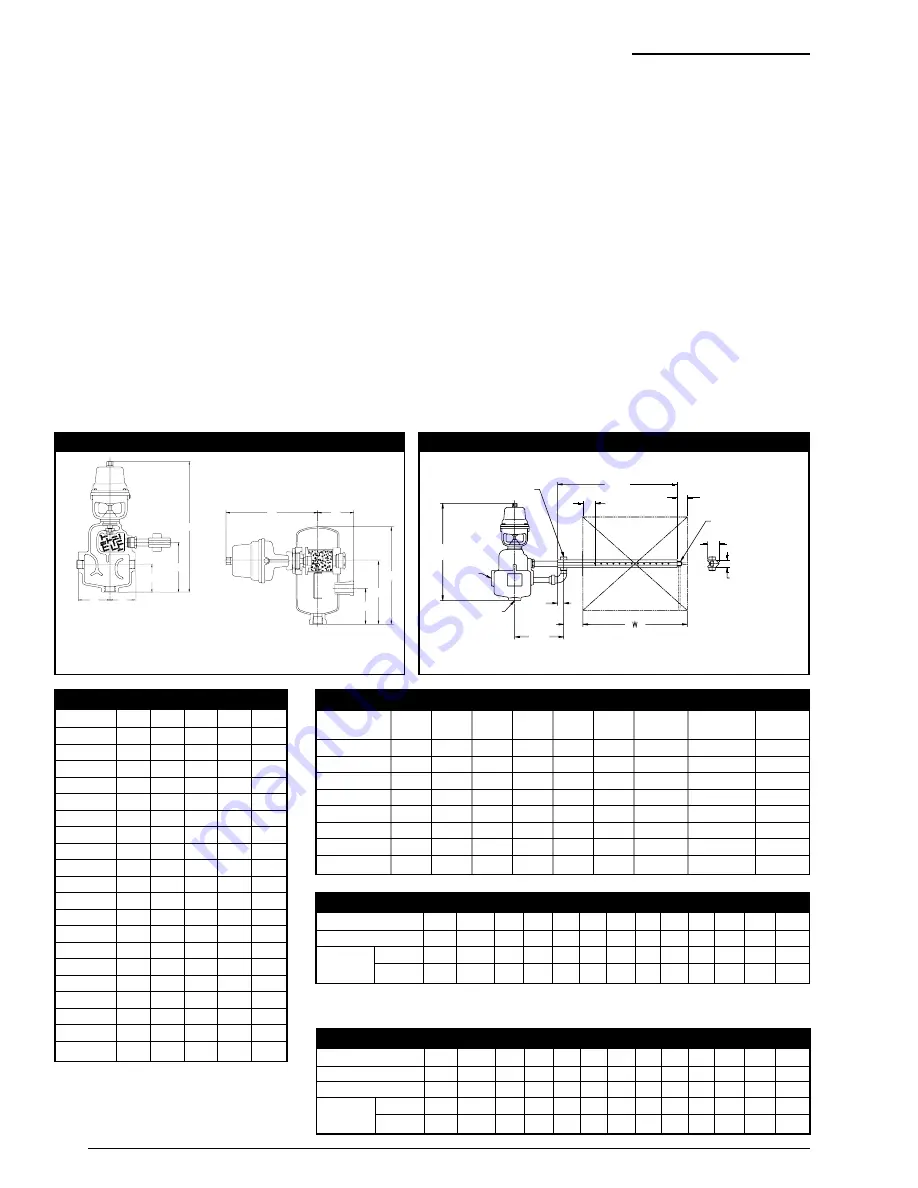
Table 2-2. Cross-Section Dimensions
Model “N”
“R”
“S”
“T”
“X”
“Y”
Steam
Condensate Alternate
Supply
Drain
Inlet
90 Size
5
3
/
8
"
2"
1"
1"
1
1
/
4
"
1
7
/
8
"
1
/
2
" NPT
1"
1
/
2
"
91 Size
5
11
/
16
"
2"
1"
1"
1
1
/
4
"
1
7
/
8
"
1
/
2
" NPT
1"
3
/
4
"
92 Size
8
9
/
16
"
2"
1"
1"
1
3
/
4
"
2
5
/
8
"
3
/
4
" NPT
1"
3
/
4
"
1200 Size
8
9
/
16
"
2"
1"
1"
1
3
/
4
"
2
5
/
8
"
3
/
4
" NPT
1"
3
/
4
"
93 Size
9
1
/
16
"
2"
1
5
/
8
"
1
5
/
8
"
2
1
/
8
"
3
1
/
8
"
1
1
/
4
" NPT
1
1
/
4
"
1
1
/
4
"
1300 Size
9
7
/
8
"
2"
1
5
/
8
"
1
5
/
8
"
2
1
/
8
"
3
1
/
8
"
1
1
/
4
" NPT
1
1
/
4
"
1
1
/
4
"
94 Size
13
1
/
2
"
2"
1
5
/
8
"
1
5
/
8
"
3
1
/
4
"
4
1
/
4
"
2" NPT
2"
2"
1400 Size
14
5
/
16
"
2"
1
5
/
8
"
1
5
/
8
"
3
1
/
4
"
4
1
/
4
"
2" NPT
2"
2"
Table 2-1. Dimensions in Inches
Model No.
B
C
D
E
F
AM-90
8
7
/
8
–
2
3
/
8
2
7
/
16
2
13
/
16
HEM-90
15
1
/
2
–
2
3
/
8
2
7
/
16
2
13
/
16
DSA-90
7
–
2
3
/
8
2
7
/
16
2
13
/
16
AM-91
16
3
3
/
8
3
1
/
16
6
1
/
16
3
13
/
16
HEM-91
19
1
/
2
3
3
/
8
3
1
/
16
6
1
/
16
3
13
/
16
DSA-91
10
7
/
8
3
3
/
8
3
1
/
16
6
1
/
16
3
13
/
16
AM-92
16
3
3
/
8
3
13
/
16
6
1
/
16
3
13
/
16
HEM-92
19
1
/
2
3
3
/
8
3
13
/
16
6
1
/
16
3
13
/
16
DSA-92
10
7
/
8
3
3
/
8
3
13
/
16
6
1
/
16
3
13
/
16
AM-1200
10
3
/
8
3
13
/
16
3
13
/
16
6
11
/
16
9
11
/
16
HEM-1200 10
3
/
8
3
13
/
16
3
13
/
16
6
11
/
16
13
1
/
4
AM-93
19
1
/
8
4
5
/
8
4
3
/
4
9
4
3
/
4
HEM-93
22
3
/
4
4
5
/
8
4
3
/
4
9
4
3
/
4
DSA-93
14
1
/
2
4
5
/
8
4
3
/
4
9
4
3
/
4
AM-1300
16
3
/
4
6
5
9
/
16
10
5
/
16
10
15
/
16
HEM-1300 16
3
/
4
6
5
9
/
16
10
5
/
16
14
3
/
16
AM-94
23
1
/
2
6
7
/
8
8
12
5
/
8
8
HEM-94
28
1
/
2
6
7
/
8
8
12
5
/
8
8
AM-1400
24
5
/
8
8
15
/
16
8
5
/
16
14
11
/
16
12
HEM-1400 24
5
/
8
8
15
/
16
8
5
/
16
14
11
/
16
16
1
/
2
Table 2-3. Manifold Lengths and Duct Widths With Which They May Be Used
Manifold Model No.
M-1 M-1.5 M-2 M-3 M-4 M-5 M-6 M-7 M-8 M-9 M-10 M-11 M-12
(L) Length
12"
18"
24"
36"
48" 60"
72" 84"
96" 108" 120" 132"
144"
W - Duct
(Min)
8"
15"
21"
31"
43" 53"
65" 77"
89" 101" 113" 125"
137"
Width
(Max)
14"
20"
30"
42"
52" 64"
76" 88" 100" 112" 124" 136"
148"
Table 2-4. Model 90 Manifold Lengths and Duct Width With Which They May Be Used
Vertical Air Flow No.
MV-1 MV-1.5 MV-2 MV-3 MV-4 MV-5 MV-6 MV-7 MV-8 MV-9 MV-10 MV-11 MV-12
Horizontal Air Flow No. MH-1 MH-1.5 MH-2 MH-3 MH-4 MH-5 MH-6 MH-7 MH-8 MH-9 MH-10 MH-11 MH-12
(L) Length
12"
18"
24"
36"
48" 60"
72" 84"
96" 108" 120" 132"
144"
W - Duct
(Min)
8"
15"
21"
31"
43" 53"
65" 77"
89" 101" 113" 125"
137"
Width
(Max)
14"
20"
30"
42"
52" 64"
76" 88" 100" 112" 124" 136"
148"
NOTE: Insulated manifolds available. Consult factory.
Figure 2-1. Humidifier Dimensions
Figure 2-2. Steam Distribution Manifold Data
Sectional view of
Model 1200
Sectional view of AM9000. Model
EM9000 is similar except for
operator. See Table for dimensions.
See Page 14 for Mounting Hole Information.
E
C
D
F
B
D
B
E
C
F
Alternate
Inlet
Condensate
Drain
B
S
N
(min)
T
(min)
L
R
(min)
W
X
1" Min.
Support for Manifold
(Not furnished on M-1 Size)
Y
Steam Supply


