North America • Latin America • India • Europe / Middle East / Africa • China • Pacific Rim
armstrong
international.com
Designs, materials, weights and performance ratings are approximate and subject to change without notice. Visit
armstrong
international.com for up-to-date information.
25
Cleaning the Water Level Electrodes
1. If there is water in the steam generating tank, turn the Steam Generation switch to off, and completely
drain the tank.
2. After the tank has drained, turn off the main power at the
disconnect and close the main gas shut-off.
3. Unclamp and remove the 5/8” ID Silicone tubing from
the top outlet of the level canister.
4. Disconnect wires from the probes, noting the probe and
wire locations. Note: Level control float switches are used
for DI, RO, or very pure water. Cleaning should not be
required.
5. Unscrew the probes from the level canister using the
hex nut fitting on the probe (Note: Level canister bushings
may be removed with the probes, if necessary).
6. Use a wire brush, wire wheel, or similar means to clean
scale deposits off the stainless steel tip of the probe.
Cleaning of the Teflon insulating jacket (white portion) should not be needed.
7. Inspect the interior of the level canister. If large amounts of scale or debris are present, remove the
canister from the cabinet by removing the two clamping bracket screws and disconnecting the 5/8” ID
Silicone hose at the bottom of the canister. Flush the canister with water to remove debris and reinstall.
To Bottom of Tank
Electrode Level
Container
Common Electrode Probe
(No Reducing Bushing)
Low Level
Electrode Probe
High Water
Electrode Probe
To Top of Tank
Reducing Bushing
Figure 25-1
Modify the Bed Life Setting
1. Complete the steps for servicing the unit as outlined above.
2. The unit must run for at least an hour.
3. Power the unit down.
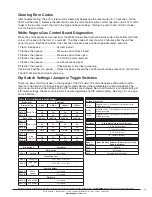
4. Set the dip switches to the desired EOL settings. See Page 29 for table of dip switch settings.
5. Power the unit up. The new Bed Life Settings wil be set.
Note:
If the dip switches are reset prior to the completion of step two, the unit could lock up. The power of
LED will be lit, but the unit will not respond to any input. If this is the case, the following steps must be taken
to restore the unit to proper operation.
a. Power the unit down.
b. Reset the dip switches to the previous settings as recorded (
Factory Defaults
are GFH-150, GFH-300 +
GFH-450 = 500 hours).
c. Power the unit up at breaker.
d. Press and hold the "RESET" button to reset the EOL time. This must be held for at least 20 seconds.
e. Allow the unit to run for at least an hour.
f. Power the unit down at breaker.
g. Set the dip switches to the desired settings. See Page 29 for the dip switch settings.
h. Power the unit at breaker.
8. Armstrong also offers a non-caustic cleaning solution called Rite-Quick. Please contact Armstrong, or
your local Armstrong Representative for more information.
9. Install new ionic beds, snapping them into place on the support pins.
10. Be sure lid gasket is lapped over all edges of tank access opening. Replace and secure lid.
11. Turn on power at circuit breaker, then open gas valve.
12. Depress and hold in the reset button for 20 seconds. All the LED’s will blink together indicating the
accumulated hours memory has been reset to zero. The unit should start to fill.
NOTE:
The accumulated
time memory can only be reset to zero when the service LED is blinking or on solid.

