


4
1. Read all instructions and important safeguards.
2. Remove all packaging materials and make sure items are received in good
condition.
3. Tear up all plastic bags as they can pose a risk to children.
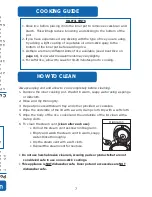
4. Wash lid, steam vent and accessories in warm soapy water. Rinse and dry
thoroughly.
5. Remove inner pot from rice cooker and clean with warm soapy water. Rinse
and dry thoroughly before returning to cooker.
6. Wipe body clean with a damp cloth.
• Do not use abrasive cleaners or scouring pads.
• Do not immerse the rice cooker base, cord or plug in water at any time.
USING YOUR RICE COOKER
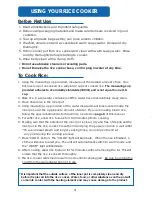
Before First Use:
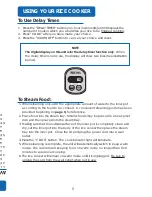
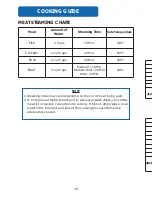
To Cook Rice:
1. Using the measuring cup provided, measure out the desired amount of rice. One
full, level cup of uncooked rice will yield 2 cups of cooked rice. The measuring cup
provided adheres to rice industry standards (180mL) and is not equal to one U.S.
cup.
2. Rinse rice in a separate container until the water becomes relatively clear; drain.
3. Place rinsed rice in the inner pot.
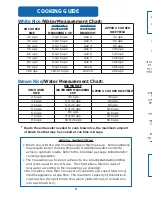
4. Using measuring cup provided or the water measurement lines located inside the
inner pot, add the appropriate amount of water. If you are making brown rice,
follow the special instructions for brown rice located on page 8 of this manual.
5. For softer rice, allow rice to soak for 10-20 minutes prior to cooking.
6. Making sure that the exterior of the inner pot is clean, dry and free of debris, set the
inner pot in the rice cooker. Close the lid and plug the power cord into a wall outlet.
* To avoid loss of steam and longer cooking times, do not open the lid at
any point during the cooking process.
7. Press “COOK” button. The “COOK” light will illuminate. When the rice is finished, a
chime will sound to alert you. The unit will automatically switch to warm mode and
the “WARM” light will illuminate.
8. After cooking, allow rice to stand for 5-10 minutes without removing the lid. This will
ensure that the rice is cooked thoroughly.
9. The rice cooker will remain in warm mode until it is unplugged. Be sure to unplug the
cord from the wall outlet when not in use.
* It is important that the outside surface of the inner pot is completely clean and dry
before it is placed into the rice cooker. Water, food, or other substances on the pot will
come into contact with the heating element and may cause damage to the product.
4
IDENTIFICATIONDES
PIÈCES
1
4
2
3
5
12
13
14
15
16
1.
Boutonde
dégagement
ducouvercle
2.
Poignée
3.
Éventà
vapeur
4.
Couvercle
5.
Collecteurde
condensation
6.
Boutonde
laminuterie
à
retardement
7.
Témoinlumineux
pourla
fonction«
Cuisson»
8.
Bouton«
Cuisson»
9.
Affichagenumérique
de
laminuterie
à
retardement
10.Témoin
lumineuxpour
la
fonction«
Maintienau
chaud»
11.Bouton
«Maintien
au
chaud/Arrêt»
12.Bol
interne
13.Tasse
demesure
duriz
14.Spatule
àriz
15.Louche
àsoupe
16.Plateau
vapeur
6
7
8
10
11


