background image

USING YOUR ELECTRIC KETTLE

7

7

Cóm

o re

tira

r y

 in

ser

tar

 el

 fil

ter

o:

Ilu

stra

ció

n A

Ilu

stra

ció

n B

CO

NSE

JO

 ÚT

IL:

•P

erd

ió 

su 

filt

ro?

 La

s p

iez

as d

e re

pue

sto

 es

tán

 di

spo

nib

les

 en

 lín

ea 

en

ww

w.A

rom

aC

o.c

om

o p

óng

ase

 en

 co

nta

cto

 A

rom

a

®

de 

Ser

vic

io 

al C

lie

nte


al t

elé

fon

o g

rat

uito

 1-

800

-27

6-6

286

.

Par

a re

tira

r e

l fi

ltro

:

1.

Esp

ere

 ha

sta

 qu

e la

 un

ida

d se

 ha

ya 

enf

ria

do 

por

 co

mpl

eto

.

Abr

a la

 ta

pa.

2.S

uje

te 

la 

pes

tañ

a d

e la

 pa

rte

 su

per

ior

 de

l fi

ltro

 y 

jál

ela

 ha

cia

 ar

rib

a. E

filtr

o se

 de

be 

des

liza

r h

aci

a a

fue

ra 

con

 fa

cilid

ad.

3.L

ave

 y 

enj

uag

ue 

el f

iltr

o, lu

ego

 vu

elva

 a 

col

oca

rlo

.

Par

a in

ser

tar

 el

 filt

ro:

1.A

bra

 la

 ta

pa.

2.T

om

and

o e

l fi

ltro

 de

 la

 pe

sta

ña 

(

Ilu

stra

ció

n A

), d

eslíc

elo

 ha

cia

 la

abr

aza

der

as d

e la

 pa

rte

 in

ter

ior

 de

l p

ico

 su

rtid

or h

asta

 qu

e e

l fi

ltro

 ha

ga 

clic

 en

 su

 lu

gar

.

3.U

na 

vez

 qu

e e

l fi

ltro

 es

té 

bie

n c

olo

cad

o e

n su

 lu

gar

 (

Ilu

stra

ció

n B

), la


tet

era

 es

tá 

list

a p

ara

 us

arse

.

CO

MO

 US

AR 

SU 

APA

RA

TO

Util

iza

ndo

 la

s te

mpe

rat

ura

s p

ara

 m

ant

ene

rla


cal

ien

te:

12.

Ant

es d

e se

rvi

r le

van

te 

la 

tet

era

 de

 la

 ba

se 

de 

pod

er u

san

do 

la 

man

ija

 de

fác

il e

mpu

ñad

ura

. P

roc

ure

 no

 to

car

 el

 cu

erp

o d

e la

 te

ter

a p

orq

ue 

seg

ura

men

te 

est

ará

 ca

lie

nte

. A

l le

van

tar

la 

de 

la 

bas

e e

sta

 se

 ap

aga

rá.

13.

Des

pué

s d

e se

rvi

r, a

seg

úre

se 

que

 la

 ba

se 

de 

la 

tet

era

 y 

la 

bas

e d

e p

ode

r

est

én 

sec

os a

nte

s d

e v

olv

er a

 co

loc

ar l

a te

ter

a so

bre

 la

 ba

se.

14.

Par

a c

ont

inu

ar u

tiliz

and

o e

l m

ism

o e

squ

em

a d

e te

mpe

rat

ura

 de

 ‘K

eep

-W

arm

hag

a p

res

ión

 en

 el

 bo

tón

 de

 Po

der

 (P

ow

er) 

par

a p

ren

der

 la

 te

ter

a o

tra

 ve

z y

con

tin

uar

 co

n la

 te

mpe

rat

ura

 de

sea

da 

pre

sio

nan

do 

el b

otó

n d

Tem

per

atu

ra 

cal

ien

te 

aut

om

átic

a (A

UTO

MA

TIC

 KE

EP-

WA

RM

 TE

MPE

RA

TUR

E).

15.

Par

a a

pag

ar l

a te

ter

a p

res

ion

e e

l b

otó

n d

e P

ow

er d

os v

ece

s se

gui

das

Using the Keep Warm Temperatures:

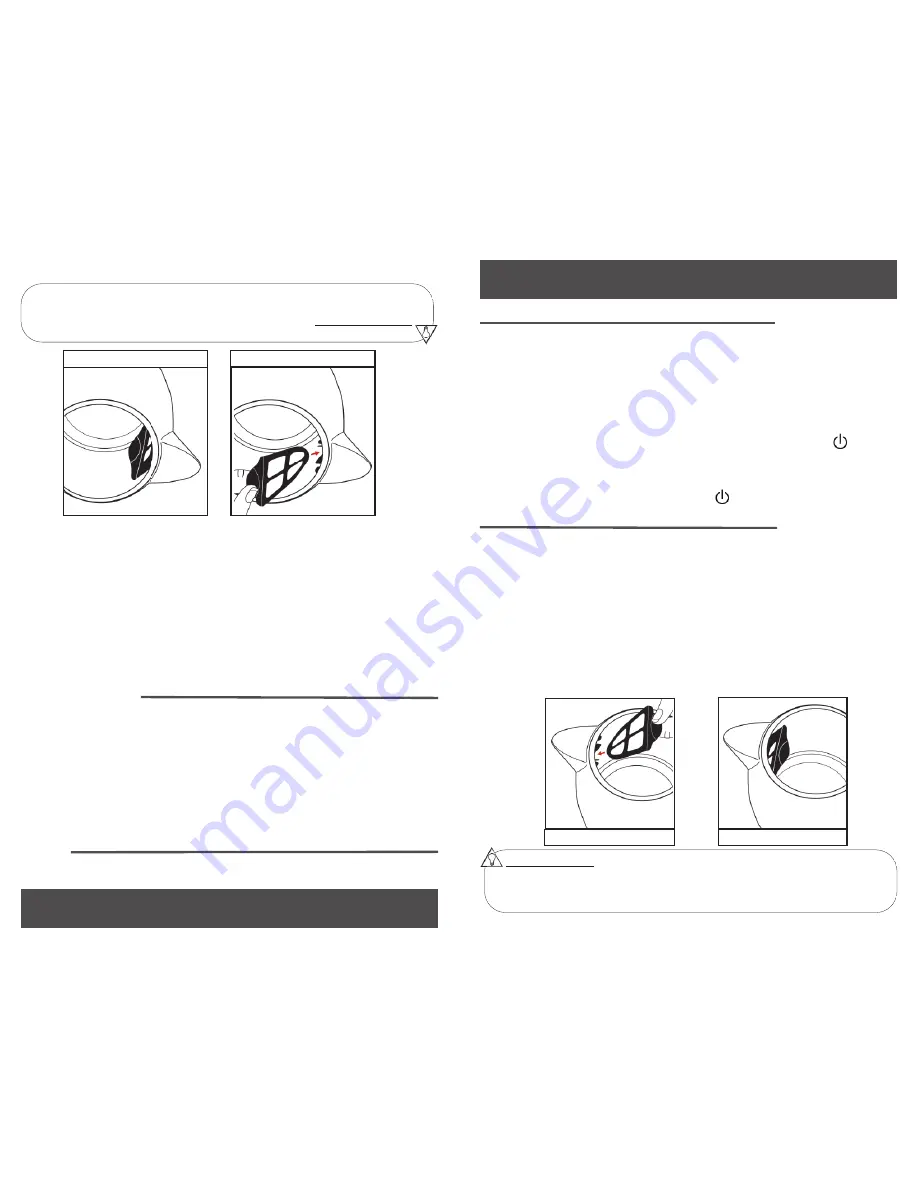
Removing and Inserting the Filter:

To remove the filter:

1. 

Do not attempt to remove the filter until the unit has cooled 

completely.

Open the lid.

2.  Grasp the angled tab on top of the filter and pull upward. The filter 

should slide out easily.

3.  Wash and rinse the filter, then replace.

To insert the filter

:

1.  Open the lid.

2.  Grasping the filter at the angled tab (

Illustration A

), slide the filter into 

the slots on the inside of the spout until the filter fits securely into place.

3.  Once the filter is securely in place (

Illustration B

), the kettle will be 

ready for use.

Illustration A

Illustration B

HELPFUL HINT:

•Misplaced your filter? Replacement parts are available online at 

www.AromaCo.com

or contact Aroma

®

Customer Service toll-free 

at 1-800-276-6286.

11.Once the selected temperature is reached, the kettle will beep and

stop heating. The kettle will heat occasionally in order to maintain the

selected temperature.

12.Lift the kettle off the power base before pouring, using the easy-grip

handle. Take care not to touch the kettle body, as it will be hot. Lifting

the kettle off the power base will turn it off.

13.After pouring, make sure the bottom of the kettle and the power base

are dry before placing kettle on the power base.

14.To continue using the Keep-Warm setting, press the POWER (    ) button

to turn the kettle back on and select the desired keep-warm 

temperature by pressing the AUTOMATIC KEEP-WARM TEMPERATURE

button.

15.To turn off the kettle, press the POWER (    ) button twice.

Summary of Contents for Gourmet AWK-290BD

Page 1: ...Digital Electric Kettle Instruction Manual AWK 290BD www AromaCo com Digital tetera eléctrica Manual de instrucciones AWK 290BD www AromaCo com ...

Page 2: ...e For more information on your Aroma Digital Electric Kettle or for product service and other home appliance solutions please visit us online at www AromaCo com Felicidades en la compra de su tetera eléctrica digital Este conveniente y cómodo electrodoméstico le proporciona más velocidad y comodidad que los fogones de estufa tradicionales Sin olvidar mencionar sus múltiples medidas de seguridad Su...

Page 3: ...iones dentro de la tostadora crean condiciones insalubres y la posibilidad de incendio o de mal funcionamiento de la unidad 18 Desenchufe la unidad cuando no esté en uso y antes de limpiarla Cuando se usen aparatos electricos siempre deberán observarse las precauciones básicas de seguridad incluyendo las siguientes GUARDE ESTAS INSTRUCCIONES Basic safety precautions should always be followed when ...

Page 4: ...s like sketch A An adapter sketch B should be used for connecting sketch A plug plugs to two plugs to two prong receptacles The grounding tab which extends from the adapter must be connected to a permanent ground such as a properly grounded outlet box as shown in sketch C using a metal screw This appliance is for household use only 2 Este aparato electrodoméstico debe estar puesto a tierra mientra...

Page 5: ...ca de la tapa de la tetera 3 Panel de control digital 4 Manija de agarre fácil 5 Cable de corriente 6 Base de poder 7 Bastidor de la tetera 8 Indicador del nivel del agua 9 Surtidor o caño 10 Filtro desmontable 2 7 3 4 6 9 10 8 5 1 Panel de control digital 11 12 13 14 3 11 Digital Display 12 Power Button 13 Automatic Keep Warm Temperature Button 14 Quick Boil Button 11 Pantalla digital 12 Botón de...

Page 6: ...escalcificación vea Cómo retirar e insertar el filtro de la página 7 con las instrucciones Lave el filtro con agua tibia con jabón Enjuáguelo y séquelo bien antes de colocarlo de nuevo en la unidad 5 Con un paño húmedo limpie con cuidado el exterior de la tetera No limpie los componentes eléctricos Esto puede causar daños a la unidad 6 Seque todas las partes por completo 7 También se recomienda qu...

Page 7: ...esione el botón de Poder Power una sola vez para apagarlo Cuando no esté en uso desconecte el cable del muro NOTE Depending upon the amount of water being boiled and environmental factors the kettle may not appear to immediately begin heating It may take some time before the water crosses 100 F and the temperature display screen changes from LO Never open the lid while water is boiling The kettle ...

Page 8: ... alcanzado la temperatura seleccionada la tetera emitirá un pitido y dejará de calentarse y ocasionalmente se calentará para mantener la temperatura seleccionada CONTINÚA EN LA PÁGINA SIGUIENTE 6 Using the Keep Warm Temperatures 1 Place power base on a sturdy level and heat resistant surface 2 Make sure that the removable filter is properly inserted See Removing and Inserting the Filter on page 7 ...

Page 9: ...eada presionando el botón de Temperatura caliente automática AUTOMATIC KEEP WARM TEMPERATURE 15 Para apagar la tetera presione el botón de Power dos veces seguidas Using the Keep Warm Temperatures Removing and Inserting the Filter To remove the filter 1 Do not attempt to remove the filter until the unit has cooled completely Open the lid 2 Grasp the angled tab on top of the filter and pull upward ...

Page 10: ...la unidad y permita que se enfríe por completo antes de limpiarla 2 Limpie el exterior de la tetera con un paño limpio y húmedo teniendo cuidado de evitar tocar los componentes eléctricos Use un paño suave para secarla 3 Para limpiar el interior de la tetera use una esponja suave y agua con jabón para tallarla con cuidado Si su mano no entra en la tetera coloque agua tibia con jabón en el interior...

Page 11: ...NTÍA LIMITADA Aroma Housewares Company garantiza que este producto no tenga defectos en sus materiales y fabricación durante un período de un año a partir de la fecha comprobada de compra dentro de la parte continental de los Estados Unidos Dentro de este período de garantía Aroma Housewares Company reparará o reemplazará a su opción las partes defectuosas sin ningún costo siempre y cuando el prod...

Reviews: