background image

AMIRA

Q U I C K    G U I D E

30 May 2018

AMIRA

Q U I C K    G U I D E

30 May 2018

Summary of Contents for Amira

Page 1: ...AMIRA Q U I C K G U I D E 30 May 2018 AMIRA Q U I C K G U I D E 30 May 2018...

Page 2: ...nik GmbH Co Betriebs KG All other brands or products are trademarks or registered trademarks of their respective holders and should be treated as such Original version Label NOTICE This document is a...

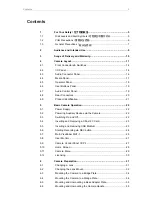
Page 3: ...a Operation 22 5 1 Power Supply 22 5 2 Powering Auxiliary Devices via the Camera 22 5 3 Switching On and Off 22 5 4 Inserting and Removing a CFast 2 0 Card 23 5 5 Inserting and Removing USB Medium 23...

Page 4: ...onnecting the MVF 1 36 6 9 Balancing the Camera 37 6 10 Adjusting the Monitor 37 6 11 Adjusting the Viewfinder 37 7 Appendix 38 7 1 Supported CFast 2 0 Cards 38 7 2 Technical Data 39 7 3 MPEG 2 Notice...

Page 5: ...inent hazardous situation which if not avoided will result in death or serious injury WARNING WARNING indicates a potentially hazardous situation which if not avoided may result in death or serious in...

Page 6: ...insert objects For operation always use a power source as indicated in the instructions Always unplug the power cable by gripping the power plug not the cable Never try to repair All repair work shou...

Page 7: ...can result in camera housing temperatures above 60 C 140 F At ambient temperatures above 25 C 77 F protect the camera from direct sunlight Protect the optical system and sensor Never point the camera...

Page 8: ...8 For Your Safety ARRI ARRI...

Page 9: ...mm digital camera solely and exclusively for recording images at various resolutions suitable for a variety of distribution formats ProRes 422 LT ProRes 422 ProRes 422 HQ ProRes 4444 ProRes 4444 XQ MP...

Page 10: ...a handle with viewfinder adapter Four XLR connector caps one spare keep all four for later use Four BNC connector caps WPA 1 or BPA 3 base adapter if ordered WiFi antenna Bluetooth antenna USB memory...

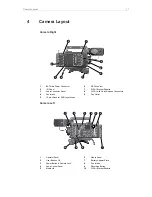
Page 11: ...udio Connector Panel 8 WPA 1 with Quick Release Connectors 4 Fan Intake 9 Fan Outlet 5 12 pin Hirose for ENG type lenses Camera Left 1 2 3 4 5 6 7 8 9 10 1 Operator Panel 6 Media Panel 2 User Buttons...

Page 12: ...2 MVF 1 Recording Button 6 Camera Type Label 3 Viewfinder Hinge with Clamp 7 Level 4 Accessory Shoe 8 3 8 Accessory Threads on Camera Handle Camera Bottom 1 Battery Adapter Plate 4 MVF 1 Type Label 2...

Page 13: ...unt with Hirose Connector 5 RS Connector 3 ND Filter Switch Camera Back 1 2 3 4 5 6 7 8 1 MVF 1 Fold away Monitor 5 I O Panel 2 Viewfinder OLED Eyepiece 6 BAT Main Power Connector 3 Bluetooth Antenna...

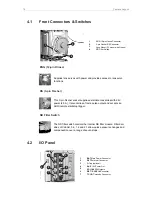
Page 14: ...external accessories with 24 V power 2 0 A It also carries a frame pulse output and accepts an ARRI remote start stop trigger ND Filter Switch The ND filter switch controls the internal ND filter mod...

Page 15: ...V DC from the camera 12V 4 pin Hirose Supplies 12 V auxiliary power with a maximum power of 2 0 A com bined output of 4 pin Hirose and 2 pin LEMO 12V 2 pin LEMO Supplies 12 V auxiliary power with a m...

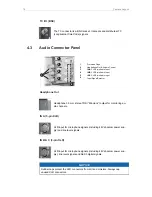
Page 16: ...XLR 3 pin Audio Input 6 Input Signal Selector Headphone Out Headphone 3 5 mm stereo TRS Mini jack output for monitoring au dio channels IN A 5 pin XLR XLR input for microphone signals including 48V ph...

Page 17: ...olid red Not ready to record card full or card invalid CFast Card Slots A B Storage media slots for CFast 2 0 recording cards USB Connectors 1 2 Interface for USB memory sticks with FAT file system Th...

Page 18: ...or LOOK presets Per factory default the user switch is not assigned setting NONE EI Switch The exposure index switch offers quick access to three exposure index presets The factory default presets for...

Page 19: ...unction Each button can be assigned with two functions e g user button 1 becomes user button 5 when pressed in combination with the SHIFT button 4 7 Audio Control Panel 1 2 3 4 1 Audio Function Switch...

Page 20: ...Battery Adapter Mount WiFi Connector for antenna for WiFi signal according to 802 11g Used for remote camera access Bluetooth Connector for antenna for Bluetooth signal Used for wireless audio monito...

Page 21: ...type labels with serial number are on the camera top 1 and on the bottom of the viewfinder 2 The serial number consists of the last 5 digits of the equipment number K1 71700 0 XXXXX An FCC conformity...

Page 22: ...ed quickly in case of emergency Do not use power cables longer than 4m 5 2 Powering Auxiliary Devices via the Camera You can supply power to auxiliary devices from the camera using several connectors...

Page 23: ...endix of this document NOTICE AMIRA does not accept ALEXA formatted CFast 2 0 cards and vice versa Before using a CFast 2 0 card with AMIRA you must erase it in camera to create the required file syst...

Page 24: ...ble and with a maximum capacity of 16GB Hard drives or similar can not be recognized 5 6 Starting Recording via REC button The REC button 1 is located on the left side of the camera on the MVF 1 and t...

Page 25: ...VF 1 User Button 10 Screen Buttons 5 VF 2 User Button 11 Jogwheel 6 REC Recording Button User Monitor Live View and User Interface The 3 2 fold away monitor with up and down tilt function can display...

Page 26: ...g 9 left or right to adapt the viewfinder image to your visual acuity The diopter adjustment can compensate from 5 to 5 diopters Screen Buttons The functionality of the screen buttons 10 depends on th...

Page 27: ...3 the screen 4 Their function depends on the screen content and is labeled directly above or below each button Unlabeled buttons do not have a function for that screen A grayed out label indicates th...

Page 28: ...en is the AMIRA s default screen It shows the most important camera parameters and gives quick access to changing them through the screen buttons 1 MENU Button Access 2 ALERT Screen 3 FPS Frame Rate S...

Page 29: ...red blue correction You can also color compensate for green magenta tints in a range from 16 0 to 16 0 Positive or negative CC color compensation values then appear in superscript here 0 0 For automat...

Page 30: ...line Visit the ARRI License Shop and follow the instructions for purchasing and downloading license keys Following license keys are available for the AMIRA AMIRA Advanced License Key AMIRA Premium Lic...

Page 31: ...asping the lens firmly Then carefully slide the lens out of the port 3 To fit a lens align the notch in the lens flange with the index pin on the mount keeping the lens rotated into a position where t...

Page 32: ...luence the flange focal depth and reduces stress on the lens mount ARRI offers a wide range of lens supports for 15mm and 19mm studio rods 6 2 Changing the Lens Mount The AMIRA s interchangeable PL le...

Page 33: ...of electric shock and fire Short circuits may entail lethal injury and damage Use original ALEXA Mini or AMIRA lens mounts only Before each lens mount change always switch the camera off and disconne...

Page 34: ...er and tighten 2 5 Note Always ensure a proper lock NOTICE Always use a flat screwdriver to connect the BPA 3 to a bridge plate Never use a coin A coin does not deliver enough force to ensure a proper...

Page 35: ...dge Plate Adapter BPA 3 1 1 2 3 1 Open the clamp 1 2 With the safety pin pulled 2 slide the adapter off the camera 3 6 6 Mounting and Unmounting the Camera Handle 1 3 2 1 Open the clamp 1 2 Slide the...

Page 36: ...asten all three screws 2 3 Remove the battery adapter 1 6 8 Connecting the MVF 1 Required Tools 2 0 mm Allen key Connecting the EVF Cable to the MVF 1 2 1 1 With your fingers unscrew and remove the vi...

Page 37: ...the Monitor The 3 2 monitor of the MVF 1 is a fold away monitor with an up and down tilt function 1 2 3 Fold out 1 swivel 2 and fold in 3 the monitor to put the display visible in the folded in positi...

Page 38: ...15 02 SanDisk Extreme Pro CFast 2 0 512GB ARRI Edition K2 0016648 512 GB CF1502AR Lexar Professional 3600x CFast 2 0 128GB LC128Cxxxx3600 128 GB 20150507 Lexar Professional 3600x CFast 2 0 256GB LC256...

Page 39: ...200x1800 3200x1800 2880x1620 Shutter Electronic shutter 5 0 356 0 1s 1 8000s Exposure Latitude 14 stops over the entire sensitivity range from EI 160 to EI 3200 as measured with the ARRI Dynamic Range...

Page 40: ...dity max non con densing splash and dust proof through sealed electronics Viewfinder Multi Viewfinder MVF 1 OLED and LCD with flip out LCD screen and military grade connector to camera Camera Control...

Page 41: ...60 30 4K UHD ProRes 422 LT ProRes 422 ProRes 422 HQ ProRes 4444 ProRes 4444 XQ 60 60 51 34 22 60 60 60 60 30 Audio Data External Interfaces 2x 3 pin XLR in In B C 1x 5 pin XLR in In A 1x 3 5mm TRS out...

Page 42: ...om 50 to 0 dBFS Markers at 20 18 and 9 dBFS Warnings from 5 dBFS yellow and 2 dBFS red to 0 dBFS Input clipping indication through red frame around audio meter Internal Test Tone Gener ator 1 kHz sine...

Page 43: ...ilable on the market of radio equipment DIRECTIVE 2011 65 EU OF THE EUROPEAN PARLIAMENT AND OF THE COUNCIL of 8 June 2011 on the restriction of the use of certain hazardous substances in electrical an...

Page 44: ...0M 62205ANH or 4104A AR5B22 Bluetooth IC ID 5123A BGTWT32AE China WiFi Module 2A 0219 AMIRA South Korea WiFi Module Certification No KCC CRM ATH AR5B22 7 5 Dimensional Drawings Dimensional drawings of...

Page 45: ...0 78 20 0 78 12 mm 0 47 73 mm 4 06 268 mm 9 1 max min min max max M4 thread insert threads are the same on the left side 76 mm 2 99 63 mm 2 47 Technical Data are subject to change without notice CAME...

Page 46: ...0 83 102 mm 4 00 46 mm 1 83 36 mm 1 42 UNC 3 8 16 10 mm deep 32 mm 1 28 32 mm 1 28 Camera Left Image Plane Camera Back Optical Center 55 mm 2 16 53 mm 2 09 27 mm 1 05 213 8 mm 8 42 M3 thread insert U...

Page 47: ...mm 1 0 25 4 mm 1 0 25 4 mm 1 0 23 mm 0 92 UNC 3 8 16 10 mm deep M4 thread insert same thread pattern on camera top 30 mm 1 18 30 mm 1 18 80 mm 3 15 60 mm 2 36 20 mm 0 79 Optical Center Technical Data...

Reviews: